跳转到主内容

Nintendo WaveBird Wireless Controller Joystick Replacement

你所需要的

  1. Nintendo WaveBird Wireless Controller Joystick Replacement, Batteries: 步骤 1 中的图像 1,2 Nintendo WaveBird Wireless Controller Joystick Replacement, Batteries: 步骤 1 中的图像 2,2
    • Pull down on the battery cover release lever and pull back to remove the cover.

  2. Nintendo WaveBird Wireless Controller Joystick Replacement: 步骤 2 中的图像 1,1
    • Remove both batteries from the device.

  3. Nintendo WaveBird Wireless Controller Joystick Replacement, Front Panel: 步骤 3 中的图像 1,2 Nintendo WaveBird Wireless Controller Joystick Replacement, Front Panel: 步骤 3 中的图像 2,2
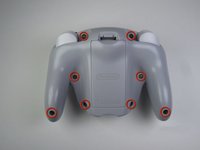
    • Remove the eight 9 mm screws from the back panel using the Tri-point Y1 screwdriver.

    • During reassembly, firmly hold the panels of the controller together while replacing the screws so the panels do not separate.

  4. Nintendo WaveBird Wireless Controller Joystick Replacement: 步骤 4 中的图像 1,2 Nintendo WaveBird Wireless Controller Joystick Replacement: 步骤 4 中的图像 2,2
    • Carefully turn over the controller and place it on a flat surface.

    • Slowly separate the top panel from the bottom panel.

    • The buttons are loose and may fall off the motherboard.

    • Once separated, set aside the top panel.

    • During reassembly, make sure the front panel lines up with the buttons so they slide back into place.

  5. Nintendo WaveBird Wireless Controller Joystick Replacement, Buttons: 步骤 5 中的图像 1,3 Nintendo WaveBird Wireless Controller Joystick Replacement, Buttons: 步骤 5 中的图像 2,3 Nintendo WaveBird Wireless Controller Joystick Replacement, Buttons: 步骤 5 中的图像 3,3
    • Use tweezers to remove the buttons.

    • It may be easier to remove the A button off of the pad by lifting it with your fingers.

    • During reassembly, make sure all buttons are in their respective sockets so they match up with the front panel.

  6. Nintendo WaveBird Wireless Controller Joystick Replacement, Joystick: 步骤 6 中的图像 1,2 Nintendo WaveBird Wireless Controller Joystick Replacement, Joystick: 步骤 6 中的图像 2,2
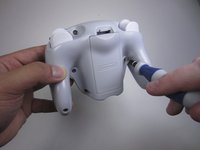
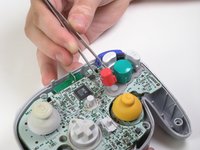
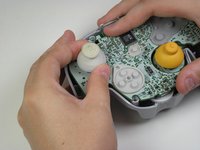
    • Grab the base of the grey joystick cover with one hand and firmly hold down the rest of the controller with the other hand.

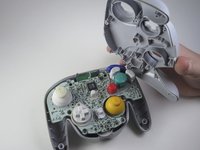
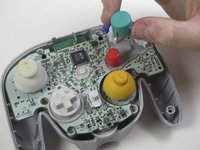
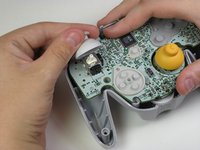
    • Pull off the grey joystick cover.

    • During reassembly, make sure the slots inside the joystick cover line up with the motherboard so it can fit back together.

结论

To reassemble your device, follow these instructions in reverse order.

7等其他人完成本指南。

Garrett Leung

于04/16/13注册

955 声望

创作了8篇指南

团队

Cal Poly, Team 10-40, Amido Spring 2013 Cal Poly, Team 10-40, Amido Spring 2013 的会员

CPSU-AMIDO-S13S10G40

4 名成员

创作了37篇指南

一条评论

Question. My wavebird joystick wobbles a lot and gets stuck in directions I’m not inputting. Will replacing the top of the stick fix this? Or would I have to solder a new analog stick to the board?

Golgamang - 回复

添加评论

浏览统计数据:

过去 24 小时: 1

过去 7 天: 12

过去 30 天: 48

总计 9,442