跳转到主内容

Nintendo Entertainment System Game Cartridge Tray Replacement

你所需要的

  1. Nintendo Entertainment System Game Cartridge Tray Replacement, Game Cartridge Tray: 步骤 1 中的图像 1,2 Nintendo Entertainment System Game Cartridge Tray Replacement, Game Cartridge Tray: 步骤 1 中的图像 2,2
    • Remove the six 13.25mm Phillips screws on the bottom of the game console with a #2.5 flathead screwdriver.

    • The screws are recessed about 40 mm.

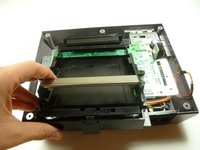
    • Flip the game console right side up and take off the top by pulling it up and away from the rest of the device with your hands.

  2. Nintendo Entertainment System Game Cartridge Tray Replacement: 步骤 2 中的图像 1,2 Nintendo Entertainment System Game Cartridge Tray Replacement: 步骤 2 中的图像 2,2
    • Remove the seven 13.25mm Phillips screws from the metal cover with a Phillips head #2 screwdriver.

    • Remove the metal cover by pulling it up and away from the rest of the console with your hands.

  3. Nintendo Entertainment System Game Cartridge Tray Replacement: 步骤 3 中的图像 1,3 Nintendo Entertainment System Game Cartridge Tray Replacement: 步骤 3 中的图像 2,3 Nintendo Entertainment System Game Cartridge Tray Replacement: 步骤 3 中的图像 3,3
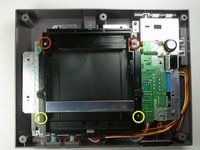
    • Remove the two silver 17.45mm Phillips screws from the cartridge tray using a Phillips head #2 screwdriver.

    • Remove the two bronze 13.25mm Phillips screws from the cartridge tray using a Phillips head #2 screwdriver.

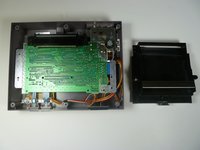
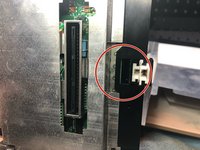
    • Slide the cartridge tray toward you, away from the 72-PIN connector, and off the motherboard assembly.

  4. Nintendo Entertainment System Game Cartridge Tray Replacement: 步骤 4 中的图像 1,2 Nintendo Entertainment System Game Cartridge Tray Replacement: 步骤 4 中的图像 2,2
    • Note: Underneath the cartridge tray is a black trapezoid-shaped tab/lip (see marker). When properly assembled this tab/lip goes below the motherboard and shielding as seen here.

    • During reassembly, make sure you orient this tab underneath the motherboard in addition to orienting the tray on top. Failure to do so will bow the cartridge tray and place stress on the component, causing the cartridge spring mechanism to bind.

结论

To reassemble your device, follow these instructions in reverse order.

8等其他人完成本指南。

nicholasweiser

于09/22/10注册

2,634 声望

创作了6篇指南

团队

Cal Poly, Team 14-40, Forte Fall 2010 Cal Poly, Team 14-40, Forte Fall 2010 的会员

CPSU-FORTE-F10S14G40

4 名成员

创作了20篇指南

0条评论

添加评论

浏览统计数据:

过去 24 小时: 5

过去 7 天: 16

过去 30 天: 97

总计 14,886