跳转到主内容
Nintendo 3DS 2015 Circle Pad Replacement

Nintendo 3DS 2015 Circle Pad Replacement

Michael

Michael5 其他贡献者

最后更新于 July 13, 2024

20分钟
中等
特色学生指南

If your 3DS joystick is not responding, follow these steps to replace the joystick pad and get your device working again. Watch out for delicate ribbon cables in the device. There is a loose black washer in the joystick housing. Be sure not to lose it.

你所需要的

配件

工具

查看更多...

  1. Nintendo 3DS 2015 Circle Pad Replacement, Battery: 步骤 1 中的图像 1,1
    • Unscrew the two 3mm Phillips #1 head screws along the top edge of the device.

    • The screws on the back panel strip easily. Go slowly and press down firmly.

    • The screws on the back panel are held in by locking washers, so they won't come out of the back panel.

  2. Nintendo 3DS 2015 Circle Pad Replacement: 步骤 2 中的图像 1,2 Nintendo 3DS 2015 Circle Pad Replacement: 步骤 2 中的图像 2,2
    • Pull the top corner tabs of the front face plate outward and towards you.

    • Pull the faceplate up and out of the slots at the bottom of the device.

    • Set aside the back faceplate.

  3. Nintendo 3DS 2015 Circle Pad Replacement: 步骤 3 中的图像 1,3 Nintendo 3DS 2015 Circle Pad Replacement: 步骤 3 中的图像 2,3 Nintendo 3DS 2015 Circle Pad Replacement: 步骤 3 中的图像 3,3
    • Insert a plastic opening tool into the notch at the top of the battery.

    • Pry the battery up with the plastic opening tool.

  4. Nintendo 3DS 2015 Circle Pad Replacement, SD Card Reader: 步骤 4 中的图像 1,1
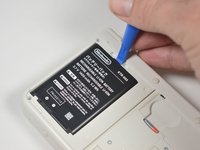
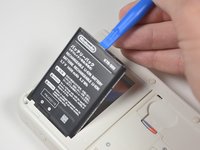
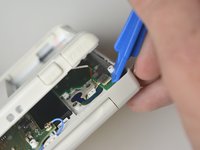
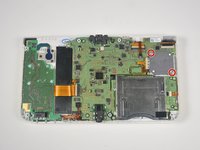
    • Unscrew the three 3mm Y0 screws along the right and bottom of the SD card reader.

    • The bottom of the SD card reader should slightly pop out after removing the screws.

  5. Nintendo 3DS 2015 Circle Pad Replacement: 步骤 5 中的图像 1,1
    • Pull the SD card reader from the edge with two holes gently to free the tab at the top of the SD card reader.

    • Don't completely pull the SD card out of the device yet. There is a ribbon cable connected under the SD card reader.

    • Reorient the device so that the power jack faces you.

  6. Nintendo 3DS 2015 Circle Pad Replacement: 步骤 6 中的图像 1,2 Nintendo 3DS 2015 Circle Pad Replacement: 步骤 6 中的图像 2,2
    • Lift the SD card reader gently.

    • Use a plastic opening tool to pry the SD card ribbon cable off the socket on the motherboard.

    • Lift the SD card reader out off of the lower casing.

    Where can I buy a new SD card reader? Cant seem to find any.

    Aldair - 回复

  7. Nintendo 3DS 2015 Circle Pad Replacement, Lower Case: 步骤 7 中的图像 1,3 Nintendo 3DS 2015 Circle Pad Replacement, Lower Case: 步骤 7 中的图像 2,3 Nintendo 3DS 2015 Circle Pad Replacement, Lower Case: 步骤 7 中的图像 3,3
    在这个步骤中使用的工具:
    Tweezers
    $4.99
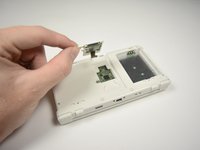
    • Reorient the device so that the game slot now faces you.

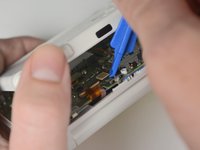
    • Remove the two rubber bumpers along the top of the device using tweezers.

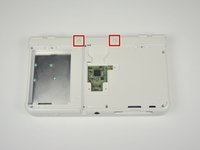
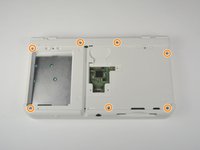
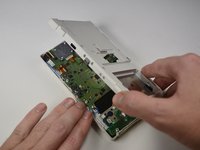
    • Unscrew the seven 6mm Phillips #00 screws along the top and bottom of the 3DS.

  8. Nintendo 3DS 2015 Circle Pad Replacement: 步骤 8 中的图像 1,2 Nintendo 3DS 2015 Circle Pad Replacement: 步骤 8 中的图像 2,2
    • Lift the top edge of the lower case slightly off on the 3DS.

    • Don't pull the lower casing completely off, you may break those connections. There are ribbon cables that must be disconnected first.

    • Pry the ribbon cable socket under the right trigger using a plastic opening tool.

    • Pry the ribbon cable socket under the infrared receiver cover using a plastic opening tool.

  9. Nintendo 3DS 2015 Circle Pad Replacement: 步骤 9 中的图像 1,3 Nintendo 3DS 2015 Circle Pad Replacement: 步骤 9 中的图像 2,3 Nintendo 3DS 2015 Circle Pad Replacement: 步骤 9 中的图像 3,3
    • Open the device slowly from its top edge. Be careful not to tug the ribbon cable connected near the bottom edge of the device.

    • Pry the last ribbon cable attached to the lower case using a plastic opening tool.

  10. Nintendo 3DS 2015 Circle Pad Replacement, Circle Pad: 步骤 10 中的图像 1,3 Nintendo 3DS 2015 Circle Pad Replacement, Circle Pad: 步骤 10 中的图像 2,3 Nintendo 3DS 2015 Circle Pad Replacement, Circle Pad: 步骤 10 中的图像 3,3
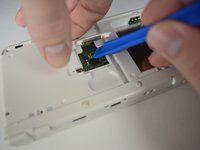
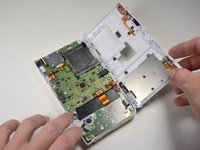
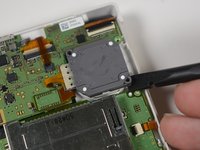
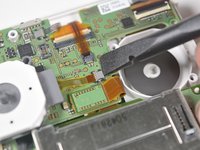
    • Locate the joystick assembly near the top right corner of the motherboard.

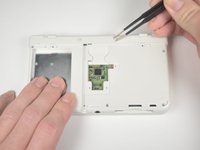
    • Remove the two 8mm Phillips #00 screws from the back of the joystick.

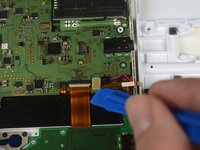
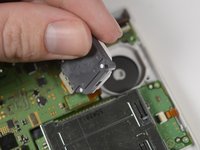
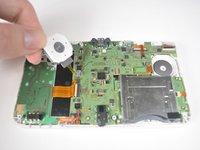
    • Use the flat end of the spudger to pry off the joystick pad from its plastic housing.

  11. Nintendo 3DS 2015 Circle Pad Replacement: 步骤 11 中的图像 1,2 Nintendo 3DS 2015 Circle Pad Replacement: 步骤 11 中的图像 2,2
    • Lift the joystick pad and place it on its back. This will reveal the ribbon cable connected to the joystick pad.

    • Use the flat end of the spudger to pry up the retaining flap for the ribbon cable.

    • Lift the joystick out of the device.

结论

To reassemble your device, follow these instructions in reverse order.

6等其他人完成本指南。

Michael

于10/14/16注册

173 声望

撰写一个指南

团队

Cal Poly, Team 4-6, Livingston Fall 2016 Cal Poly, Team 4-6, Livingston Fall 2016 的会员

CPSU-LIVINGSTON-F16S4G6

4 名成员

创作了35篇指南

2条评论

thank you for the help

Crichton Vance - 回复

Great, detailed tutorial. Was able to sucessfully unscrew my housing of the 3ds. I am currently fixing my circle pad.

Keyboard Smasher Gaming X - 回复

添加评论

浏览统计数据:

过去 24 小时: 14

过去 7 天: 67

过去 30 天: 362

总计 9,519