简介
如果你依然为标志性的 2004 年 Razr 翻盖手机感到兴奋,我们有好消息:那些“传说”重的东西真的来了,《超人总动员》终于有了续集,还有这里有全新的 Razr 会让你失心疯,我们已经严格的确认了它可折叠,现在我们必须测试一下它的可维修性。清理一下你的工具,加入我们!
哦,如果您使用其他 Motorola 的型号,我们已经解决了您的维修问题。
想要看到更多的拆解,幕后信息或是最新最棒的拆解信息,关注我们的 Instagram, Twitter 还有 Facebook。想要收到推送?点击这里关注。
你所需要的
视频概述
-
-
有人说说我们只关心可维修性而往往会忽略重要的参数,比如色彩精度,但是这不全对。这里有其他的很多参数我们可以忽略,比如:
-
6.2" 可折叠塑料 OLED 显示屏分辨率 2142 × 876(~373 PPI)
-
2.2 GHz 八核 Qualcomm Snapdragon 710 处理器配备 6 GB RAM
-
128 GB 内置储存
-
2510 mAh 电池
-
一颗 16 MP ƒ/1.7 主摄配备 双核自动对焦和一颗 5 MP ƒ/2.0 前置摄像头
-
没有官方的 IP 等级,但是 Motorola 声称它有“防泼溅的防水纳米涂层”
-
-
-
在把我们的 Razr 放在刀下前(或不锋利的塑料边),我们的朋友 Creative Electron 会帮我们先用 X光一睹其内部面貌。
-
在两张 X 光照片之间反复移动你的鼠标,你会注意到有一些被动式部件随着手机的开关轻微的上下移动。这些可能是附着在可折叠 OLED 屏幕上的,会在手机关上的时候下滑藏到这个手机的下巴里。
-
与此同时,这个操作的中心似乎是手机的下半部分,上半部分装着剩下的屏幕,一块电池和摄像头设备。
-
如果你看得真的很仔细,你可以看到所有折叠动作的中心——铰链的内部工作方式。稍后展开讲。
-
-
-
在我们的那个古老的年代,Razr可以说是当时最酷的玩意了。我们很高兴看到新款Razr继承了原版的精美设计,并对屏幕、相机、扬声器、和处理能力做出了巨大升级。
-
但是,新Razr上的现代装备令重量明显增加。跟2004年的原版V3相比,新Razr变宽了35%,变重了118%,所以新Razr比你想象的更难放进裤兜里。
-
先不管放在裤兜的事了,离近看折叠屏的折叠装置,在合页与两边的屏幕间有一条缝隙。你可能会想到,类似的缝隙就是导致早期Galaxy Fold 屏幕损坏的罪魁祸首。
-
-
这个步骤还没有翻译 帮忙翻译一下
-
Battery Ho! But no other fun goodies below this cover, so we opt to pop the Quick View display off the other side. Despite some nasty glue, it eventually comes free.
-
Outer display out of the way, we catch our first glimpse at the second battery. The first battery's ready for removal in the bottom half of the phone, but the second is still hiding behind some cables in the top half.
-
Above the batteries, the single 16 MP main camera stares back at us. These days it's pretty rare to see just one main/rear camera on a smartphone, but it's easy to understand that Motorola had other things on their mind in the four years they spent developing this phone.
-
-
-
这个步骤还没有翻译 帮忙翻译一下
-
So far disassembly has been relatively straightforward. As we hone in on the flexible display, we hope we don't screw it up—but for now, we're breezily unscrewing some Torx screws with our handy Mako kit!
-
With a bit of alcoholic coercion, the first battery of two comes free (weighing in at 4.7 Wh and just 2.6 mm thin)—but more on those later, we're on the fast track to silicon town now!
-
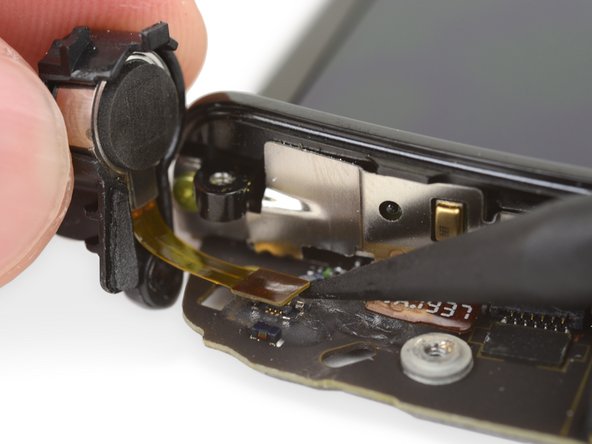
One brief pit stop on our race to motherboard glory: in removing the vibration motor (a pretty boring coin-style one) we spot some curious slime!
-
-
这个步骤还没有翻译 帮忙翻译一下
-
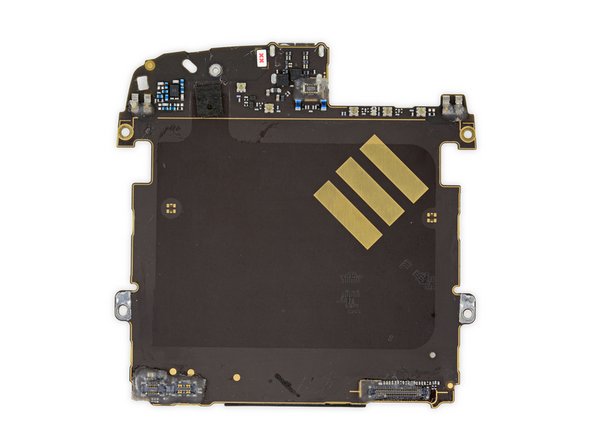
Digging out the motherboard we spy some serious shielding strategy—what treasures could these caps cover?
-
Qualcomm SDM710 Snapdragon 710 processor
-
Samsung KM2V7001CM 6 GB LPDDR4 memory and 128 GB storage package
-
Skyworks SKY 78185-11 Low Band 2G/3G/4G Module
-
Skyworks SKY 78187-11 High Band 2G/3G/4G Module
-
SDR660 003 radio frequency IC
-
Qualcomm PM670 & PM670A power management ICs
-
Qualcomm WCN3990 WiFi 802.11ac, Bluetooth LE, and FM SoC
-
-
这个步骤还没有翻译 帮忙翻译一下
-
Flipping this floppy foldable is a lot easier after a few more screws, and gives us access to the cameras and the second battery.
-
Eager to get our hands on that bendy OLED, we execute a series of complex teardown maneuvers:
-
First, we evacuate another handful of Torx screws. Then we carefully extract a metal bracket. Finally, we tenderly unstick the thick cable that runs through the hinge and over the second battery.
-
-
这个步骤还没有翻译 帮忙翻译一下
-
With the pOLED display removed, we're a bit dismayed that the battery comes with it. Prying against this flexible sheet for a battery swap doesn't seem ideal, even if the battery is in a metal caddy.
-
Nine steps in we finally have both batteries: This yellow rectangle packs slightly more punch, at 1265 mAh and 4.8 Wh, than the wafer-thin 4.7 Wh cell we extracted earlier.
-
The batteries add up to Motorola's claim of 2510 mAh, or 9.7 Wh of power. For comparison, just one of the Galaxy Fold batteries has about the same capacity of both of these things put together. The giant L-shaped iPhone XS Max battery manages to dwarf them all at 3969 mAh, or 15.04 Wh.
-
The pOLED display (allegedly a BOE screen, potentially using LG Display technology) isn't giving up many secrets—but we do spy some Samsung tech:
-
Samsung S6SY77CX, likely an iteration of Samsung's popular touch controller.
-
GigaDevice GD25LQ40C 512 KB serial NOR flash memory
-
pOLED display driver
-
-
这个步骤还没有翻译 帮忙翻译一下
-
Here's something you don't usually see on a smartphone teardown: mechanical parts. Big ones!
-
The folding action of this Razr comprises a continuous geared hinge, a cat-head cam, two support plates, and a few springs.
-
Motorola's patents illustrate the way the cam and the support plates work together to protect the fragile OLED display. They provide support and hold it taut while the phone is open, then get out of the way to allow for a nice big radius (which helps to prevent a crease in the display from forming) when it shuts.
-
In X-ray closeups of the hinge area, you can see the continuous geared hinge as well as the springs embedded in each side of the frame.
-
-
这个步骤还没有翻译 帮忙翻译一下
-
Motorola’s nostalgia-stoking Razr officially wins the award for most complicated phone-based contraption we’ve ever taken apart. We’re impressed with the numerous feats of engineering that Moto pulled off to resurrect their iconic clamshell.
-
It won’t win any awards for serviceability, but just bringing this impossible gizmo into existence was such a tall order that we’re not surprised serviceability didn’t make it into v1.0. It’s fun to see how they made it happen (if not so fun to tease it all apart).
-
We're going to score it all the same (just like we did the Galaxy Fold), but we know this is a first-gen design and we shouldn't expect functionality and repairability to come all at once.
-
We doubt the foldable craze will end anytime soon—Samsung's recently announced Galaxy Z Flip is already on its way. Hopefully manufacturers will figure out how to make these things both durable and repairable before too long, especially at these price points...
-
-
这个步骤还没有翻译 帮忙翻译一下
-
Thanks for sticking around! Here's some bonus material: A 360-degree X-ray view inside the Moto Razr.
-
PS: Are you getting Spinning Dancer vibes, too? Is it spinning left? Right? You decide—we've got to score this thing.
-
- The only driver you'll need is a standard T3 Torx.
- The delicate primary display is replaceable, if you're determined.
- Every repair starts (and ends) with stubborn, glued-on outer covers.
- Replacing the battery—or rather, batteries—requires near-total disassembly.
- The charging port is soldered directly to the main board.
- Complex construction and multiple flex cable booby traps makes for tricky repair work.


最后的想法
可修复性评分


(10是最容易修复)


7条评论
Nice teardown! Wonder if this “folding phone” thing will stick around for long…
spinning left :)
Man, convincing my brain to get the image to spin backwards hurts. I was able to see the phone spinning backwards (while actually looking at it directly) when the phone was facing away. If I was only just barely looking at it from the corner of my eye, I could get the entire thing spinning in reverse.
Let’s just say that the brain interprets the reverse spinning very oddly, so the phone looks like it is warping around the edges while it is spinning.
If you somehow manage to fold it backwards, I applaud you, because you just wasted yourself $1500.