
Lenovo IdeaPad 300-17ISK Hard Drive Replacement
简介
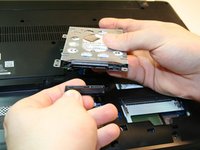
转到步骤 1The hard drive can become faulty if you drop the laptop while it’s running, or if it’s placed under an excessive amount of stress. If the laptop doesn’t boot or indicates hard disk read errors, follow this guide to replace it.
The battery for this device is not easily accessible and cannot be easily removed. Before you begin your replacement, be sure to disconnect the laptop from any power source. Additionally, we recommend that you drain the battery completely before you begin this replacement.
你所需要的
修复工具包
本套装包含完成指南所需的所有零件和工具。


配件


工具


查看更多...
-
-
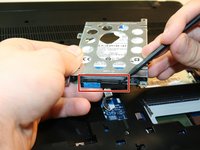
Unscrew the two 7mm Phillips #1 screws that hold the bottom back plate in its place.
-
-


To reassemble your device, follow these instructions in reverse order.
To reassemble your device, follow these instructions in reverse order.
10等其他人完成本指南。
团队

UC Davis, Team 1-3, Rodger Winter 2017 UC Davis, Team 1-3, Rodger Winter 2017 的会员
UCD-RODGER-W17S1G3
4 名成员
创作了6篇指南