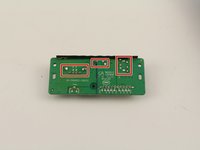
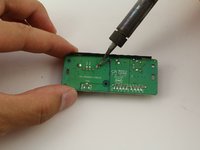
跳转到主内容

JBL Charge 3接口更换

你所需要的

  1. JBL Charge 3接口更换, 前部面板: 步骤 1 中的图像 1,3 JBL Charge 3接口更换, 前部面板: 步骤 1 中的图像 2,3 JBL Charge 3接口更换, 前部面板: 步骤 1 中的图像 3,3
    • 将你的扬声器上下颠倒然后将塑料撬棍垂直塞入前部面板的缝隙中。

    • 慢慢向外拉动塑料撬棍来撬开固定它的四个卡扣。

    • 在四个边缘都重复这个步骤。

  2. JBL Charge 3接口更换: 步骤 2 中的图像 1,1
    • 轻轻地从两侧拽开,并且从扬声器外壳移除。

    • 前部面板的内部有为了重新组装而必须与在扬声器外壳的销对应的洞。

    • 移除前部面板并不会影响设备的防水密封。然而,任何进一步的拆解都需要你移除防水密封和垫片。在这些被改动之后,你的设备可能不再防水。

  3. JBL Charge 3接口更换, 接口: 步骤 3 中的图像 1,3 JBL Charge 3接口更换, 接口: 步骤 3 中的图像 2,3 JBL Charge 3接口更换, 接口: 步骤 3 中的图像 3,3
    • 从接口外壳上移除4个 8mm #1 十字螺丝。

    • 用塑料撬棍撬开接口周围以将其卸下。

  4. JBL Charge 3接口更换: 步骤 4 中的图像 1,3 JBL Charge 3接口更换: 步骤 4 中的图像 2,3 JBL Charge 3接口更换: 步骤 4 中的图像 3,3
    • 从接口上移除两个线缆接头。

  5. JBL Charge 3接口更换: 步骤 5 中的图像 1,3 JBL Charge 3接口更换: 步骤 5 中的图像 2,3 JBL Charge 3接口更换: 步骤 5 中的图像 3,3
    • 从接口电路板上移除3个 8mm #1 十字螺丝。

    • 将接口外壳从电路板上移除。

  6. JBL Charge 3接口更换: 步骤 6 中的图像 1,2 JBL Charge 3接口更换: 步骤 6 中的图像 2,2
    • 将USB, MicroUSB或AUX 接口从电路板上拆焊。

结论

通过执行相反顺序的步骤来重新组装你的设备。

35等其他人完成本指南。

由衷感谢以下译者:

en zh

100%

这些译者帮助我们修补全世界! 您也想加入吗?
开始翻译 ›

Jack Ng

于10/08/18注册

2,140 声望

创作了4篇指南

团队

Cal Poly, Team S1-G6, Zimmerman Spring 2020 Cal Poly, Team S1-G6, Zimmerman Spring 2020 的会员

CPSU-ZIMMERMAN-S20S1G6

4 名成员

创作了27篇指南

15条评论

Is there a place to buy an entire replacement port bay?

indecisive_decision - 回复

Found the whole assembly on line for 30 bucks. Or a usb port for five from jbl

bonnie.1964 - 回复

Can u share a link? Need a new port bay!

Max de Groot -

Hello! My jbl charge 3 has a problem in bluetooth, I can't detect the bluetooth in any gadget. Is there anybody have an idea how to fix this?

ebataluna - 回复

anyone have the charging ways of this board i have 2 pads missing and would like to run the lines

Juju B - 回复

添加评论

浏览统计数据:

过去 24 小时: 10

过去 7 天: 141

过去 30 天: 691

总计 57,035