跳转到主内容
HP Pavilion 15-au123cl Network Card Replacement

HP Pavilion 15-au123cl Network Card Replacement

Mohammad Gardezi

Mohammad Gardezi 另一个贡献者

最后更新于 December 28, 2017

15 - 20 分钟
中等

Using this guide, you should be able to replace the network card on your laptop. If you are having internet connectivity issues, this guide could be your best bet for fixing them. Do note that when replacing the part, make sure the gold connection pins are fully connected when putting the network card in place.

你所需要的

工具

  • Phillips #0 Screwdriver
    Phillips #0 Screwdriver
  • iFixit Opening Tool
    iFixit Opening Tool
  • Spudger
    Spudger

查看更多...

  1. HP Pavilion 15-au123cl Network Card Replacement, Battery: 步骤 1 中的图像 1,1
    • Make sure the laptop is off and unplugged before starting.

    • Using the plastic opening tool, remove the top rubber feet on the back panel as it hides one of the screws we will be removing.

  2. HP Pavilion 15-au123cl Network Card Replacement: 步骤 2 中的图像 1,2 HP Pavilion 15-au123cl Network Card Replacement: 步骤 2 中的图像 2,2
    • Using a PH0 screwdriver, unscrew the ten 4.4mm Phillips head screws located on the back panel.

  3. HP Pavilion 15-au123cl Network Card Replacement: 步骤 3 中的图像 1,2 HP Pavilion 15-au123cl Network Card Replacement: 步骤 3 中的图像 2,2
    • Using the plastic opening tool, remove the back cover of the laptop.

    • It is recommended that you start with a corner and run the tool throughout the edges of the cover.

    • Be sure not to bend the cover by applying too much force.

  4. HP Pavilion 15-au123cl Network Card Replacement: 步骤 4 中的图像 1,2 HP Pavilion 15-au123cl Network Card Replacement: 步骤 4 中的图像 2,2
    • Using a PH0 screwdriver, unscrew the two 3.8mm PH0 Phillips head screws that hold the battery in place.

  5. HP Pavilion 15-au123cl Network Card Replacement: 步骤 5 中的图像 1,3 HP Pavilion 15-au123cl Network Card Replacement: 步骤 5 中的图像 2,3 HP Pavilion 15-au123cl Network Card Replacement: 步骤 5 中的图像 3,3
    • Carefully disconnect the cable connecting the top of the battery and remove the battery.

  6. HP Pavilion 15-au123cl Network Card Replacement, Network Card: 步骤 6 中的图像 1,3 HP Pavilion 15-au123cl Network Card Replacement, Network Card: 步骤 6 中的图像 2,3 HP Pavilion 15-au123cl Network Card Replacement, Network Card: 步骤 6 中的图像 3,3
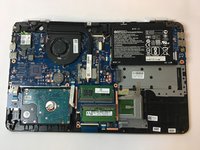
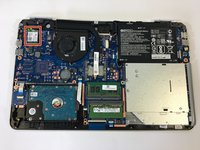
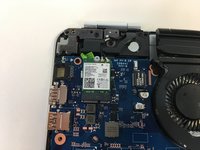
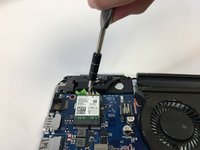
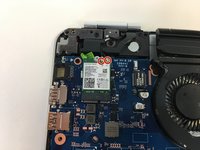
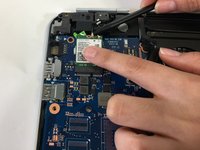
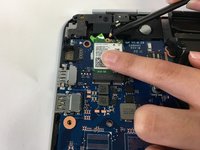
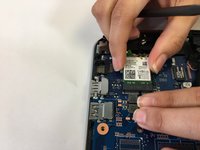
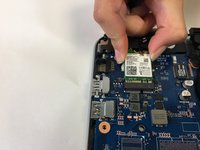
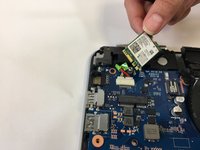
    • The network card is located at the top left corner of the motherboard.

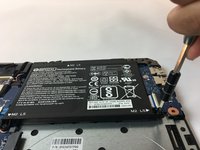
    • Unscrew the 4.4mm PH0 Phillips screw at the top of the network card.

  7. HP Pavilion 15-au123cl Network Card Replacement: 步骤 7 中的图像 1,3 HP Pavilion 15-au123cl Network Card Replacement: 步骤 7 中的图像 2,3 HP Pavilion 15-au123cl Network Card Replacement: 步骤 7 中的图像 3,3
    • Using the spudger, remove the two gold pins at the top of the network card.

    • It is recommended to gently apply a vertical force upward with the spudger.

  8. HP Pavilion 15-au123cl Network Card Replacement: 步骤 8 中的图像 1,3 HP Pavilion 15-au123cl Network Card Replacement: 步骤 8 中的图像 2,3 HP Pavilion 15-au123cl Network Card Replacement: 步骤 8 中的图像 3,3
    • Lift up the network card and remove it from the motherboard connector.

结论

To reassemble your device, follow these instructions in reverse order.

Mohammad Gardezi

于10/17/17注册

1,420 声望

创作了6篇指南

团队

USF Tampa, Team S13-G3, Cagle Fall 2017 USF Tampa, Team S13-G3, Cagle Fall 2017 的会员

USFT-CAGLE-F17S13G3

2 名成员

创作了6篇指南

0条评论

添加评论

浏览统计数据:

过去 24 小时: 6

过去 7 天: 15

过去 30 天: 28

总计 1,706