跳转到主内容
加入维修社区 - 创建账户

HP 15-ay052nr Screen Replacement

你所需要的

    1. HP 15-ay052nr Screen Replacement, Battery: 步骤 1 中的图像 1,1
      • To protect the device and yourself, make sure your device is completely powered down before disassembling. Disconnect all external devices before starting any tear down process.

      • Turn the device and lay it upside-down on a flat surface so the base of the computer is facing upwards.

      询问修复机器人

      添加评论

    2. HP 15-ay052nr Screen Replacement: 步骤 2 中的图像 1,1
      • Identify the two (2) sliding lock mechanisms on either side of the battery and slide them towards the center.

      • The sliders are located at the back of the device on the side where the display hinges are.

      • The slider closest to the optical drive (CD reader) clicks open but the opposite slider has a spring.

      询问修复机器人

      添加评论

    3. HP 15-ay052nr Screen Replacement: 步骤 3 中的图像 1,1
      • Pull the battery slightly up and out to remove.

      • If the battery doesn't pop out, the sliders weren't pushed in far enough. Push the sliders towards the center until the battery pops out.

      询问修复机器人

      添加评论

    1. HP 15-ay052nr Screen Replacement, Bottom Cover: 步骤 4 中的图像 1,1
      • Remove the rubber feet on the bottom of the device to access all the screws.

      • There are two rubber feet, one on each side of the battery compartment.

      询问修复机器人

      添加评论

    2. HP 15-ay052nr Screen Replacement: 步骤 5 中的图像 1,1
      • Unscrew the twelve 9 mm JIS #0 screws on the back of the device.

      • Gently remove the optical drive (CD reader) to more easily separate the base.

      询问修复机器人

      添加评论

    3. HP 15-ay052nr Screen Replacement: 步骤 6 中的图像 1,1
      • Unclip the keyboard surface from the base using an iFixit opening tool around the entire border.

      询问修复机器人

      添加评论

    4. HP 15-ay052nr Screen Replacement: 步骤 7 中的图像 1,1
      • Separate the base of the computer from the component assembly.

      • The optical drive can be placed in the base where it corresponds to prevent misplacing it.

      询问修复机器人

      添加评论

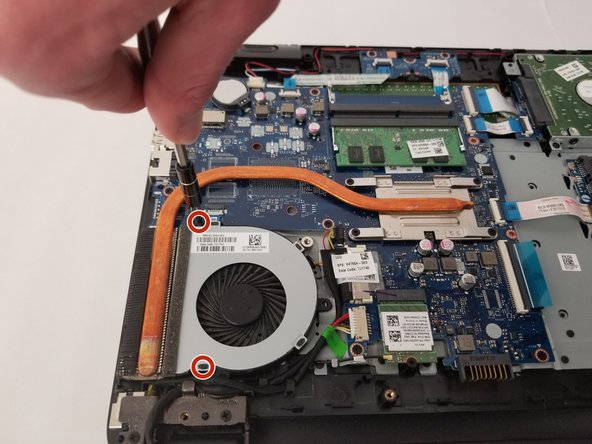
    1. HP 15-ay052nr Screen Replacement, Fan: 步骤 8 中的图像 1,1
      • Remove the two 6.5 mm JIS #0 screws holding the cooling fan to the base.

      • The base is the side by the heatsink, which is made of copper.

      询问修复机器人

      添加评论

    2. HP 15-ay052nr Screen Replacement: 步骤 9 中的图像 1,1
      • Unplug the fan cable from the motherboard.

      • The fan can now be removed.

      询问修复机器人

      添加评论

    1. HP 15-ay052nr Screen Replacement, Screen: 步骤 10 中的图像 1,1
      • Disconnect the display cable.

      询问修复机器人

      添加评论

    2. HP 15-ay052nr Screen Replacement: 步骤 11 中的图像 1,1
      • Unplug the wire attached to the wireless adapter.

      询问修复机器人

      添加评论

    3. HP 15-ay052nr Screen Replacement: 步骤 12 中的图像 1,1
      • Remove the two 6.5-mm screws from the fan side of the computer.

      询问修复机器人

      添加评论

    4. HP 15-ay052nr Screen Replacement: 步骤 13 中的图像 1,1
      • Remove the two 3mm JIS #0 screws.

      • Remove the one broad head 2mm JIS #0 screw.

      询问修复机器人

      添加评论

    5. HP 15-ay052nr Screen Replacement: 步骤 14 中的图像 1,1
      • Lay the display with its back on a flat surface.

      询问修复机器人

      添加评论

    6. HP 15-ay052nr Screen Replacement: 步骤 15 中的图像 1,1
      • Pry open the screen cover using an iFixit opening tool around the entire screen.

      询问修复机器人

      添加评论

    7. HP 15-ay052nr Screen Replacement: 步骤 16 中的图像 1,1
      • Remove the four 3-mm JIS #0 screws.

      询问修复机器人

      添加评论

    8. HP 15-ay052nr Screen Replacement: 步骤 17 中的图像 1,1
      • Unplug the cable connected to the screen located on the bottom.

      • The screen should come off and can be replaced.

      询问修复机器人

      添加评论

结论

To reassemble your device, follow these instructions in reverse order.

取消:我没有完成这个指南。

2等其他人完成本指南。

0指南评论

添加评论

浏览统计数据:

过去 24 小时: 2

过去 7 天: 5

过去 30 天: 23

总计 756