跳转到主内容

当前版本的文档还未经巡查,您可以查看最新的已查核版本

你所需要的

  1. 这个步骤还没有翻译 帮忙翻译一下

    : 步骤 1 中的图像 1,3 : 步骤 1 中的图像 2,3 : 步骤 1 中的图像 3,3
    • Insert a SIM eject tool, bit, or a straightened paper clip into the small hole on the SIM card tray on the left edge of the phone.

    • Press firmly to eject the tray.

    • Remove the SIM card tray.

  2. , 加热玻璃背板: 步骤 2 中的图像 1,1
    • 准备好一个 iOpener,将其置于背板下缘约一分钟。

    • 吹风机、热风枪甚至热盘子可能也会奏效,但是千万不要使手机过热,因为显示模块和内置电池都十分易被高温损伤。

  3. , 放上维修用吸盘: 步骤 3 中的图像 1,2 , 放上维修用吸盘: 步骤 3 中的图像 2,2
    • 在背板下半尽可能靠近下缘的位置放上一个吸盘,然后下压吸盘以使其产生吸力,

    • 如果背板已经被严重损坏,那在背板上贴一层胶带可能有助于吸盘起效.。不过,也可以直接用粘性特别强的胶带来代替吸盘。如果上述方法都不起效,那还可以将吸盘直接用强力胶粘在破损的背板上。

  4. 这个步骤还没有翻译 帮忙翻译一下

    : 步骤 4 中的图像 1,2 : 步骤 4 中的图像 2,2
    • Pull up on the suction cup with strong, steady force to create a gap between the back panel and the frame.

    • Depending on the age of your phone, this may be difficult. If you are having trouble, apply more heat to the edge and try again.

    • Insert the point of an opening pick into the gap.

  5. 这个步骤还没有翻译 帮忙翻译一下

    : 步骤 5 中的图像 1,3 : 步骤 5 中的图像 2,3 : 步骤 5 中的图像 3,3
    • Slide the opening pick across the bottom towards the left corner to slice the adhesive.

    • With the pick still inserted, slide it from the bottom left corner over to the bottom right corner to completely slice the bottom side adhesive.

    • Leave the pick inserted in the bottom right corner to prevent the adhesive from re-sealing.

  6. 这个步骤还没有翻译 帮忙翻译一下

    : 步骤 6 中的图像 1,1
    • Prepare an iOpener and apply it on the left edge of the phone for one minute.

  7. 这个步骤还没有翻译 帮忙翻译一下

    : 步骤 7 中的图像 1,2 : 步骤 7 中的图像 2,2
    • Insert a second opening pick underneath the back panel directly over the charge port.

    • Slide the opening pick to the bottom left corner of the phone.

  8. 这个步骤还没有翻译 帮忙翻译一下

    : 步骤 8 中的图像 1,2 : 步骤 8 中的图像 2,2
    • Slide the opening pick around the bottom left corner and across the left side of the phone to slice the adhesive.

    • The adhesive can be very gummy. Push the pick in and out in a sawing motion to help with slicing.

    • Stop when you reach the top left corner, near the camera, and leave the pick inserted.

  9. 这个步骤还没有翻译 帮忙翻译一下

    : 步骤 9 中的图像 1,1
    • Prepare an iOpener and apply it on the right edge of the phone for one minute.

  10. 这个步骤还没有翻译 帮忙翻译一下

    : 步骤 10 中的图像 1,3 : 步骤 10 中的图像 2,3 : 步骤 10 中的图像 3,3
    • With the first two opening picks still in place, insert a third pick on the lower part of the righthand side.

    • Slide the opening pick up towards the top of the phone, slicing the right side's adhesive.

    • Stop when you reach the top right corner, and leave the pick inserted.

  11. 这个步骤还没有翻译 帮忙翻译一下

    : 步骤 11 中的图像 1,2 : 步骤 11 中的图像 2,2
    • Slide the third opening pick around the top right corner and across the top side of the phone, slicing the final strip of adhesive.

  12. 这个步骤还没有翻译 帮忙翻译一下

    : 步骤 12 中的图像 1,3 : 步骤 12 中的图像 2,3 : 步骤 12 中的图像 3,3
    • Once you have sliced around the perimeter of the phone, carefully lift the right edge of the back cover, opening it like a book.

    • Do not try to pull the panel all the way off yet, as it is still connected to the phone.

  13. 这个步骤还没有翻译 帮忙翻译一下

    : 步骤 13 中的图像 1,2 : 步骤 13 中的图像 2,2
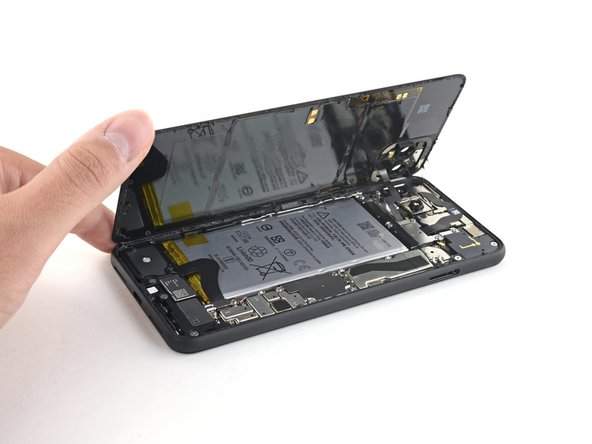
    • Continue swinging open the back panel until you can rest it on the left edge the phone, being careful not to put any stress on the attached ribbon cable.

    • During reassembly, this is a good point to power on your phone and test all functions before sealing it up. Be sure to power your phone back down completely before you continue working.

  14. 这个步骤还没有翻译 帮忙翻译一下

    : 步骤 14 中的图像 1,1
    在这个步骤中使用的工具:
    Magnetic Project Mat
    $19.95
    购买
    • Remove the four T3 Torx screws securing the battery connector shield:

    • One 1.8 mm screw

    • One 4.1 mm screw

    • One 4.4 mm shouldered screw

    • One 4.0 mm shouldered screw

    • Throughout this repair, keep track of each screw and make sure it goes back exactly where it came from.

  15. 这个步骤还没有翻译 帮忙翻译一下

    : 步骤 15 中的图像 1,2 : 步骤 15 中的图像 2,2
    • Use a pair of tweezers to remove the battery connector shield.

  16. 这个步骤还没有翻译 帮忙翻译一下

    : 步骤 16 中的图像 1,2 : 步骤 16 中的图像 2,2
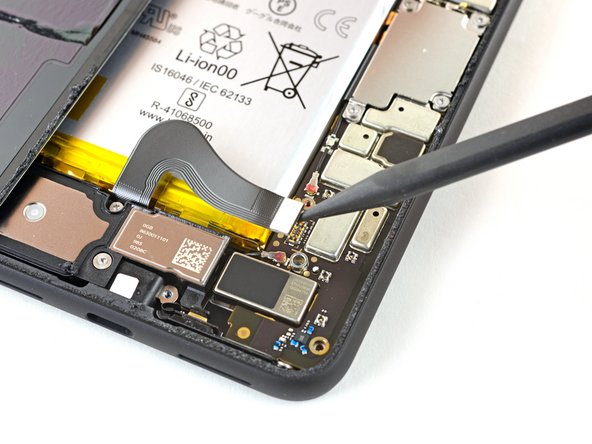
    • Whenever you use the spudger near the battery, be very careful not to puncture the battery.

    • Using the pointed end of a spudger, pry the battery connector straight up from the motherboard to disconnect the battery.

    • To re-attach press connectors like this one, carefully align and press down on one side until it clicks into place, then repeat on the other side. Do not press down on the middle. If the connector is misaligned, the pins can bend, causing permanent damage.

  17. 这个步骤还没有翻译 帮忙翻译一下

    : 步骤 17 中的图像 1,2 : 步骤 17 中的图像 2,2
    • Using the flat end of a spudger, gently fold the battery cable over so it doesn't accidentally make contact during the rest of your repairs.

  18. 这个步骤还没有翻译 帮忙翻译一下

    : 步骤 18 中的图像 1,1
    • Use a T3 Torx driver to remove the two 4.1 mm screws securing the back panel connector cover.

  19. 这个步骤还没有翻译 帮忙翻译一下

    : 步骤 19 中的图像 1,2 : 步骤 19 中的图像 2,2
    • Use a pair of tweezers to remove the back panel connector cover.

  20. 这个步骤还没有翻译 帮忙翻译一下

    : 步骤 20 中的图像 1,2 : 步骤 20 中的图像 2,2
    • Using the pointed end of a spudger, pry up and disconnect the back panel connector.

  21. 这个步骤还没有翻译 帮忙翻译一下

    : 步骤 21 中的图像 1,1
    • Remove the back panel.

    • During reassembly, follow this guide to install custom-cut adhesives for your device.

    • Follow this guide if you are using a pre-cut adhesive card.

  22. 这个步骤还没有翻译 帮忙翻译一下

    : 步骤 22 中的图像 1,2 : 步骤 22 中的图像 2,2
    • Gently pry back the battery adhesive pull tab to allow easier access to the screws underneath it.

  23. 这个步骤还没有翻译 帮忙翻译一下

    : 步骤 23 中的图像 1,1
    • Remove the three T3 Torx screws securing the rear-facing camera connector cover:

    • One 2.7 mm screw

    • One 4.1 mm screw

    • One 4.2 mm screw

  24. 这个步骤还没有翻译 帮忙翻译一下

    : 步骤 24 中的图像 1,2 : 步骤 24 中的图像 2,2
    • Use a pair of tweezers to remove the rear-facing camera connector cover.

  25. 这个步骤还没有翻译 帮忙翻译一下

    : 步骤 25 中的图像 1,1
    • Remove the three T3 Torx screws securing the front-facing camera connector cover:

    • One 4.1 mm screw

    • One 4.0 mm shouldered screw

    • One 4.1 mm shouldered screw

  26. 这个步骤还没有翻译 帮忙翻译一下

    : 步骤 26 中的图像 1,2 : 步骤 26 中的图像 2,2
    • Use a pair of tweezers to remove the front-facing camera connector cover.

  27. 这个步骤还没有翻译 帮忙翻译一下

    : 步骤 27 中的图像 1,3 : 步骤 27 中的图像 2,3 : 步骤 27 中的图像 3,3
    • Using the pointed end of a spudger, pry the camera and sensor connectors straight up from the motherboard.

  28. 这个步骤还没有翻译 帮忙翻译一下

    : 步骤 28 中的图像 1,2 : 步骤 28 中的图像 2,2
    • Disconnect the additional sensor connector.

    • This cable is secured to the phone with some light adhesive.

  29. 这个步骤还没有翻译 帮忙翻译一下

    : 步骤 29 中的图像 1,1
    • Remove the three T3 Torx screws securing the front camera and sensor assembly:

    • Two 2.7 mm screws

    • One 3.1 mm screw

  30. 这个步骤还没有翻译 帮忙翻译一下

    : 步骤 30 中的图像 1,3 : 步骤 30 中的图像 2,3 : 步骤 30 中的图像 3,3
    • Use a pair of tweezers to remove the front camera and sensor assembly.

  31. 这个步骤还没有翻译 帮忙翻译一下

    : 步骤 31 中的图像 1,1
    • Use a T3 Torx driver to remove the four 3.5 mm screws securing the display connector cover.

  32. 这个步骤还没有翻译 帮忙翻译一下

    : 步骤 32 中的图像 1,2 : 步骤 32 中的图像 2,2
    • Use a pair of tweezers to remove the display connector cover.

  33. 这个步骤还没有翻译 帮忙翻译一下

    : 步骤 33 中的图像 1,2 : 步骤 33 中的图像 2,2
    • Use the flat end of a spudger to disconnect the display connector from the motherboard.

  34. 这个步骤还没有翻译 帮忙翻译一下

    : 步骤 34 中的图像 1,1
    • Use a T3 Torx driver to remove the 2.7 mm screw securing the motherboard to the frame.

  35. 这个步骤还没有翻译 帮忙翻译一下

    : 步骤 35 中的图像 1,3 : 步骤 35 中的图像 2,3 : 步骤 35 中的图像 3,3
    • Use the pointed end of a spudger to disconnect the side buttons connector from the motherboard.

    • Disconnect the two rear-facing camera connectors from the motherboard.

  36. 这个步骤还没有翻译 帮忙翻译一下

    : 步骤 36 中的图像 1,1
    • Disconnect the earpiece speaker connector from the motherboard.

  37. 这个步骤还没有翻译 帮忙翻译一下

    : 步骤 37 中的图像 1,3 : 步骤 37 中的图像 2,3 : 步骤 37 中的图像 3,3
    • Disconnect the two grip sensor connectors from the motherboard.

    • Disconnect the charge port connector from the motherboard.

  38. 这个步骤还没有翻译 帮忙翻译一下

    : 步骤 38 中的图像 1,3 : 步骤 38 中的图像 2,3 : 步骤 38 中的图像 3,3
    • Use the pointed end of a spudger and pry up gently to unclip the top antenna connector from the motherboard.

    • Disconnect the bottom antenna connector.

  39. 这个步骤还没有翻译 帮忙翻译一下

    : 步骤 39 中的图像 1,2 : 步骤 39 中的图像 2,2
    • Using a spudger, pivot the top end of the motherboard up and out of the phone's frame.

  40. 这个步骤还没有翻译 帮忙翻译一下

    : 步骤 40 中的图像 1,3 : 步骤 40 中的图像 2,3 : 步骤 40 中的图像 3,3
    • Slowly lift out the motherboard, being careful not to snag any ribbon cable connectors.

    • The rear-facing camera module connectors loop around the motherboard, and the camera module is not secured to the phone, so it may lift out with the motherboard during this step.

    • Completely remove the motherboard.

    • When reinstalling the motherboard, check that no ribbon cable connectors are caught underneath.

终点

10等其他人完成本指南。

Carsten Frauenheim

于03/10/20注册

113,910 声望

创作了338篇指南

团队

iFixit iFixit 的会员

Staff

135 名成员

创作了17,163篇指南

4条评论

Are the Gyroscope and Accelerometer on the motherboard or where?

Ivo Ruest - 回复

where can i purchase a pixel 4xl motherboard replcement?

erik popper - 回复

This guide doesnt mention thatthe front camera and sensor array is married to the motherboard and replacing one without the other will cause face unlock to not function. This situation throws a "Certificate Expired" error and neither factory reset nor reflashing/sideloading firmware corrects this. Google support says repair or replace is the only remedy. I'm currently trying to prove that assertion wrong.

J L - 回复

Hey J L, Did you ever manage to find a solution for the certificate expired issue? I recently replaced my front camera and sensor assembly hoping to fix broken face unlock sensor. Encountering the same certificate expired issue after replacement

Echo -

添加评论

浏览统计数据:

过去 24 小时: 6

过去 7 天: 38

过去 30 天: 174

总计 10,656