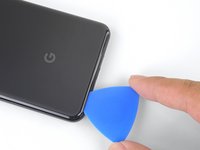
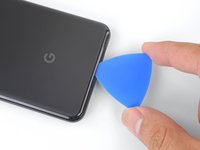
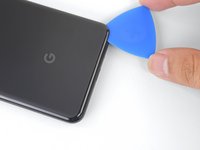
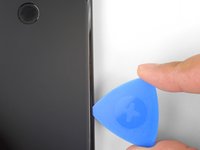
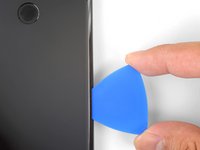
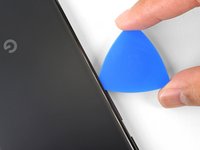
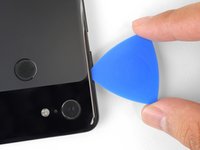
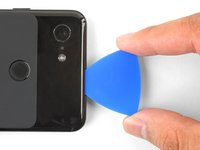
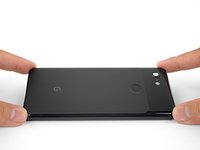
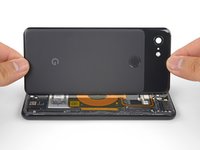
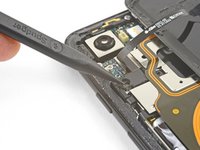
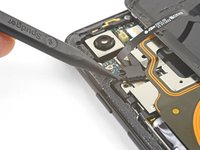
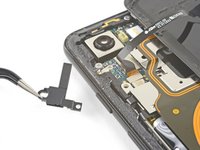
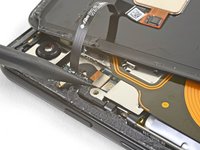
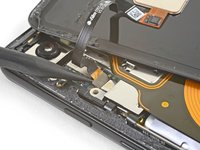
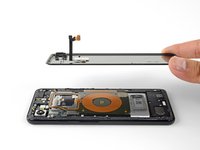
跳转到主内容

此翻译可能不反映源指南的最新更新。 帮助更新翻译查看源指南

Google Pixel 3 后盖更换

你所需要的

  1. Google Pixel 3 后盖更换, 后盖: 步骤 1 中的图像 1,2 Google Pixel 3 后盖更换, 后盖: 步骤 1 中的图像 2,2
    • 加热 iOpener 并将其放置在手机底部一分钟。

    • 在撬动电源按钮上方时,注意不要将工具插入太深,否则会损坏指纹传感器排线。

  2. Google Pixel 3 后盖更换: 步骤 2 中的图像 1,3 Google Pixel 3 后盖更换: 步骤 2 中的图像 2,3 Google Pixel 3 后盖更换: 步骤 2 中的图像 3,3
    • 在加热后的后盖底部边缘吸附一个吸盘。

    • 确保你把吸盘吸附在后盖上而不是屏幕上。

    • 如果你的后盖玻璃严重破碎,请用一层透明的胶带覆盖它,这么做会让吸盘更容易吸住。

    • 确保吸附牢固后,稳稳提起吸盘。让后盖和机身间出现一个小缝隙。

    • 取决于你的手机的新旧程度,这可能需要很大的力量。如果你有困难,请再次按照上一步骤加热底部并再次尝试。

    • 将撬片插入缝隙中。

  3. Google Pixel 3 后盖更换: 步骤 3 中的图像 1,3 Google Pixel 3 后盖更换: 步骤 3 中的图像 2,3 Google Pixel 3 后盖更换: 步骤 3 中的图像 3,3
    • 沿着手机的底部边缘一直到右侧边角切开后盖与机身之间的粘合剂。

    • 将撬片放置于此,以防止粘合剂重新粘黏。

  4. Google Pixel 3 后盖更换: 步骤 4 中的图像 1,3 Google Pixel 3 后盖更换: 步骤 4 中的图像 2,3 Google Pixel 3 后盖更换: 步骤 4 中的图像 3,3
    • 用iOpener加热机身右边的边缘,用撬片继续切开机身侧面粘合剂。

    • 粘合剂可能是非常强力的。可以将撬片用拉大锯的方式来分离粘合剂。

  5. Google Pixel 3 后盖更换: 步骤 5 中的图像 1,3 Google Pixel 3 后盖更换: 步骤 5 中的图像 2,3 Google Pixel 3 后盖更换: 步骤 5 中的图像 3,3
    • 继续加热并切开手机周边的其余部分的粘合剂。在每个边缘留出一个撬片,以防止粘合剂重新粘牢。

    • 在电源按钮上方切开时,不要将撬片插入一半以上,以免损坏指纹传感器排线。

  6. Google Pixel 3 后盖更换: 步骤 6 中的图像 1,3 Google Pixel 3 后盖更换: 步骤 6 中的图像 2,3 Google Pixel 3 后盖更换: 步骤 6 中的图像 3,3
    • 手机四周的粘合剂切割完毕后,小心地抬起后盖的左边缘

    • 不要试图取下后盖。它仍然由指纹传感器排线连接在手机上。

    • 沿着机身侧面翻转后盖,将其放置于一侧,使指纹传感器的排线不被拉扯。

  7. Google Pixel 3 后盖更换: 步骤 7 中的图像 1,1
    • 卸下固定指纹连接器支架的两颗4.1毫米长的十字螺丝。

    • 在重新组装过程中,要注意不要过度拧紧这些螺丝,否则可能会损坏屏幕。

  8. Google Pixel 3 后盖更换: 步骤 8 中的图像 1,3 Google Pixel 3 后盖更换: 步骤 8 中的图像 2,3 Google Pixel 3 后盖更换: 步骤 8 中的图像 3,3
    • 用撬棒的尖头将指纹连接器支架从NFC线圈下滑出。

    • 拆出指纹连接器支架。

  9. Google Pixel 3 后盖更换: 步骤 9 中的图像 1,2 Google Pixel 3 后盖更换: 步骤 9 中的图像 2,2
    • 用撬棒的尖头撬起并断开指纹连接器与插座的连接。

    • 当你断开像这样的连接器时,要注意不要使插座附近元件移位。

    • 要重新安装像这样的按压式插座,要小心地对准并按下一边,直到它咔嚓一声到位,然后在另一边重复。不要压在中间。如果连接器没有对准,针脚会弯曲,造成永久性损坏。

  10. Google Pixel 3 后盖更换: 步骤 10 中的图像 1,3 Google Pixel 3 后盖更换: 步骤 10 中的图像 2,3 Google Pixel 3 后盖更换: 步骤 10 中的图像 3,3
    • 取走后盖。

    • 在你安装替换的后盖之前,一定要清除手机边框上的所有粘合剂残留物。用开口工具刮掉残留粘合剂,并用高浓度异丙醇清洗表面。

    • 如果你要重新使用旧的后盖,一定要清理掉任何粘合剂,并涂上新的后盖粘合剂。

    • 如果你要安装一个替换的后盖,一定要与原来的部件进行比较。将任何剩余的部件(如闪光扩散器)转移到你的新的替换部件上。

结论

请按照这些步骤如果你需要将指纹传感器转移到你的替换后盖。

要重新组装你的设备,请按照这些说明以相反的顺序进行。

维修中出了纰漏?请查看我们的谷歌 Pixel 3 答案社区,以获得故障排除帮助。

27等其他人完成本指南。

由衷感谢以下译者:

en zh

33%

这些译者帮助我们修补全世界! 您也想加入吗?
开始翻译 ›

Arthur Shi

于01/03/18注册

252,468 声望

创作了526篇指南

团队

iFixit iFixit 的会员

Staff

135 名成员

创作了16,757篇指南

12条评论

My back cover would not come off by just using an iOpener. After getting a heat gun and applying the heat to the bottom corners I was able to get the adhesive weak enough to pry open.

Anthony Laskowski - 回复

Where I can buy a GENUINE back cover for my Pixel 3? Does anybody know?

FabianoD - 回复

Where can I buy all the tools needed to repair my Pixel 3?

karenleehanna - 回复

How do you ensure the back cover is waterproof after putting it on? The precut adhesive card turns out just to be a roll of tesa tape, it would be nice if it actually had round cutouts, or large rectangular sections to custom cut to ensure water proofing around fingerprint sensor, and camera flash led.

Daniel Patterson - 回复

Hi Daniel,

Unfortunately, there is no easy way to ensure water resistance after a repair, as the factory adhesive is applied using specialty tools. I’d suggest sealing it the best you can with adhesive and using a water resistant case.

On the adhesive product page, you can find the adhesive card under the first pull-down menu. The adhesive card does have rounded corners and cutouts for this purpose.

Arthur Shi -

添加评论

浏览统计数据:

过去 24 小时: 17

过去 7 天: 84

过去 30 天: 329

总计 46,620