跳转到主内容
Game Boy Advance Shoulder Button and Side Panels Replacement

Game Boy Advance Shoulder Button and Side Panels Replacement

Aldo Corona

Aldo Corona7 其他贡献者

最后更新于 September 18, 2024

5 - 10 分钟
中等

Use this guide for disassembly and for resolving jammed or finicky shoulder buttons.

你所需要的

工具

查看更多...

  1. Game Boy Advance Shoulder Button and Side Panels Replacement, Remove the Battery Cover/Batteries: 步骤 1 中的图像 1,3 Game Boy Advance Shoulder Button and Side Panels Replacement, Remove the Battery Cover/Batteries: 步骤 1 中的图像 2,3 Game Boy Advance Shoulder Button and Side Panels Replacement, Remove the Battery Cover/Batteries: 步骤 1 中的图像 3,3
    • Take the battery cover off by releasing the locking tab and hinging the cover away. Remove the batteries inside the cover

    • Do not forget to remove the batteries! This applies to working with any electronic device as working with live electricity may damage the device or cause malfunctions

  2. Game Boy Advance Shoulder Button and Side Panels Replacement, Unscrew the Back Panel: 步骤 2 中的图像 1,2 Game Boy Advance Shoulder Button and Side Panels Replacement, Unscrew the Back Panel: 步骤 2 中的图像 2,2
    • Remove the six back panel screws using a Tri-wing Screwdriver.

    • Remove bottom back panel screw with a Phillips #1 screw driver. (Image #2)

  3. Game Boy Advance Shoulder Button and Side Panels Replacement, Remove the Back Panel: 步骤 3 中的图像 1,1
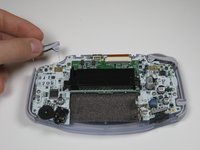
    • Remove the back panel by pulling away with one hand and the front secured in the other hand.

    • Removal of the back panel may cause shoulder buttons and side panels to come loose and fall off.

  4. Game Boy Advance Shoulder Button and Side Panels Replacement, Remove Triggers: 步骤 4 中的图像 1,2 Game Boy Advance Shoulder Button and Side Panels Replacement, Remove Triggers: 步骤 4 中的图像 2,2
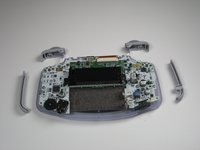
    • Remove left and right triggers by lifting and pulling them away from the system.

    • Do the same for side panels

    • For finicky or jammed triggers only! Adjust and correct triggers and reassemble. Most jammed triggers are caused by buttons misplaced or jammed in its enclosure.

结论

To reassemble your device, follow these instructions in reverse order.

4等其他人完成本指南。

Aldo Corona

于01/25/10注册

814 声望

创作了6篇指南

团队

Cal Poly, Team 16-29, Maness Winter 2010 Cal Poly, Team 16-29, Maness Winter 2010 的会员

CPSU-MANESS-W10S16G29

5 名成员

创作了62篇指南

1指南评论

i need help th e side pannels loose

Mark - 回复

添加评论

浏览统计数据:

过去 24 小时: 1

过去 7 天: 7

过去 30 天: 83

总计 8,577