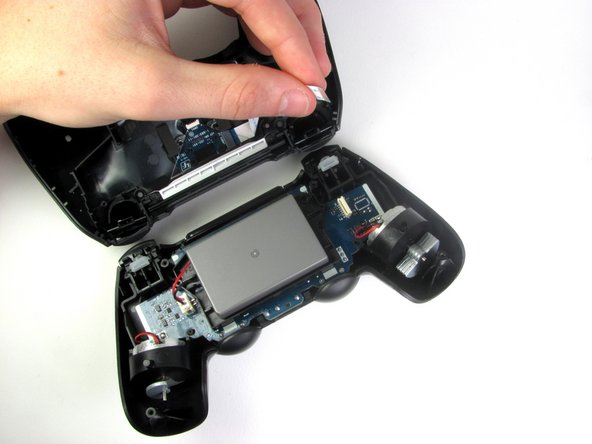
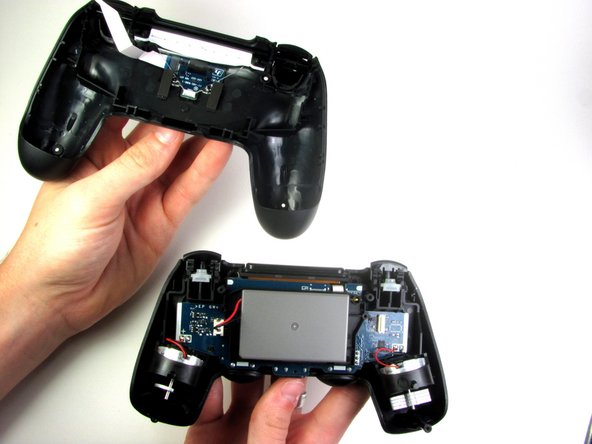
跳转到主内容

此翻译可能不反映源指南的最新更新。 帮助更新翻译查看源指南

DualShock 4左遥控杆维修

你所需要的

  1. DualShock 4左遥控杆维修, 拆解DualShock 4控制器: 步骤 1 中的图像 1,1
    • 使用Phillips #00 螺丝刀移除四颗6.0mm固定后面板的螺丝。

    • 切勿使用强力来松开螺丝,否则会造成螺纹的永久性损坏,从而导致无法拆卸手柄。

  2. DualShock 4左遥控杆维修: 步骤 2 中的图像 1,3 DualShock 4左遥控杆维修: 步骤 2 中的图像 2,3 DualShock 4左遥控杆维修: 步骤 2 中的图像 3,3
    • 左肩处开始

    • 将撬棒插入左肩来撬开一个开口

    • 在开口处滑动来打开更多的空间

    • 取下撬棒,打开手柄壳。

    • 右肩重复这些步骤。

  3. DualShock 4左遥控杆维修: 步骤 3 中的图像 1,3 DualShock 4左遥控杆维修: 步骤 3 中的图像 2,3 DualShock 4左遥控杆维修: 步骤 3 中的图像 3,3
    • 将一个撬棒楔入壳体来打开以下按钮附近的卡扣:

    • Share键

    • Options键

    • 将控制器塑料外壳分开,注意两者依然通过排线连接。

    • 3个小模块经常从框架中跑出,为了避免损失,请保持工作台的干净整洁。

    • 2个触发弹簧

    • 1个灰色复位按钮扩展

  4. DualShock 4左遥控杆维修, 电池: 步骤 4 中的图像 1,3 DualShock 4左遥控杆维修, 电池: 步骤 4 中的图像 2,3 DualShock 4左遥控杆维修, 电池: 步骤 4 中的图像 3,3
    • 使用手指来断开控制器两侧的主板排线。

    • 注意排线的方向,并且在重新连接的时候确认其方向正确。

    • 断开后,将控制器的顶部放在一边。

  5. DualShock 4左遥控杆维修: 步骤 5 中的图像 1,3 DualShock 4左遥控杆维修: 步骤 5 中的图像 2,3 DualShock 4左遥控杆维修: 步骤 5 中的图像 3,3
    • 使用镊子,轻轻地将镊子轻轻摇动,松开插头,取出电池插头。

    • 在断开主板上的插头后电池就可以从控制器中提起。

    • 匆忙移除电池可能扭坏塑料把手。

  6. DualShock 4左遥控杆维修, 拆解DualShock 4 主板组件: 步骤 6 中的图像 1,1
    • 用十字#00螺丝刀拆下电池固定器下面的单个6.0 mm十字螺丝。

    • 切勿用力拆卸螺丝,因为它可能导致螺纹的永久性损坏,使得螺丝变得不可能拆卸。

  7. DualShock 4左遥控杆维修: 步骤 7 中的图像 1,2 DualShock 4左遥控杆维修: 步骤 7 中的图像 2,2
    • 使用镊子轻轻取下连接到主板的触摸板排线。 触摸板排线通过连接器连接到主板,该连接器需要翻转来松开。 在重新组装时,为了重新连接排线,塑料托盘需要从主板上轻轻取出,并且将翻盖锁翻开。

  8. DualShock 4左遥控杆维修: 步骤 8 中的图像 1,2 DualShock 4左遥控杆维修: 步骤 8 中的图像 2,2
    • 小心地从前盖拆下主板组件。

    • 振动电机十分松动的与转相连。 在两端支撑,以便分离。

    • 当移除主板组件时,切勿将外壳上下倾倒,按键可能会掉出来。

  9. DualShock 4左遥控杆维修, 拆解完成: 步骤 9 中的图像 1,3 DualShock 4左遥控杆维修, 拆解完成: 步骤 9 中的图像 2,3 DualShock 4左遥控杆维修, 拆解完成: 步骤 9 中的图像 3,3
    • 成功的拆解了控制器,将呈现以下三个部份。

    • 主板组件

    • 前外壳

    • 后外壳

  10. DualShock 4左遥控杆维修, 左遥控杆: 步骤 10 中的图像 1,3 DualShock 4左遥控杆维修, 左遥控杆: 步骤 10 中的图像 2,3 DualShock 4左遥控杆维修, 左遥控杆: 步骤 10 中的图像 3,3
    • 使用“助手”或类似的工具来保持电路板稳定的焊接工作。

    • 这些焊接连接将需要拆焊。由于电路板倒挂,左边是正确的方向

    • 利用去焊芯和助焊剂来熔化并去除焊料

  11. DualShock 4左遥控杆维修: 步骤 11 中的图像 1,3 DualShock 4左遥控杆维修: 步骤 11 中的图像 2,3 DualShock 4左遥控杆维修: 步骤 11 中的图像 3,3
    • 一旦所有的触点被拆除,旧的操纵杆可以拿下来。 这可能需要一些练习,因为所有的焊料都必须去除。 在熔化焊料和使用灯芯的同时,在操纵杆上拉一点点也是有帮助的。

    • 确保更换操纵杆的触点与原件相同。

    • 检查所有的孔是否清除了旧的焊料。 可以使用注射器以及非常小的钻头来清除孔。 电路板上熔化的物质是用于脱焊的助焊剂。

  12. DualShock 4左遥控杆维修: 步骤 12 中的图像 1,3 DualShock 4左遥控杆维修: 步骤 12 中的图像 2,3 DualShock 4左遥控杆维修: 步骤 12 中的图像 3,3
    • 将新的操纵杆插入电路板。 确保它正确就位,并且所有触点都与电路板上的孔对齐。

    • 将所有触点焊接到电路板上。

    • 这是维修过后的电路板。 剩下的就是用一些异丙醇清除旧的焊剂。

结论

要重新组装您的设备,请按照指南并按照相反的顺序解决。

84等其他人完成本指南。

由衷感谢以下译者:

en zh

85%

笑得像个300斤的孩子正在帮助我们修复这个世界! 您也想加入吗?
开始翻译 ›

oldturkey03

于09/29/10注册

781,610 声望

创作了119篇指南

团队

Global Fixers Global Fixers 的会员

Community

32 名成员

创作了531篇指南

37条评论

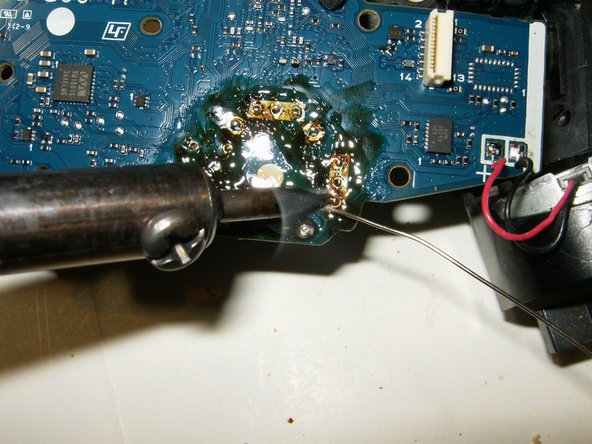
Swammieslippyslappy, there is no lead in the device, if so the solder would release much easier. Lead Solder goes to liquid at 180-190 Celsius vs lead free at 212-226 Celsius. I would suggest buying a desoldering iron (cheap ones are fine $10-$20 they have the bulb attached for one handed operation) as using a solder wick becomes rather tedious with the smaller parts.

Joseph Van Meter - 回复

Would this fix the issue with the L3 button not remaining activated after initiating? (ie. running in call of duty)

Jorge - 回复

Very helpful guide!! I've never soldered/desoldered anything before so this was a little difficult for me. I ran into a few problems along the way: my inital soldering iron was 30W and it wasn't melting the solder, so I had to buy a 40W iron and that one did the trick. I also had a rough time using the desoldering wick (the solder didn't seem to suck up into the wick) so I ended up using a combination of a desoldering pump and the wick. I eventually got the piece out and the rest was easy! Thanks again and if anybody needs help with this project feel free to message me and I'll do the best I can to help.

SergeantCorbett - 回复

添加评论

浏览统计数据:

过去 24 小时: 64

过去 7 天: 411

过去 30 天: 2,004

总计 341,142