跳转到主内容
Droid Ultra XT1080 Power Button Replacement

Droid Ultra XT1080 Power Button Replacement

knoyes

knoyes2 其他贡献者

最后更新于 May 16, 2024

35分钟
中等

This guide will show you how to properly replace the power button on your Motorola Droid Ultra XT 1080

你所需要的

工具

  • iFixit Opening Tool
    iFixit Opening Tool
  • Spudger
    Spudger
  • T5 Torx Screwdriver
    T5 Torx Screwdriver
  • T4 Torx Screwdriver
    T4 Torx Screwdriver

查看更多...

  1. Droid Ultra XT1080 Power Button Replacement, Power Button: 步骤 1 中的图像 1,3 Droid Ultra XT1080 Power Button Replacement, Power Button: 步骤 1 中的图像 2,3 Droid Ultra XT1080 Power Button Replacement, Power Button: 步骤 1 中的图像 3,3
    • Gently remove the SIM card tray from the device using a spudger.

  2. Droid Ultra XT1080 Power Button Replacement: 步骤 2 中的图像 1,1
    • After SIM card removal press the spudger between the plastic case and the frame until you hear a snap.

    • Work your way around the device until all the clips are released.

    • Be gentle while doing this so you don't crack or break the plastic.

  3. Droid Ultra XT1080 Power Button Replacement: 步骤 3 中的图像 1,1
    • Remove the five screws on top of the device with a T5 Torx.

    • Remove the single screw holding the camera with a T4 Torx.

    • Remove the two screws on the bottom of the device with a T5 Torx.

  4. Droid Ultra XT1080 Power Button Replacement: 步骤 4 中的图像 1,2 Droid Ultra XT1080 Power Button Replacement: 步骤 4 中的图像 2,2
    • Once the screws are removed, use a nylon spudger and lift up on the two plastic pieces that were secured by the screws.

  5. Droid Ultra XT1080 Power Button Replacement: 步骤 5 中的图像 1,1
    • Remove the four T5 Torx screws securing the motherboard.

  6. Droid Ultra XT1080 Power Button Replacement: 步骤 6 中的图像 1,1
    • Gently pry the motherboard out of the frame using the plastic opening tool.

  7. Droid Ultra XT1080 Power Button Replacement: 步骤 7 中的图像 1,2 Droid Ultra XT1080 Power Button Replacement: 步骤 7 中的图像 2,2
    在这个步骤中使用的工具:
    Tweezers
    $3.99
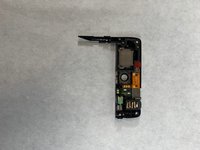
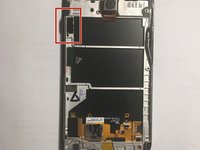
    • Once motherboard is removed you have gained access to the power button.

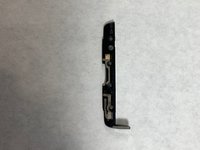
    • Gently, using a pair of angled tweezers pull on the power button to remove it.

结论

To reassemble your device, follow these instructions in reverse order.

knoyes

于10/30/18注册

785 声望

创作了5篇指南

团队

UMass Dartmouth, Team S3-G8, Peak Fall 2018 UMass Dartmouth, Team S3-G8, Peak Fall 2018 的会员

UMASSD-PEAK-F18S3G8

3 名成员

创作了10篇指南

0指南评论

添加评论

浏览统计数据:

过去 24 小时: 0

过去 7 天: 0

过去 30 天: 24

总计 349