
简介
转到步骤 1On a laptop keyboard, keycaps and switches can start to wear out over time, no matter the usage level. When a laptop keyboard starts to have issues and isn't working the way that it is intended to work, it might be better to replace the keyboard because it would be much more cost efficient than having to replace the entire laptop. If you are in need of replacing the keyboard on a Dell Inspiron 8600, this guide will be beneficial and take you step by step in the process of replacing the keyboard.


-
-
Insert a spudger into the notch at the far left side of the top blue panel and pry the hinge cover off.
-
You may need to pry the other side off as well. You can do this by inserting the spudger between the hinge and the top cover.
-
-
-
-
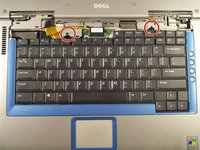
Using the Phillips #1 remove the screws at the top of the keyboard as indicated.
-
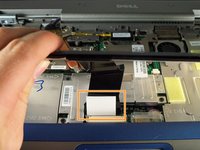
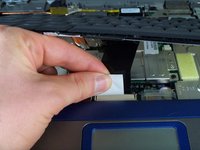
You will need to pull out the white tab underneath the keyboard upwards until it pops out of its socket.
-


To reassemble your device, follow these instructions in reverse order.
To reassemble your device, follow these instructions in reverse order.
2等其他人完成本指南。
团队

Cal Poly, Team 18-22, Garner Spring 2011 Cal Poly, Team 18-22, Garner Spring 2011 的会员
CPSU-GARNER-S11S18G22
4 名成员
创作了16篇指南
1指南评论
followed instructions, keyboard works great now!! All letters and numbers work! Thank you
fordsmtack - 回复