跳转到主内容
Dell Inspiron 17" 7786 2-in-1 Fan Replacement

Dell Inspiron 17" 7786 2-in-1 Fan Replacement

Delia Padilla

Delia Padilla2 其他贡献者

最后更新于 December 28, 2022

2分钟
简单

This is the Dell Inspiron 17" 7786 2-in-1 fan replacement guide.

Some signs of a faulty fan include:

  • The device has a loud fan noise with no air coming out of the vents.
  • The device is hot to the touch, overheats, shuts down, freezes, and you can smell some odd smells coming from the computer.

Check and clean the air vents because obstructions can restrict airflow causing the hardware within the PC to overheat. The heat then causes performance issues, reduced speeds in the processor and in turn making a loud noise. Sometimes you can smell an odd burning plastic smell and the laptop freezes/turns off for no reason. Proper ventilation is needed for better air circulation inside and outside of the the computer. This helps the PC perform better. Try keeping the computer in a colder area.

When the temperature reaches a critical level, the system will shut itself down, restart itself or will stop randomly. This is to prevent permanent damage. The system shutdown will also show an error message. This may be a sign of a faulty, clogged or dead fan.

Make sure to rule out malware and other types of software problems as well.

你所需要的

工具

  1. Dell Inspiron 17" 7786 2-in-1 Fan Replacement, Base Cover: 步骤 1 中的图像 1,2 Dell Inspiron 17" 7786 2-in-1 Fan Replacement, Base Cover: 步骤 1 中的图像 2,2
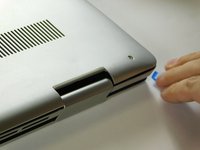
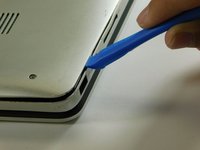
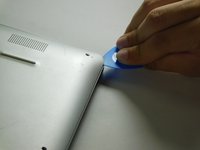
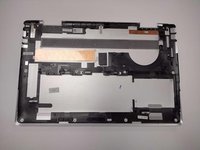
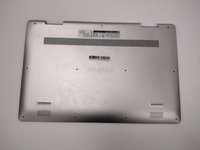
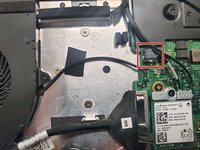
    • Remove the eight M2 5mm screws that secure the base cover using a Phillips #0 screwdriver.

  2. Dell Inspiron 17" 7786 2-in-1 Fan Replacement: 步骤 2 中的图像 1,2 Dell Inspiron 17" 7786 2-in-1 Fan Replacement: 步骤 2 中的图像 2,2
    • Loosen the three captive screws that secure the base closer to the hinges.

    • Do not attempt to remove the three captive screws! You need only to loosen them. They're supposed to stay on the base cover.

  3. Dell Inspiron 17" 7786 2-in-1 Fan Replacement: 步骤 3 中的图像 1,3 Dell Inspiron 17" 7786 2-in-1 Fan Replacement: 步骤 3 中的图像 2,3 Dell Inspiron 17" 7786 2-in-1 Fan Replacement: 步骤 3 中的图像 3,3
    • Carefully pry the base cover using an iFixit opening tool in the crevice near the hinges. Guide the pick along the edges and slightly lift upwards as you go along.

    • Do not start from the speaker end of the edges when opening, or you may cause further damage to your device!

  4. Dell Inspiron 17" 7786 2-in-1 Fan Replacement: 步骤 4 中的图像 1,3 Dell Inspiron 17" 7786 2-in-1 Fan Replacement: 步骤 4 中的图像 2,3 Dell Inspiron 17" 7786 2-in-1 Fan Replacement: 步骤 4 中的图像 3,3
    • Carefully remove the base cover from the laptop.

  5. Dell Inspiron 17" 7786 2-in-1 Fan Replacement, Fan: 步骤 5 中的图像 1,2 Dell Inspiron 17" 7786 2-in-1 Fan Replacement, Fan: 步骤 5 中的图像 2,2
    • Gently remove the I/O cable.

  6. Dell Inspiron 17" 7786 2-in-1 Fan Replacement: 步骤 6 中的图像 1,2 Dell Inspiron 17" 7786 2-in-1 Fan Replacement: 步骤 6 中的图像 2,2
    • Remove the fan cable from the motherboard.

  7. Dell Inspiron 17" 7786 2-in-1 Fan Replacement: 步骤 7 中的图像 1,1
    • Remove two 3 mm screws that secure the fan using a Phillips #0 screwdriver.

  8. Dell Inspiron 17" 7786 2-in-1 Fan Replacement: 步骤 8 中的图像 1,2 Dell Inspiron 17" 7786 2-in-1 Fan Replacement: 步骤 8 中的图像 2,2
    • There is a little piece of tape/sticker on the fan that connects it to the heat sink. Gently remove this.

    • Lift the fan off the palm rest assembly.

结论

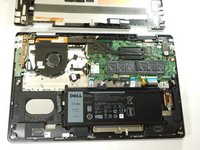
To reassemble your device, follow these instructions in reverse order.

另外一个人完成了本指南。

Delia Padilla

于08/23/22注册

588 声望

创作了5篇指南

团队

Gateway, Team 1-3, Class Fall 2022 Gateway, Team 1-3, Class Fall 2022 的会员

GCC-CLASS-F22S1G3

4 名成员

创作了15篇指南

0条评论

添加评论

浏览统计数据:

过去 24 小时: 1

过去 7 天: 18

过去 30 天: 32

总计 362