
Canon PowerShot A4000 IS Display Replacement


-
-
First remove the batteries and memory card.
-
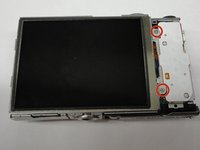
Remove the screws for the back cover (circled in red) with a Phillips head screwdriver (PH000) .
-
-
-
The back cover can be gently pried off after the screws are removed.
-
-
-
-
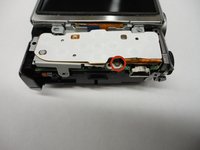
Remove the three screws outlined in the pictures.
-
-
-
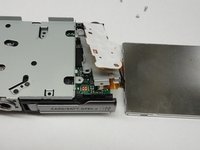
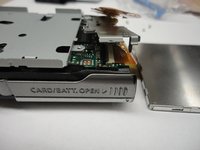
The metal frame of the screen can be removed using a thin spatula or spudger. After the frame is removed the part of the ribbon connected to the screen is accessible.
-


To reassemble your device, follow these instructions in reverse order.
To reassemble your device, follow these instructions in reverse order.
团队

Clemson, Team 1-3, Benson Fall 2014 Clemson, Team 1-3, Benson Fall 2014 的会员
CLEM-BENSON-F14S1G3
3 名成员
创作了17篇指南
一条评论
Completely worthless repair guide! Do not try before reading below!
In Step 4, this guide neglects to mention at all if you raise the plate too high to get to the screen ribbon connector, you will DISCONNECT the ribbon connector “north” (above) it for all the controls and, apparently, power on/off. And if you disconnect this second connector, you are S.O.L. as there is no way to remove the plate completely to reconnect it (the ribbon has nearly zero length/play in it) and the ribbon/control board cannot be completely detached from the plate to give you more length/play as there is a THIRD ribbon connector between the plate and microphone from the control board that dives deep into the innards of the camera.
So because I wasn’t warned and lifted the plate a little too high, I disconnected the controls/power connector with no good way as an average person at home with limited tools or camera repair skills to reseat it, and now have a $20 new LCD screen in a camera that won’t turn on.
Thanks, fixit! >:(