跳转到主内容
Asus华硕 ROG Zephyrus G14 幻14 硅脂更换

Asus华硕 ROG Zephyrus G14 幻14 硅脂更换

jon bush

jon bush5 其他贡献者

最后更新于 February 14, 2025

45分钟 - 1小时
中等
社区贡献指南

你所需要的

配件

工具

查看更多...

  1. Asus华硕 ROG Zephyrus G14 幻14 硅脂更换, 打开设备D面: 步骤 1 中的图像 1,1
    • 首先拧下底壳螺丝。 螺丝有两种不同尺寸。 一长一短。(已颜色区分)

    • 红色为短螺丝,橘色为长螺丝,请注意辨别。

  2. Asus华硕 ROG Zephyrus G14 幻14 硅脂更换, 断开电池连接: 步骤 2 中的图像 1,2 Asus华硕 ROG Zephyrus G14 幻14 硅脂更换, 断开电池连接: 步骤 2 中的图像 2,2
    • 使用塑料撬棍向右推动电池插头的固定扣。如图所示。

  3. Asus华硕 ROG Zephyrus G14 幻14 硅脂更换, 移除散热模组: 步骤 3 中的图像 1,1
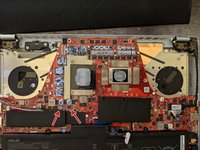
    • 以红色和橘色标记的为散热模组的固定螺丝。

    • 黄色标记的为供电和信号模块,使用塑料撬棍断开

    • 使用相同的撬棒平侧撬开两个模具。 旧的导热膏可能会增大拆卸难度

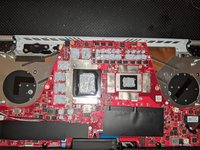
    • 小心地卸下最左侧(蓝色边框中)隐藏在塑料下的显示屏线。

    • 小心的取下最右侧(粉色边框中)隐藏在塑料下的Wifi线(白色和黑色)。

    • 这时,我们才可以卸下散热模组。

  4. Asus华硕 ROG Zephyrus G14 幻14 硅脂更换, 清理并更换新硅脂: 步骤 4 中的图像 1,3 Asus华硕 ROG Zephyrus G14 幻14 硅脂更换, 清理并更换新硅脂: 步骤 4 中的图像 2,3 Asus华硕 ROG Zephyrus G14 幻14 硅脂更换, 清理并更换新硅脂: 步骤 4 中的图像 3,3
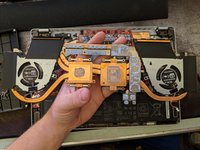
    • 如图可以看到应该涂抹硅脂的位置,确保将其涂抹在相同的表面上。

    • 两个容易遗漏的部分已标记

    • 作者使用了 70% 的酒精、纸巾和撬棒的平头来去除旧硅脂。

    • 作者使用塑料撬棒将硅脂涂抹在芯片上,以确保完全接触。

    • 通过反向进行步骤三来安装散热器

  5. Asus华硕 ROG Zephyrus G14 幻14 硅脂更换, 安装D面: 步骤 6 中的图像 1,1
    • 通过放置并拧上底壳来扣住设备。

    • 橙色标记为长螺丝。红色标记为短螺丝。

  6. Asus华硕 ROG Zephyrus G14 幻14 硅脂更换, 温度对比: 步骤 7 中的图像 1,2 Asus华硕 ROG Zephyrus G14 幻14 硅脂更换, 温度对比: 步骤 7 中的图像 2,2
    • 更换前

  7. Asus华硕 ROG Zephyrus G14 幻14 硅脂更换, 温度对比: 步骤 8 中的图像 1,3 Asus华硕 ROG Zephyrus G14 幻14 硅脂更换, 温度对比: 步骤 8 中的图像 2,3 Asus华硕 ROG Zephyrus G14 幻14 硅脂更换, 温度对比: 步骤 8 中的图像 3,3
    • 更换后

    • 测试内容 使用了3D mark time spy without the demo。自定义的风扇曲线。两次运行的配置文件都设置为 turbo。

结论

按相反顺序来重新组装设备

14等其他人完成本指南。

由衷感谢以下译者:

en zh

100%

这些译者帮助我们修补全世界! 您也想加入吗?
开始翻译 ›

jon bush

于11/19/20注册

591 声望

撰写一个指南

9条评论

I used metal tweezers and my laptop won’t turn on now. What did I do?

Mason - 回复

Did you manage to get an answer to this? I didn't use metal tweezers but my laptop won't turn on and it's blinking as if it's trying to run but it can't!

OVO Architects -

Open up chips and look if there are cracks on chips, if there are, then you got a dead chip.

hazard4636 -

You have probably created a spark between the tweezers and the laptop circuit while the battery power is still on, bring it to a repair shop that provides micro soldering service and let them fix it.

Jerry Li -

I followed this and even used ifixit tools and now my laptop won't boot. No bios, no charge light, no cpu light, no fans. I followed it exactly, grounded myself, didn't touch the motherboard, didn't even get up as to not accidentally generate static, worked on concrete and a wooden table, none of the connections are loose or damaged. It just won't turn on. What happened and how can I fix it?

Daniel Carbaugh (Danny) - 回复

添加评论

浏览统计数据:

过去 24 小时: 65

过去 7 天: 233

过去 30 天: 735

总计 27,793