跳转到主内容

Alienware 17 R3 Battery Replacement

你所需要的

  1. Alienware 17 R3 Battery Replacement, Battery: 步骤 1 中的图像 1,1
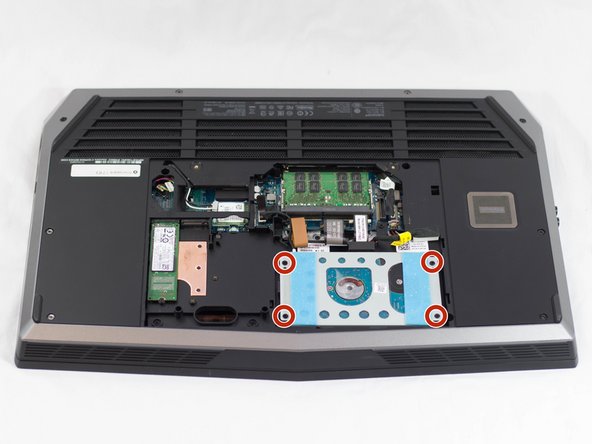
    • Turn the computer off.

    • Disconnect the charging cable from the computer.

    • Failure to unplug the charging cable could result in damaging the computer or seriously injuring yourself.

    • Wear the anti-static wrist strap to prevent any electrical shock to the components. Shocks may damage the components.

  2. Alienware 17 R3 Battery Replacement: 步骤 2 中的图像 1,1
    • Unscrew and remove the two 4mm Phillips #1 screws from the cover.

    • Remember to put the screws in a safe place so you can find them all during re-assembly.

  3. Alienware 17 R3 Battery Replacement: 步骤 3 中的图像 1,1
    • Pull up and slide the cover off.

  4. Alienware 17 R3 Battery Replacement: 步骤 4 中的图像 1,2 Alienware 17 R3 Battery Replacement: 步骤 4 中的图像 2,2
    • Unplug the black wire with the yellow tag to disconnect the battery.

  5. Alienware 17 R3 Battery Replacement: 步骤 5 中的图像 1,2 Alienware 17 R3 Battery Replacement: 步骤 5 中的图像 2,2
    • Unscrew and remove the four 3mm Phillips #1 screws holding the hard drive in place.

  6. Alienware 17 R3 Battery Replacement: 步骤 6 中的图像 1,2 Alienware 17 R3 Battery Replacement: 步骤 6 中的图像 2,2
    • Unscrew and remove the four 2mm Phillips #1 screws holding the casing together.

  7. Alienware 17 R3 Battery Replacement: 步骤 7 中的图像 1,2 Alienware 17 R3 Battery Replacement: 步骤 7 中的图像 2,2
    • Remove the plug from the hard drive.

    • Lift the hard drive out and set aside.

  8. Alienware 17 R3 Battery Replacement: 步骤 8 中的图像 1,1
    • Unscrew the one Phillips #1 screw holding down the bottom of the M.2 chip.

    • Pull the M.2 chip straight out of its socket.

  9. Alienware 17 R3 Battery Replacement: 步骤 9 中的图像 1,1
    • Unscrew and remove the eight 3mm Phillips #1 screws (located in areas labeled "P").

  10. Alienware 17 R3 Battery Replacement: 步骤 10 中的图像 1,1
    • Carefully disconnect the four flex cables.

    • To unlock a ZIF connector, use the tip of a spudger or your fingernail to flip up the small, hinged locking flap. Carefully slide the unlocked cable out of the socket.

  11. Alienware 17 R3 Battery Replacement: 步骤 11 中的图像 1,1
    • Remove the six 4mm Phillips #1 screws on the side and the two 10mm Phillips #1 screws on the top.

  12. Alienware 17 R3 Battery Replacement: 步骤 12 中的图像 1,1
    • Flip over the laptop and open it.

    • Insert the spudger along the edges of the laptop and gently pry upward to lift the keyboard panel.

  13. Alienware 17 R3 Battery Replacement: 步骤 13 中的图像 1,1
    • Remove the six 4mm Phillips #1 screws holding the battery in place.

  14. Alienware 17 R3 Battery Replacement: 步骤 14 中的图像 1,3 Alienware 17 R3 Battery Replacement: 步骤 14 中的图像 2,3 Alienware 17 R3 Battery Replacement: 步骤 14 中的图像 3,3
    • Unplug the two sets of wires from the motherboard.

  15. Alienware 17 R3 Battery Replacement: 步骤 15 中的图像 1,1
    • Lift out the battery pack.

结论

To reassemble your device, follow these instructions in reverse order.

Take your e-waste to an R2 or e-Stewards certified recycler.

Repair didn’t go as planned? Try some basic troubleshooting, or ask our Answers community for help.

18等其他人完成本指南。

团队

UW Tacoma, Team 1-1, Rose Winter 2017 UW Tacoma, Team 1-1, Rose Winter 2017 的会员

UWT-ROSE-W17S1G1

3 名成员

创作了5篇指南

4条评论

Hi ! Nice DIY . Is it possible to disassemble the battery pack and change the cell inside ?

francois tremblay - 回复

Hi, please edit step 10. There a 4th ribbon has to be pulled.

Nevertheless a very good manual.

Steffen Bönisch - 回复

Hi Steffen,

Thanks for the tip! I edited step 10 to correct the mistake.

Arthur Shi -

Very helpful and concise. Worked very well for me. Many Thanks

Ragufta Khan - 回复

添加评论

浏览统计数据:

过去 24 小时: 18

过去 7 天: 86

过去 30 天: 350

总计 29,695