跳转到主内容
ASUS VivoBook Flip TP501U Hard Drive Replacement

ASUS VivoBook Flip TP501U Hard Drive Replacement

Megan Phinney

Megan Phinney5 其他贡献者

最后更新于 November 17, 2022

10 - 15 分钟
中等

The hard drive is the component of the computer that stores information such as files and programs. You will want to replace your hard drive if the drive is failing, almost out of storage space, or has slow reading and writing speeds. This guide will walk you through the process of replacing the hard drive in the Asus Vivobook Flip TP501U.

你所需要的

修复工具包

本套装包含完成指南所需的所有零件和工具。

配件

工具

查看更多...

  1. ASUS VivoBook Flip TP501U Hard Drive Replacement, Keyboard Panel: 步骤 1 中的图像 1,2 ASUS VivoBook Flip TP501U Hard Drive Replacement, Keyboard Panel: 步骤 1 中的图像 2,2
    • Open the laptop until it is flat and lay it screen down.

    • Remove eight 9.6mm Phillips #00 screws from the bottom of the laptop.

    • Remove two 4.8mm Phillips from the corners of the device.

  2. ASUS VivoBook Flip TP501U Hard Drive Replacement: 步骤 2 中的图像 1,1
    • Turn the device face up.

    • Use the plastic Opening Pick to separate the keyboard panel from the chassis that was just unscrewed.

    • Pull the panel away from the chassis CAREFULLY, as there are ribbon cables attached between the keyboard and internal electronics.

  3. ASUS VivoBook Flip TP501U Hard Drive Replacement: 步骤 3 中的图像 1,1
    • With the keyboard panel pulled up, detach the two ribbon cables from the motherboard using the blue tabs on the cables.

    • Remove the keyboard panel completely.

  4. ASUS VivoBook Flip TP501U Hard Drive Replacement, Hard Drive: 步骤 4 中的图像 1,2 ASUS VivoBook Flip TP501U Hard Drive Replacement, Hard Drive: 步骤 4 中的图像 2,2
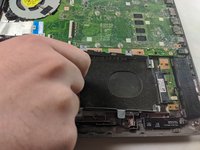
    • Unscrew the five 4.8mm Phillips #00 screws holding in the hard drive mounting bracket.

    • Slide the mounting bracket towards the battery to disconnect the hard drive from the motherboard.

  5. ASUS VivoBook Flip TP501U Hard Drive Replacement: 步骤 5 中的图像 1,1
    • Unscrew the hard drive from the mounting bracket.

    • Remove the hard drive from the mounting bracket.

    • At the time of guide creation, the hard drive was not in the device.

结论

To reassemble your device, follow these instructions in reverse order.

0指南评论

添加评论

浏览统计数据:

过去 24 小时: 0

过去 7 天: 7

过去 30 天: 17

总计 1,680