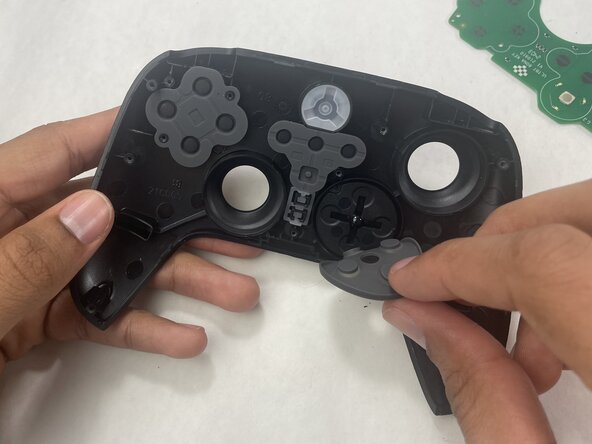
跳转到主内容
加入维修社区 - 创建账户

8BitDo Ultimate Wireless Button Conductive Pad Replacement

你所需要的

  1. 8BitDo Ultimate Wireless Button Conductive Pad Replacement, Case: 步骤 1 中的图像 1,2 8BitDo Ultimate Wireless Button Conductive Pad Replacement, Case: 步骤 1 中的图像 2,2
    • Insert an opening pick into the seam between the left controller grip and main controller body.

    • Pry the grip off.

    • Repeat for the right grip.

    询问修复机器人
  2. 8BitDo Ultimate Wireless Button Conductive Pad Replacement: 步骤 2 中的图像 1,2 8BitDo Ultimate Wireless Button Conductive Pad Replacement: 步骤 2 中的图像 2,2
    • Remove the six 8 mm T6 Torx screws securing the rear case to the front case.

    询问修复机器人
  3. 8BitDo Ultimate Wireless Button Conductive Pad Replacement: 步骤 3 中的图像 1,3 8BitDo Ultimate Wireless Button Conductive Pad Replacement: 步骤 3 中的图像 2,3 8BitDo Ultimate Wireless Button Conductive Pad Replacement: 步骤 3 中的图像 3,3
    • Insert an opening tool into seam at the bottom of the device and carefully pry the front and back shells apart.

    • Set the halves next to each other with care not to strain the connected ribbon cables.

    询问修复机器人
  4. 8BitDo Ultimate Wireless Button Conductive Pad Replacement: 步骤 4 中的图像 1,3 8BitDo Ultimate Wireless Button Conductive Pad Replacement: 步骤 4 中的图像 2,3 8BitDo Ultimate Wireless Button Conductive Pad Replacement: 步骤 4 中的图像 3,3
    • The ribbon cable is secured with a locking tab connector.

    • Use tweezers to unlock the locking tab on the ribbon cable connector, then gently disconnect the ribbon cable.

    询问修复机器人
  5. 8BitDo Ultimate Wireless Button Conductive Pad Replacement, Button Conductive Pad: 步骤 5 中的图像 1,2 8BitDo Ultimate Wireless Button Conductive Pad Replacement, Button Conductive Pad: 步骤 5 中的图像 2,2
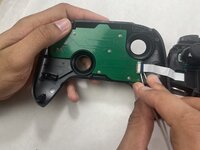
    • Remove the seven 5 mm Phillips #00 screws securing the PCB to the top shell.

    • Lift the PCB out.

    询问修复机器人
  6. 8BitDo Ultimate Wireless Button Conductive Pad Replacement: 步骤 6 中的图像 1,2 8BitDo Ultimate Wireless Button Conductive Pad Replacement: 步骤 6 中的图像 2,2
    • Lift button conductive pads out of the shell with your hands.

    • Replace or clean as needed.

    • If cleaning with water, make sure pads are fully dry before replacing.

    询问修复机器人
结论

To reassemble your device, follow the above steps in reverse order.
Take your e-waste to an R2 or e-Stewards certified recycler.
Repair didn’t go as planned? Try some basic troubleshooting or ask our Answers community for help.

另外一个人完成了本指南。

John Sweriduk

于04/03/26注册

85 声望

撰写一个指南

团队

UMass Dartmouth, Team 1-3, Biswokarma Spring 2026 UMass Dartmouth, Team 1-3, Biswokarma Spring 2026 的会员

UMASSD-BISWOKARMA-S26S1G3

5 名成员

创作了5篇指南

0指南评论

添加评论

浏览统计数据:

过去 24 小时: 3

过去 7 天: 17

过去 30 天: 24

总计 66