跳转到主内容

如何升级 PlayStation 5 中的可扩展存储

你所需要的

视频概述

  1. 如何升级 PlayStation 5 中的可扩展存储, 拆下支架螺丝: 步骤 1 中的图像 1,1
    • 如果你的 PlayStation 5 处于垂直方向,请将其倒置,使支架朝上。

    • 如果你的 PlayStation 5 处于水平方向,请跳至步骤 6。

    • 在平坦的表面上工作以防止你的 PlayStation 翻倒。

    • 使用一个硬币或者一字螺丝刀卸下 26.5 毫米长的支架螺丝。

  2. 如何升级 PlayStation 5 中的可扩展存储, 取下垂直支架: 步骤 2 中的图像 1,2 如何升级 PlayStation 5 中的可扩展存储, 取下垂直支架: 步骤 2 中的图像 2,2
    • 竖直向上提起以卸下支架。

  3. 如何升级 PlayStation 5 中的可扩展存储, 存放支架螺丝: 步骤 3 中的图像 1,2 如何升级 PlayStation 5 中的可扩展存储, 存放支架螺丝: 步骤 3 中的图像 2,2
    • 将螺丝插入支架底部的小隔间。

  4. 如何升级 PlayStation 5 中的可扩展存储, 盖上螺丝孔: 步骤 4 中的图像 1,3 如何升级 PlayStation 5 中的可扩展存储, 盖上螺丝孔: 步骤 4 中的图像 2,3 如何升级 PlayStation 5 中的可扩展存储, 盖上螺丝孔: 步骤 4 中的图像 3,3
    在这个步骤中使用的工具:
    Tweezers
    $4.99
    • 镊子或指甲取下隔间盖子。

    • 用手指将盖子按入螺丝孔。

  5. 如何升级 PlayStation 5 中的可扩展存储, 关闭小隔间: 步骤 5 中的图像 1,3 如何升级 PlayStation 5 中的可扩展存储, 关闭小隔间: 步骤 5 中的图像 2,3 如何升级 PlayStation 5 中的可扩展存储, 关闭小隔间: 步骤 5 中的图像 3,3
    • 逆时针旋转支架以关闭小隔间。

  6. 如何升级 PlayStation 5 中的可扩展存储, 取下水平支架: 步骤 6 中的图像 1,2 如何升级 PlayStation 5 中的可扩展存储, 取下水平支架: 步骤 6 中的图像 2,2
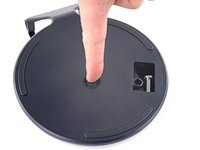
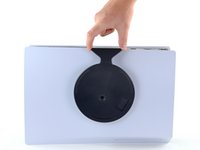
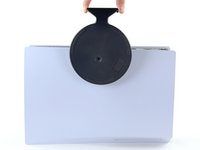
    • 如果你的 PlayStation 5 处于水平方向,请将其平放,充电口朝上。

    • 将支架竖直向上提起以将其卸下。

    Do you guys sell the stand

    Corey Lewis - 回复

    Steps 1 through 6 are just about removing the stand, correct? Storing the screw and all that is just about being neat and tidy?

    tofu - 回复

  7. 如何升级 PlayStation 5 中的可扩展存储, 移除右侧面板: 步骤 7 中的图像 1,3 如何升级 PlayStation 5 中的可扩展存储, 移除右侧面板: 步骤 7 中的图像 2,3 如何升级 PlayStation 5 中的可扩展存储, 移除右侧面板: 步骤 7 中的图像 3,3
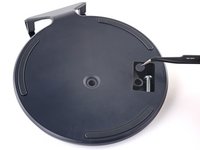
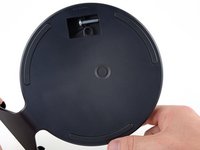
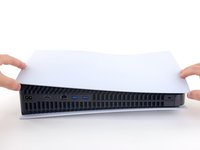
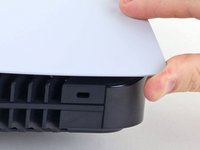
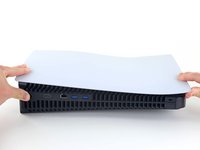
    • 翻转设备,使机身背面的USB和以太网接口位于你的左侧。
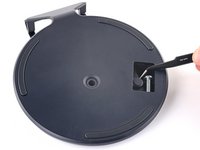
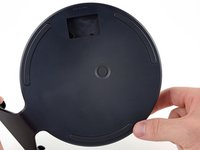
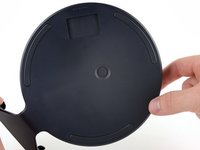
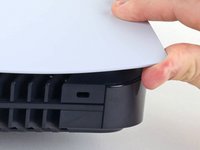
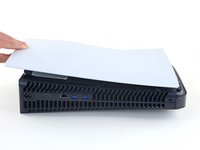
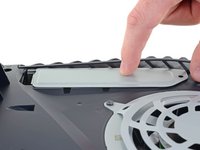
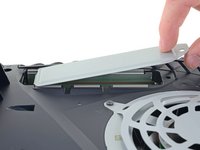
    • 抓住并抬起面板的角落,使卡扣松脱。

    lift the corner on the top of the device on the back to unclip it

    Nicole Best - 回复

  8. 如何升级 PlayStation 5 中的可扩展存储: 步骤 8 中的图像 1,2 如何升级 PlayStation 5 中的可扩展存储: 步骤 8 中的图像 2,2
    • 在抬起角落的同时,向机身底部推动整个面板。

    • 取下右侧面板。

  9. 如何升级 PlayStation 5 中的可扩展存储, 卸下 SSD 盖螺丝: 步骤 9 中的图像 1,1
    • 使用十字螺丝刀卸下 17 毫米长的 SSD 盖螺丝。

  10. 如何升级 PlayStation 5 中的可扩展存储, 取下 SSD 盖: 步骤 10 中的图像 1,3 如何升级 PlayStation 5 中的可扩展存储, 取下 SSD 盖: 步骤 10 中的图像 2,3 如何升级 PlayStation 5 中的可扩展存储, 取下 SSD 盖: 步骤 10 中的图像 3,3
    • 用手指将 SSD 盖滑向设备顶部,将其从外壳上松开。

    • 取下 SSD 盖。

  11. 如何升级 PlayStation 5 中的可扩展存储, 卸下 SSD 螺丝: 步骤 11 中的图像 1,1
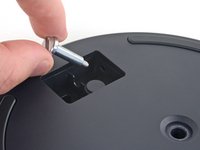
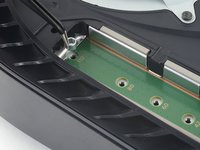
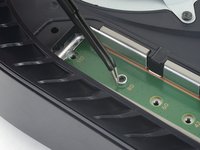
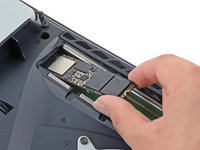
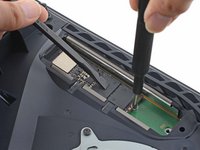
    • 使用十字螺丝刀卸下 11 毫米长的 SSD 螺丝。

    The screw in my PS5 was too tight and I can no longer get it off. Is there any replacement screws and spacers that anyone can recommend on Amazon UK? Many thanks in advance.

    Kevin McCubbin - 回复

    what type of screw is this?

    want to replace it because i stripped during the m.2 ssd installation.

    Thx in advance

    Simon - 回复

    I have the same problem and need a replacement for the screw and spacer.

    Niel Harder - 回复

    I need to find a new screw and spacer because when I got it it was stripped already Brand new

    Zane - 回复

  12. 如何升级 PlayStation 5 中的可扩展存储, 移动垫片: 步骤 12 中的图像 1,3 如何升级 PlayStation 5 中的可扩展存储, 移动垫片: 步骤 12 中的图像 2,3 如何升级 PlayStation 5 中的可扩展存储, 移动垫片: 步骤 12 中的图像 3,3
    在这个步骤中使用的工具:
    Tweezers
    $4.99
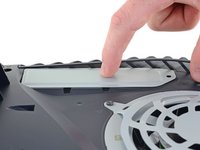
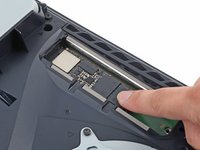
    • 使用一把镊子提起垫片并将其移至适合你选择的 M.2 SSD 的插槽。

    • 请勿尝试在正确位置安装没有垫片的 SSD。

    What are the physical dimensions of the spacer and the screw (saw the screw is 11mm, wondering the thread size and length of the threaded portion)? Looking to buy replacements online from someone other than from Sony.

    I sent my PS5 back for RMA service for visual artifacts, and it was returned to me without the screw and spacer (I had checked before sending it that the hardware was there). Seems silly to have to send the console back for replace these components, but every time I’ve called technical support - I’ve been on over hour-long wait times (haven’t gotten through to an agent yet).

    Michael Meyer - 回复

  13. 如何升级 PlayStation 5 中的可扩展存储, 插入固态硬盘: 步骤 13 中的图像 1,2 如何升级 PlayStation 5 中的可扩展存储, 插入固态硬盘: 步骤 13 中的图像 2,2
    • 如果安装的SSD需要使用散热片,请参考此指南为其安装散热片。

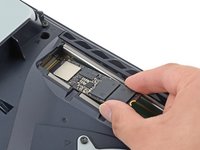
    • 将 SSD 以较浅的角度插入 M.2 插槽。

    • SSD 和 M.2 插槽不是双面设计,仅能以单一方向插入。

    • 将 SSD 插入 M.2 插槽后,SSD 以一定角度静止是正常的。

    It should be noted here that the Samsung 970 Evo Plus is NOT a PCIE 4.0 SSD (It is NOT fast enough for the PS5)

    Rowan - 回复

    Yes! Thank you, Rowan. I added a blurb addressing that in the introduction.

    Robert Boyd -

  14. 如何升级 PlayStation 5 中的可扩展存储, 将 SSD 固定到主板上: 步骤 14 中的图像 1,3 如何升级 PlayStation 5 中的可扩展存储, 将 SSD 固定到主板上: 步骤 14 中的图像 2,3 如何升级 PlayStation 5 中的可扩展存储, 将 SSD 固定到主板上: 步骤 14 中的图像 3,3
    • 用手指向下按压 SSD,直到末端位于垫片顶部。

    • 将 SSD 放在垫片上,将 SSD 螺钉插入垫片并将其拧入到位,固定 SSD 的末端。

  15. 如何升级 PlayStation 5 中的可扩展存储: 步骤 15 中的图像 1,1
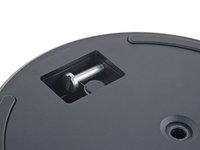
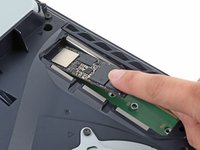
    • 使用十字螺丝刀将 11 毫米长的螺丝拧紧到 SSD 的末端。

    • 不要将这个螺丝拧得过紧。这样做可能会损坏 SSD。

    Forgot one last step:

    - Re-attach the SSD slot cover, as per Sony's instructions: https://www.playstation.com/en-us/suppor...

    Andrei Bunceanu - 回复

结论

要重新组装你的设备,请按逆序按照这些说明进行操作。

将您的电子垃圾送到 R2 或 e-Stewards 认证的回收商]。

维修没有按计划进行?尝试以下基本故障排除方法,或前往iFixit PlayStation 5 问答社区提问寻求帮助。

29等其他人完成本指南。

由衷感谢以下译者:

en zh

100%

这些译者帮助我们修补全世界! 您也想加入吗?
开始翻译 ›

Robert Boyd

于02/01/21注册

29,173 声望

创作了94篇指南

4条评论

Hello!

The 11m screw that keeps the SSD in place is totally stripped -- any tips for how to remove it? I've tried the rubber band and duct tape over the screw methods, with no luck.

Michael Deneen - 回复

Se puede cortar para extraerlo con un 🪛 plano

silentdark96 -

Very well detailed, thank you!

wakey18 - 回复

Follow the English language repair guide.

The Dutch translation needs an update.

aoosten - 回复

添加评论

浏览统计数据:

过去 24 小时: 20

过去 7 天: 102

过去 30 天: 501

总计 29,351