简介
使用本指南更换Huawei P9的显示屏。
在拆卸手机之前,请将电池放电至25%以下。如果电池意外被戳破,会着火和/或爆炸,但放电后,发生这种情况的可能性要低得多。
你所需要的
-
-
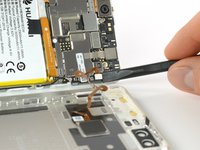
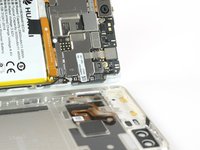
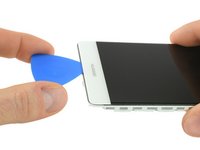
使用 iSclack 或者吸盘来将屏幕模组与后壳分离。
If you cant get suction because of cracks in the screen, use wide tape to create smooth surface.
If your screen is smashed, and nothing else will work (iSclack etc), you can get a thin blade between the casing and the screen assembly and the bottom. The screen assembly can then be pried out. I fought with mine before discovering this. Be careful of the broken glass.
I struggled to remove screen with suction cups due to damage to the back case. I used a jim to pry from bottom by usb c port, worked well.
Be very carrefull as it can open in one fell swoop !
On my model, I had 2 Little torx screws beside the USB port. If so, the screen won’t come out with them on.
Interesting, sure those were 6-starred (Torx) and not 5-starred (Pentalobe) like mentioned in step 1?
Are there any tips to help loosen the screen after taking the screws out? I brought in an extra person to help with the suction cup whilst I tried to pry the screen away with it still only moving at most 1mm (maybe less) and not enough to get any pry tools in. Ending up using quite a lot of force - far more than I think I should be to no success. As it stands I’m just ending up doing minor damage to the base of the screen/case.
Hey A Birch,
just for the case, I mention — it’s important to pull out the SIM card tray, otherwise, it will block the opening procedure and you’ll damage your phone. In case the frame is damaged or bent you’ll need more force to open the phone. In general, the opening procedure should be fairly easy.
On this step, I found it hard as the screen and the motherboard are attatched, but instead just the screen is coming up, any tips for getting under and lifting up the motherboard + battery. (Trying to do a battery replacement). The screen with that wire on Step 15 for some reference :)
Received my kit yesterday and now trying to remove the screen from the case with the suction tool. Having extreme difficulty and cannot even get a pick in to prise it off. Still trying…
Found it easy to remove screen from case using the sucker while holding the edge of the case down using the blue spudger that came with the kit. Came off in seconds…
If you have difficulty removing the display from the case, make sure to not just remove the screen. Apparently, if the case has received a knock or the motherboard is sticking to the case, it can be very, very difficult to move the motherboard as well as the screen.
However, the whole screen and motherboard assembly needs to come out. If only the screen moves, chances are the ribbon cable that attaches it to the motherboard may get pulled out of its socket or may even get damaged. I suggest to not use excessive force on the display and be very careful when attempting to pry it open. You need to get a purchase on the whole screen/motherboard unit, not just the screen.
Using a lever through the USB C port and the hole for the headphone jack may help to get the motherboard assembly moving. Be careful, though to not damage theses parts.
I think the guide should be amended to point out the possibility of moving the screen only and its associated dangers.
That depends on how the case is knocked! My case is knocked bend and you can take out the screen without using tools!
MiraEdge -
I found the screen/motherboard very difficult to move. I used the sucker (down near the USB/screw end) and the broad end of the spudger in the USB port (I was careful (I hope!) to not insert the spudger too far so I was just pressing against the case). It needed a lot of force and can away sunddenly but has left the fingerprint cable intact.
I have looked at other comments and I had removed the 2 screws next to the USB port and the sim tray, it was just plain sticky.
I couldn’t remove the screen cause I was afraid to break it!! Also using two suction caps it was impossible to lift. I tried with a thin blade but nothing to do. Is there any “trick” to release it? Why is it so strengthly stuck? Please somebody give some suggests…
Try to make sure to remove the SIM card tray and the screws at the bottom end of the phone before you try to lift the display, both block the display whilst removing the back cover. For the case that you’re using two suction cups instead of an iSclack, try to place them as close to the bottom edge as possible. For the case that the suction cups fall off easily, you can put a little water on them before pressing them on the phone. As you mentioned you can try using a blade/opening pick/jimmy as a lever during the removal procedure or you can use a tool like a spudger and insert it into the USB port to press the assembly out of the rear cover but take care to avoid damage to the port. The plastic clamps can sit really tight sometimes. In case the frame is damaged or bent you’ll need more force to open the phone.
PS I spent my money to buy battery and tool kit but if I can’t open it I wasted money believing in this “guide” that show all as a kind of easy DIY… actually it’s easier to make a damage bigger than repair!
Heating the aluminium back of the phone with a hairdryer to about 60C helps. Aluminium expands more than twice as much as the glass which anyway remains cool away from the hairdryer. Then the suction pliers and the spudger through the 3.5mm audio jack hole finally did the trick. I was about to give up!
J B Graham - 回复
I just replaced the battery of the Huawei p9. I had to open the phone using a thick, blunt needle using the headphone jack. After creating a gap, I carefully fulled the phone apart by my fingernails, with no problem whatsoever. No risk of damage doing it this way. Of course, you need to be carefull not to damage the contact pins inside the jack, but at least there is no risk of damaging the screen this way.
I don’t understand why the suction cups are the preferred method to open the case. They just popped of by applying a scaring amount of force…
Next time I will immediately use the headphone jack.
-
-
-
断开天线线缆
-
去除螺丝顶部的标签。
By carefully removing the cable from the antenna, the solder broke and the connector remained attached to the cable.
It was therefore not possible for me to reattach the cable during reassembly.
Nevertheless, I don't notice any malfunction after turning the phone back on: the WiFi and the 4g signal are good and I don't see any difference neither in terms of performance nor quality.
-
-
-
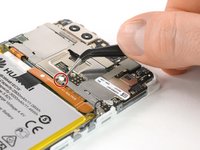
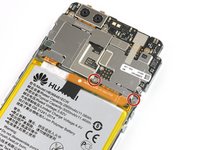
拧下将金属板固定到位的两颗十字 #00 螺丝。
-
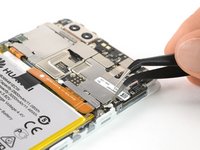
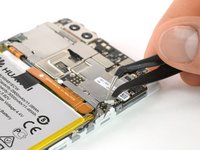
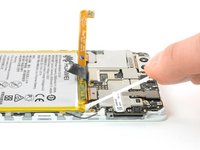
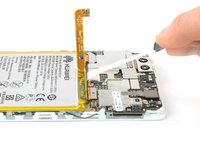
这块金属板将电池连接部位覆盖,两侧均有一个钩子。 使用镊子来将两个钩子松开。
I actually couldn’t get this plate out: as mentioned by Steven there is a slight lip (shown on the photo - the tweezers are pointing to it) and this is under another plate above. That was just a minor complication, the real problem is that I couldn’t release the end of the plate nearest the edge, In the end I had to gently bend the plate up.
-
-
-
-
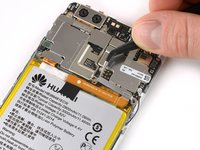
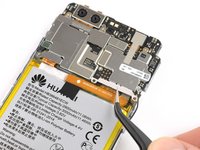
现在你可以将电池连接头弯到一边。
-
EVA-L09型号设备的电池上粘着一根NFC天线。
Just changed (05/2020) the battery on an EVA-L09 model and could not see an NFC antenna. There were no other cables leading to the battery unless it was integrated within the power ribbon somehow. Will have to wait and see after the first charge has finished to see if I still have NFC. No biggy as I never used it. Could really use a picture or some way to show where it should/could be. Thanks.
It should look somewhat similar to the P9 lite NFC antenna seen in this guide: 华为 P9 Lite 电池更换
-
-
在这个步骤中使用的工具:Tesa 61395 Tape$5.99
-
电池由三块粘合剂固定,中间有一个可拆卸的拉条,SIM托盘侧固定。按钮侧的第三块粘合剂没有拉条。
-
不断移动拉动胶粘片以释放电池。
-
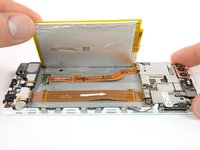
缓慢提起电池,将其从隐藏的粘合剂中取出。完成!
Hi, does the LCD Screen and Digitizer Assembly with frame come with new adhesive tabs or battery stickers? I read that if there are no stickers the battery could move and cause damage. Please let me know, i would like to be sure before i place my order.
Hi Javier! The P9 display kit does have battery adhesive. It’s visible as two orange strips, which are the adhesive release liners. We’ll be sure to specify it better in the component list. Thanks for asking!
Merci mille fois à l’auteur de ce tuto qui est vraiment super
Jean-luc 11/12/2018
Removing the battery was a bit hard. The tape broke, so it was not easy to remove the battery. I didn't use the Iopener to heat it. I finally succeeded to remove it.
I do noticed that the battery was very flexible. Wondering if this means she's very old or is it normal after charging a lot of times, or is or maybe because it got humid (my phone is sometimes damped when I have it my shirt when cycling). Compared to the new battery it's a huge difference.
Those batteries are allways soft. So, don‘t worry.
Mathias -
It will be easyer, if you remove first the mainborad and then the battery. That’s my experience after the repair of this phone.
Hi, what does it mean
use the iopener for heating the stickers
?
Does it mean that for this operation it is used a hot air gun? I watched the ifixit page of iopener, but I didn't see such a gun
Hi Pinuzza,
you can find our iOpener here. It is a tool to gently loose adhesive with heat. A heat gun is a more radical way and should be used carefully. You can easily damage components by overheating them. Here is a guide how to use our iOpener.
@Dominik: First af all thank you very much for the reply and for the extremely detailed guide. I've seen many tutorials, and I put this as the best one, because it considers very important aspects, e.g. to be careful about the electronic components below the battery, the fact that there are 3 stickers, and so on. That said, I have some doubt about iOpener (the same item I had seen and referred to previously): I cannot distinguish 1) the item below the picks and on the left side of the screwdriver, 2) the item on the right side of the picks, 3) the item below the suction cup. Above all, I have an enormous doubt and curiosity about the fact that this tool allows an easy extraction of the battery even heating the stickers, i.e., what tool in the packet should it be the candidate for this purpose, and how?
Pinuzza -
(How can it heat?)
Pinuzza -
@Dominik, I've just seen the iOpener guide you linked. However, I'm not able to understand: Have I to put all the items of the tool in a microwave? Why heat a screwdriver or the suction cup? I can't see how this could heat the adhesives: they are below, protected by battery.. how heat may reach them?
@Pinuzza you only need to place the iOpener in the microwave, not every tool that is needed for the repair. Heat up the iOpener as explained and it will save the heat. Place it on the areas where the adhesive sits underneath the battery/display/etc. Leave the iOpener in its place for at least two minutes so that the heat can reach the adhesive. This will work through the battery, display and/or a circuit board. This way you’ll loosen the adhesive, what makes the removal significantly easier.
@Dominik, okay now it’s more clear, but I can't understand exactly what is the iOpener in the image you linked (I think iOpener be the name of the entire tool). I see a black fabric case (with iOpener label) which seems to contain all the repair items.. is this the heater? Or the two transparent underneath rectangle?
Hi Pinuzza,
the black fabric case you see in the picture is the iOpener. There’s a liquid in the fabric sleeve that saves heat. This is why you place the iOpener in the microwave to save heat there and then on your device to soften adhesive afterwards. All other parts in the picture are tools for repairing, prying and to cut adhesive. From left to right: screwdriver, 6 opening picks (flat tool to cut adhesive e.g. during a screen removal), blue flat battery blocker (is used if you can’t disconnect the battery in an easy way e.g. in an iPad you can slide it between the connectors), suction cup to pull up displays or rear covers, plastic card (bigger tool to cut adhesive in hard to reach areas e.g under bigger battery packs), the blue opening tool (to cut adhesive and prying tool), tweezers, spudger (all-purpose prying tool to cut adhesive and/or disconnect cables). In this guide you can see that you only place the iOpener in the microwave. All other tools are packed separately and not in the black fabric.
@Dominik, thank you very much for the detailed reply! Now it's all clear!
(And compliments for the very well supplied and assorted store…and tutorials :)
Pinuzza -
Would be useful to see recommended points to place the spudger to lever out the battery. I used the corners at the top (i.e. at the edge where the plate I couldn’t remove!) and slowly forced out the battery (which did bend quite a bit).
These phones are now about 3 or 4 years old and the adhesive has had time to bake pretty hard. Of course the tabs break off as described. Without the iOpener I used a hair dryer on low fan, hi heat intermittently for about 5 minutes and used three spudgers under the battery using the guide picture of the ribbon cables under the battery to choose the safe places for the spudgers. You have to shift them as you ease it out as the small ribbon cable weaves to the centre. Like others have said, the battery bent and distorted to an alarming amount and I was glad I had discharged it to almost flat following the guide.
J B Graham - 回复
Replacing a dead battery in 2020. Sticky tabs snapped of course. I lifted the battery up ever so slightly with a long flat spudger/spade so I could get the fine tweezers in there a grab as much as I could. Seems to be the top half inch/1.5cm that’s baked and brittle. The rest came out with no fuss.
I have the EVA-L09 model but could not find an NFC antenna so… kinda hoping for the best once I’m done charging. Could there be a photo added of one if at all possible?
Si vous n’avez pas de iOpener, vous pouvez utiliser une poche de gel chaud/froid pour les contusions (ex Actipoche)
If you don't have an iOpener, you can use a hot/cold gel pouch for bruises (ex Actipoche)
Merci a ce tutto qui est vraiment tres bien mis a part que pour ouvrir le tellephone la ventouse ne suffit pas il faut utiliser un spatule (spudger) en faisant appui par la prise usb c et pour decoller la batterie il faut prendre une pince car elle est vraiment collé fort sinon vraiement tres bien ce tutto!!
-
-
-
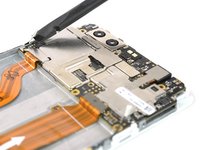
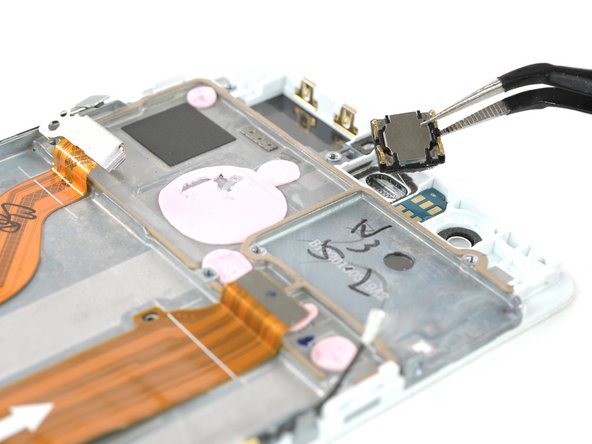
从主板上卸下其他五个菲利普斯#00十字螺丝。
-
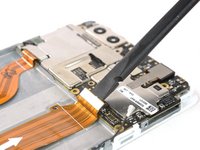
断开主板柔性电缆以及电源和音量按钮电缆。
Achtung! Ich habe vergessen, links das Kabel von den seitlichen Knöpfen zu entfernen! Ersatz kostet 100€ ca…
-
请按逆序重新组装你的设备。
请按逆序重新组装你的设备。
46等其他人完成本指南。
由衷感谢以下译者:
91%
Yuting Zhao正在帮助我们修复这个世界! 您也想加入吗?
开始翻译 ›
14条评论
While the guide shows pictures along the process it doesn't really give the whole picture.
Just one example: as a repair guide, you could easily expect the display to be cracked and you can no longer use a suction cup to open it up.
A bigger issue is that the guide doesn't show steps up to the replacement part listed.
An incomplete guide while still providing enough information to help someone with experience in repairs.
ifixit sent me screen and digitizer without the metal frame. is there a way to remove the metal frame and add it to the replacement screen? does ifixit sell screen and digitizer with the metal frame?
david cech - 回复
you guys are killing me... first you sell the display without the frame even though your instructions clearly show the frame and now it is exactly the same story with a middle frame screen... why it is not part of your display package since it is necessary for the replacement and once again showed in instructional video?
david cech - 回复
Hello David, I am very sorry for the confusion. The guide was not congruent with the spare part in the shop. Having a display assembly with the frame already attached would be more convenient and an easier repair. Though the display without the frame is a bit cheaper but makes the guide more complex (hence the rating "difficult").
What instructional video do you mean? Is it for another device?
Please sir let me know if I replace the only screen is it not effect to battery. Because someone told me if I have replace screen it should need whole cover with battery . Please tell me is it true or not
Hello Anurudda, When replacing the display you need to take out the battery (and everything else mounted on the back of the display). But you can put it back in afterwards. You do not have to replace the battery with a new one.
I’m done with the tutorial and it worked… well, partially.
If the strips of the Battery can’t be completely removed, you got heavy problems to get the battery out. I got no grip with my fingers, so I try to Lever the battery with a sprudger. I accedentily punctured it, so I needed a new one. (another 20$ for me) :(
One week later, I got the new battery and a new Display Unit (the first one was without the Frame and i struggeled to seperate the Screen andthe old Frame. So I bought the new one and done the rest of the repair.
The Problem now, is that the phone doesn’t fit in the backcase anymore and I Need to press the Phone into the case from time to time.
Another Thing is, that the touch has it’s Problems now, cause is doesn’t regonize my Thumb or the frontside of my finger, while the side of the finger is regonized by the Phone.
Don’t know, what it caused. Maybe you know an answer for that.
I too had an issue with the battery, however contact cleaner eats the adhesive and makes it much easier to remove with the spudger. In regards to your touch issues i would think its possibly a poor/faulty part and a new one may fix that issue.
I have replaced my screen and had a problem getting the battery out and bent it slightly it now turns off at 60% charge! also as Mick has said the phone does not clip fully back into the rear housing, it is the edge that has the lock and volume buttons. Anyone know how to make it stay in place?
Same problem here, genuine new screen (140€!!) doesn’t clip fully in the housing !! Had a prof. technician do the work. After first new screen i had continuously shutdowns out of the blue, even while charging or sleep mode (up to 6x a day, very annoying when you depend on Waze for work!!). Screen didn’t clip back at the connector side. Complained about it, tried factory reset, apps uninstalled, still shutdowns. Tried to explain him that the screen works as a heatsink for the CPU and if it’s not properly clipped it doesn’t touch the CPU (pink heat paste) for cooling and it might thermal shutdown for overheat protection, but he didn’t believe me. I asked for another new screen, NO MORE SHUTDOWNS, but still the same problem with the housing (it’s even worse after 3 attempts). Technician says the housing is slightly bent… but no matter how hard i look, i don’t see it, even when i place the phone on a flat surface. Anyone a solution for this?
OK, so i found out what caused my screen not to fit in it’s case… There were already rubbers installed on the new one where the earspeaker and camera are located. Especially the prox. detector had a big one. It was the technician who forgot to remove them !! I used the iSclack, wich is great for opening smartphones… just squeeze and open it goes. The pro tech toolkit comes very complete with everything you might need.
This https://www.youtube.com/watch?v=txaKuA8F... is much better
Hiya,
I've just replaced the screen of my phone and it works properly on the main page but I can't scroll. Do you have an idea what's the problem?
Thanks a lot
Why will it not power on





















your supply kit -IFIXIT does not have a screw driver bit small enough to unscrew the two Pentalobe P2 screws for my Huawei Mate P9 pro
phone. Where can I get help from ?
Vincent Leung - 回复
Hi Vincent!
Our Pentalobe P2 bits work perfectly in the Huawei P9. If you already have a driver handle that has a 4mm socket, you can use one of these bits in it and that should work fine. Otherwise, if you prefer the P2 screwdriver itself, you can find that tool here.
I hope this helps!
Kadan Sharpe -
I managed to tear the battery pack open. There was a strange smell but fortunately it didn’t explode. What should I do with the old battery now?
MiraEdge - 回复