简介
根据本指南来更换Switch的Micro SD卡槽。
Switch 使用 JIS 螺丝,但您可以在紧要关头使用十字螺丝刀。 小心不要损坏螺丝。 iFixit 的 Phillips 钻头设计为与 JIS 型螺丝交叉兼容。
***警告***:在维修时电池是不能断电的。所以只能使用安全的ESD工具而且在使用金属工具时要非常小心,否则的话会引起设备短路以至于损坏。
***注意***:本指南以及我们出售的部件,与2017年发布的初始任天堂Switch和2019年发布的较新版本兼容(型号分别为HAC-001和HAC-001(-01))
你所需要的
-
在这个步骤中使用的工具:Magnetic Project Mat$19.95
-
使用 Y00 螺丝刀拧下固定在后盖上的 4 颗 6.3 毫米螺丝。
I think my screws are stripped, any way to get them out?
I hear that using a rubber band can help? Not 100% sure on that though.
Pifase -
My top 2 screws are stripped, one into triangle, the other circle, rather than triangle spokes.
This happened when I replaced the micro-sd card slot, which turned out to have replaced the broken one with another one that turns out to be broken. I need to fix the fact that when I reapplied the back cover, the vent was misaligned.
I had huge problems removing the bottom two screws. I continued with the next steps and lifted the plastic shell as much as possible while using the screwdriver and it became an ease.
y0 works best. Press HARD at beginning then ease off to finish.
J LWsMommy - 回复
I haven't tried neither solutions that I am gonna propose here but
1. Poor some Isopropyl Alcohol, one small drop will do, get a piece of cotton (not any clothing) and dip it in the Isopropyl Alcohol, apply and then try to get a grip with tweezers and turn it out
OR (I do not reccomend it since it can cause huge damage if done wrong)
2. Grab a small drill and drill through the screw. Keep in mind; the screw is very small.
If you do one of these and it goes wrong, I am not responsible for that.
-
-
-
使用 JIS000 螺丝刀,或者 iFixIt PH000 螺丝刀取下用于固定后面板的螺丝:
-
一颗在主机顶部的散热器出口旁,长度为2.5毫米的螺丝
-
两颗在主机底部的充电接口两侧,长度为2.5毫米的螺丝
Hey guys, I tried removing the upper screw and it won't go out(neither will it go in) any tips how to fix this?
Thanks
The screw boss might be stripped out. Has the device been taken apart before? If you can unscrew it a little bit to get the screw to peek out, maybe try and grab it with some pliers as a last-ditch effort.
I have the same problem. The JIS 000 tool works great on the joy con rails per step 5 but refuses to turn the bottom two 2.5 mm screws as in step 4. These bottom screws are noticeably smaller than the screws as in step 5. The JIS 000 does not get down into these screws. Hopefully they haven’t been stripped by the wrong tool. So is there a JIS tool that is smaller than 000? I’m stuck at this point…
We used the JIS 3.0mm screwdriver for both top and bottom screws and it worked
Fun fact: these screw into little plastic tabs that stick out of the rear panel. Apparently those tabs are fragile and easy to just break off…
If the screw is turning but not coming out, the plastic tab that it screws into is probably damaged or broken. You’ll need to try to pry the screw out with tweezers as you unscrew it. It is not the end of the world if you can’t screw these back in during reassembly.
this screws are way too fragile and way too small so be careful when taking them off dont use much force and unscrew also one of them fell somewhere and spent 30 mins searching for it
PH000 will work if you don’t have JIS000. The large IFIXIT kit has both and I lost JIS000. Just be very careful as you can strip the heads when removing or inserting easier.
One thing that worked pretty well for me with the screws not coming out is slightly prying on the back cover to put them under some tension
I just came here to also confirm and say thanks to Florian for the tip. This saved me a lot of time and frustration.
Quick note, these screws are not magnetic. A magnetic screwdriver will hold onto any of the others safely, but you need to be careful not to drop these ones in particular.
Jason Lane - 回复
These would just keep rotating and not come out. What worked was, as Florian Kraupa suggested, i slid a plastic pick just between the 2 shells near the screws to prise it open slightly, then unscrewed and out they came. They're the smallest screws I've ever almost not seen before, so be careful with them.
Der Tausch von Akku (separate Anleitung) und Lüfter ging einfach vonstatten. Die Anleitung ist echt gut und leicht verständlich. Man sollte aber gewohnt sein, mit extrem kleinen Anschlüssen, Schrauben und Platinen zu arbeiten, da alles da drin recht klein ausgelegt ist und keine Toleranz für grobschlächtiges Arbeiten erlaubt! Meine Switch ist nun wieder wie neu :) - Danke iFixit!
The swapping of battery (separate instruction) and fan was fairly manageable. The instructions are easy to understand. One should be used to handle with extremely finnicky connectors, screws and circuits as the components are really small and do not allow any tolerance for rough handling at all! My Switch is good as new again :) - Thank you iFixit!
My original switch bought on launch day does not have any of these screws. I'm guessing they fell out since the plastic tabs they attach to are broken. FYI, in case anyone else does not have these screws...
-
-
-
-
在设备两边,使用 JIS000 螺丝刀(或 iFixit PH000 螺丝刀)拧下2颗长度为3.8毫米,位于中央的中心螺丝(一面一颗)
-
注意 如图所示,在主机的两面各有五颗螺丝,本步骤只需要拆除最中心的那一颗,其余四颗不需要拆卸。
I tried my JIS 000 on Step 5 and was unable to get the screw to budge. It’s partner from the other side came right out with no trouble. Don’t really want to narf up the screw, so I bailed out. Anyone else have this issue?
Could just be torqued down a bit more! I’d recommend making sure the driver bit seats nicely into the screw, apply some downward pressure, and slowly twist to try and back it out. Good luck!
Yeah I’m having this exact issue. Screw stripped and now I’m stuck. Wish I hadn’t even started.
What worked for me here was a Phillips 000, not a JIS 000
My kit only has two screwdriver heads! The package was open when I received it!
I had this issue as well. Screw was irreparably stripped. If you can get every other screw out, just keep applying pressure with a flat head screw driver right above the stripped screw and try to break the plastic piece holding onto the screw. It's a very minor invisible bit of damage that will allow you to continue the repair.
after getting all the other screws off I just hinged the back part away and it snapped off neatly where the rusted screw is. not the best solution but it worked.
Steve T -
One of my screws was SUPER attached too, but after following a bit noticed the one other in the left that got out nicely, had the plastic tab broken already! So I went ahead and broke the other tab too. So the two side screws are now holding nothing. But I think it will work thanks to the other 4 or 5 screws. Too bad!
-
-
-
从设备底部提起后盖并取下
-
从设备底部向上提起后面板并将其卸下。
How to remove micro SD port?
Pull straight up, press back into place when closing back up.
This step is missing in this guide. Here are the steps from another guide:
Step 9) 任天堂Switch的右侧Joy Con手柄滑轨的更换
Step 10) 任天堂Switch的右侧Joy Con手柄滑轨的更换
When I lifted up the back cover, it kind of stuck near the headphone port (even with cartridge slot open). But it wasn't a screw or anything and I kind of carefully pulled and wiggled and the cover came off ok
+1, there is definitely an extra clip there on my day 1 switch
I wasn't so careful here and found out during reassembly that I accidentally broke off the clip with the screw hole on the top of the back cover (the clip fell off the device when I turned it over), so I can't put the top screw back in, but oh well at least the back cover is still affixed to the device otherwise
If you're having trouble getting the back cover to fit during reassembly, check to make sure you don't have an SD card inserted in the slot. It will get in the way.
If you're like me, you might have inserted the SD card to verify your SD reader was working again after doing step 9 reassembly. If so, remove it before proceeding.
-
-
在这个步骤中使用的工具:Tweezers$4.99
-
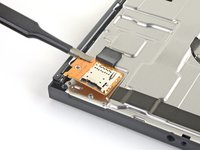
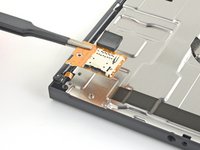
用手或镊子,缓慢地垂直提起micro SD卡槽所在的子板,使其从主机上脱离,然后断开连接并移除它。
Yes. The reverse is not so simple- you can’t see what you’re doing when you attempt to reconnect and it only takes one small error to completely bend the contacts on the connector. Very delicate.
if you very gently remove the foam pad sticker, you can at least see better how it lines up and can feel your way to a degree… then you can stick the pad back in. The pad seems pretty critical in keeping things in place once reassembled.
Definitely agree about not sticking the foam pad back on until the new SD card slot is connected. Saved a lot of headache. Great walkthrough and easy repair!
Tried several times to replace this SD reader module. As mentioned above, the issue is aligning the connectors together. It appears the foam tape is being used to hold the connection in place. (assuming you can make a viable connection) I am rather surprised at this design. In my experience, mylar ribbon cables like this usually slide into a small PC mounted socket. It appears Nintendo went the cheap route here. This design is prone to failure since it does not enable a positive connection - at least from what I can see.
I found it easier to connect it without the black foam pad so I could see and than add the foam pad over it. It was super easy and I an I 33 Mom doing this for my son. Was well worth the money for the kit saved us almost 100 bucks
Had my son follow this guide to fix his own switch where the ad card reader didn't work. And he did. Great instructions!!!! Thanks a million!
The only difficult part of following this guide is connecting the new sd card reader into the poorly designed motherboard connector. Its quite possible the sd card reader that came in the console wasnt broken at all.
The repair kit works just as advertised and even comes with stickers.
I’m still getting error 2002-2054 even after replacing memory card reader module. Thanks, Nintendo!
My switch won’t read my microSD card after I reassembled it (error 2016-0641) please help!
Tip: Keep the old SD reader piece loosely attached while you line up and gently press the new SD component into the connector on the motherboard. Once the new piece is snug, then carefully remove the old piece keeping the sticky foam in place.
I am a middle-aged mom with absolutely no special tech skills and I easily followed the directions and successfully fixed the broken SD drive. ifixit is the best!
Ah good! i have more confidence now in doing it once you said you're a middle age mom with no experience
I missed this bit about reconnecting the SD card reader under the foam pad and didn’t realise until my son pointed out a data storage problem?. All fixed in about 5 minutes taking advice from the replacing the SD card reader fix, especially removing the foam pad from the connector to better see and feel what you’re doing. All sorted!
Awesome guide! Very easy to do with the supplied kit
Tank you very much, and by tank I mean M1 Abrams, jokes apart easy and simple to follow
Thanks for the guide, I was struggling to find a solution, replaced more sd cards, before I stumbled upon this post. The Switch of my children works flawless again!
This helped me to reseat my SD card reader ribbon cable. I was getting the 2016-0641 error and no card work. A drop had dislodged the cable partially. And yes remove the foam pad gently to properly connect the cable. You can reuse the foam pad.
Kris Morey - 回复
For anyone who ends up bending the pins like I did while trying to reseat the microSD card reader…
I suggest gently placing very thin tweezers (like the curved ones in the Pro Tool Kit) in the gap and very, very gently pressing them back into alignment. Took a little effort but I was able to realign them enough to sit it in place and have it later working after reassembling the console.
When reassembling, note the alignment pins in the left and bottom notches before tightening the screw
Jason Lane - 回复
Super gemakkelijk te installeren met behulp van deze zeer duidelijke handleiding (met dank aan de vertalers!)
Wel even goed opletten op de aansluiting op het moederbord is zeer fragiel.
It is key to remember most out of the box issues with the SD card reader, do not require a replacement part and can be solved with disconnecting then re-connecting the reader at the motherboard.
Only when a simple re-seating at the connector doesn't work should you buy the replacement part.
I bought the kit and followed the directions. I plucked the black rubber foam off with a pair of eyelash tweezers. Putting the tiny screws back in place also was made easier using the tweezers. As for placing the SD card in place I think I got a bit lucky. I lined it up and gently pressed until it simply went into place. I do believe being gentle is the key there. But it went in and I put it back together. The deconstructing and reconstructing is what took the longest for me at least. I turned it on to verify it worked and then unpowered the unit and inserted the card. The system recognized and update right away and did it and then recognized the card! Just what I need for 20 something dollars. Son is happy and back to gaming.
Thank you for postingthis fix. The original sd card reader had come unplugged from the motherboard, so replacement reader will be a spare.
Anybody found a way to ensure the sd reader stays in place?
It was my first time repairing a Switch and the fan replacement wasn't too hard, but unfortunately I think there should be a better warning about the SD card connector because I damaged it while trying to put it back in. I couldn't hear any click and it didn't seem to stay put and I think I ended up applying to much force and damaging the pins.
Managed to push the connector back in with foam on, used back of plastic tool to push secure and once completed was able to use the SD port again. Brilliant little guide.
so how would you theroedictly put the old slot back on.
and how does if even work
Horrible guide, incomplete. Needs to show how to reattach the new reader but doesn't show anything. This makes it incredibly easy to bend pins that become incredibly difficult to fix. Ended up bending pins on the connector beyond repair as I didn't know what to look for or how to reattach it. Wouldn't recommend
Tried to do this, everything went smoothly I thought, but when I turn on system w SD card in the new slot, immediately freezes up the system completely until I hard shut down. Did I do something wrong?
Nate Akers - 回复
"Draw the rest of the !@#$ing owl"
Droideka30 - 回复
I have an issue that when I insert the SD card with the case off (to test the connection is correct), the switch reads it no problem. When I put the case back on, it no longer reads it. Anyone else experienced this?
This bullshit replacement part broke after two weeks of use, and now the connector on the board is damaged. My Switch is probably &&^&@@.
Thanks, iFixit! -


若要重新组装设备,请倒序按照本指南操作。在替换完坏掉的元件后,你还需要把其他部件重组回去,包括一些缓冲泡棉等。
維修結束後,請將電子廢棄物帶到R2 或 e-Stewards 認證回收點。
维修不顺利?嘗試這些基礎排障方法,或前往 Nintendo Switch 問答社群尋求幫助。
若要重新组装设备,请倒序按照本指南操作。在替换完坏掉的元件后,你还需要把其他部件重组回去,包括一些缓冲泡棉等。
維修結束後,請將電子廢棄物帶到R2 或 e-Stewards 認證回收點。
维修不顺利?嘗試這些基礎排障方法,或前往 Nintendo Switch 問答社群尋求幫助。
159等其他人完成本指南。


59条评论
My SD reader never worked.
Used this guide to find that it was never seated correctly. Reseated and now works perfectly. THANK YOU!
My console won’t boot if I have an SD card inserted after reseating it. What should I do?
Easy guide, fixed my problem. Changed the SD card reader cause I was abusing of it by putting SD in and out constantly.
Some one can help me, when I tried to put the connector again I damage the fpc connector of the motherboard so I try to find out again can any one know the kind of model of this connector I really appreciate the help
Best regards
Worked perfectly! The only issue I had was the Tripoint 000 bit that I ordered from here didn’t fit any screwdriver that I owned. So I used a vice grip to hold the bit.
Gracias, tenía el boot.bat error y esto me ayudó
Thanks i had boot.bat error and this help me
I have to give a BIG thanks to this thread! Nintendo offered to fix it for me with a 4 week wait, I didn’t want to give up my switch. So I bought all the tools and SD card reader suggested on this thread! Fixing it was super easy, mind u, I don’t have a steady hand so it took longer than the estimated time! But my switch now reads SD cards, I had already bought a 64 gig one, but since mine was faulty it wouldn’t read.
now I have all my games back, and didn’t have to send my switch anywhere! Thank u so much for having this post! I never would’ve thought to fix it myself.
Is it just me or does the parts listed under ‘Buy these parts’ link not include the needed tri-wing screwdriver?
I ordered this kit about a week ago and installed it today and Voila
Thanks ifixit.com for your website and Easy instructions for beginners like Me. Everything worked perfectly- from ordering the kit to repairing the card reader. I will definitely recommend your site to others and might be back to order anything else I might need in the future
be very careful when doing this. i did mine. then i turned it on to test, without putting all the screws back in. now my switch wont turn on.
It worked! My switch would never read the sd cards. Just got this today, followed the instructions and it worked! Make sure that it clicks on right, I had to re do it a second time to get it correctly but finally I have space in my sons switch!! Thank you!
I installed a new MicroSD card in my two year old switch for the first time today only to find out there was a fault. Followed your tutorial by disassembling the switch only to find the ribbon loosely connected.
Reconnected the ribbon, powered up the switch and it works perfectly!
Drop me your PayPal, would love to buy you a pint!
My ribbon was loose or detached as well - reseated it and all works well.
GREAT DIY ifixit article - thanks!!
Tips to newbies:
-I used a y 0.6 bit I had laying around, and LOTS of pressure, without any noticeable stripping of the screws
-BUT, the middle side screws preferred a y 2.0 bit per my experience
In the end the problem wasn’t solved by the card reader. Luckily Nintendo is opening up their repair centers again.
Awesome - was experiencing error codes 2002-2039 which I tracked down to the SD card or reader. Tried a couple of cards and then swapped out the reader using this guide. The Switch works fine now so thanks very much!
This was super easy to repair with the kit and walk through. The 15 year old is happy once again!
Ordered the parts and used this guide. Turns out my OM card reader wasn't seated properly, so it wasn't actually connected.
Nintendo would have asked for $100 for what turned out to be a 15minute fix. Keeping the parts I ordered just in case, plus they were only $15.
Thank you so much!
Fixed my nephews switch!
My SD card reader stopped working back in March. I was really dreading having to send my switch in for repairs, but when I found out I could do it myself I was really excited! I bought the part from here and I just finished the replacement. It reads my card just fine! The guide was really easy to follow for a beginner like me.
i installed this new card reader and it did not fix my sd card not reading issue. same exact no card reading as the original sd card reader
I bought my Nintendo Switch in January two years ago. Months later that I discovered that the SD memory card reader wasn’t working due to faulty connections or faulty part. It wasn’t until this month that I saw this replacement part on Amazon that I decided to buy it along with the necessary device-repair screwdriver kit. The kit and replacement part was under $20 excluding shipping, and I ordered it five days ago, and it arrived yesterday, and today I decided to do the repair following this instruction. It was easy, and fast as well. I did need to use tape to put the loose screws on in a way that kept the screws located similar to when screwed in, and I had to be careful as they’re so tiny, but fortunately the screwdriver was magnetic enough to help avoid losing any of them. I tried my Nintendo Switch compatible SD memory card, and turned it on. The new card reader works perfectly now. Thank you so much for this repair manual and the replacement part and repair kit. I definitely recommend this site and shop.
Great guide, just replaced my SD card reader with no problem!
This guide helped me replace the SD card reader. Easy to follow. Thanks for the guide! ?
Thanks for this great effort. I am not sure if the pins are attached correctly in the last step. unfortunately, the sd card still not working :(
Great guide up until the part where you have to, you know, actually replace the sd card reader. I watched this video to help with that part, but even then they weren’t clear about how they re-attached the sd card reader. What I did was remove the black foam thing and the old sd card reader, then aligned the connector of my new sd card reader with where the connector on the motherboard is. Holding that in place with one thumb, I held the metal part (where the actual slot is) in place with my other thumb (make sure you align it with the two gray pins on the left side) and then use another finger to press down on the ribbon. If you hear and a feel a click you know you did it correctly. Then just place the black foam piece back on and put everything back together :DD
You’re gonna have to do some guesswork about aligning the connector and the ribbon correctly, just don’t press too hard. I didn’t have to. Hope this helps
Dude thank you so much for going into the specifics on this- no other tutorial I found went into how to assure the connection to the motherboard was secure. I was trying to angle it flat and click it in but could't until I followed your steps. You rock.
My Switch had been randomly stating SD card removed when playing games, after trying a different SD card and having the same issue I concluded it was probably an issue with the SD card reader. I found the replacement part sold by iFixit, along with this guide.
No real problems following this guide, the main somewhat difficult part is aligning the connector for the SD card reader with the Switch’s motherboard. I used a torch so I could better see the connector on the motherboard then just did my best to accurately lay the connector over and gently press it in, that took a few minutes to eventually do as I didn’t want to force it and potentially break something.
SD card issues resolved and my Switch has plenty of storage once more!
Thank you to all involved making this possible!
Followed all of the steps above and the switch still says the MicroSD card is not inserted. Any other advice?
Even after replacing it, my SD card reader still won't work correctly, and I'm pretty sure it has something to do with the foam pad next to it. Is it safe to remove? Or should I replace it?
Sd card on my device never worked. Replaced it with this, still doesn’t work. Another $20 wasted.
It is key to remember most out of the box issues with the SD card reader, do not require a replacement part and can be solved with disconnecting then re-connecting the reader at the motherboard.
Only when a simple re-seating at the connector doesn't work should you buy the replacement part.
Thanks to this guide I could reconnect the sd card reader ribbon , everything is working ok
This guide was well-written. I could follow directions clearly and my sd reader works again!
My first ever fix! Thank you so much. What a great company :)
Worked! Thanks!
Es el mismo procedimiento para una oled???
This is a perfect walk-through. Thank you! I've completed this three time now. All three times the reader had simply disconnected itself. I didn't even need the card reader replacement.
Ezra Lange - 回复
BACK UP YOUR SDCaRD BEFORE DOING THIS TUTORIAL!! I HAD TO FORMAT MINE AGAIN AFTER CHANGING THE READER AND LOST ALL MY SAVE FILES ON IT!
Nice guide. 5/5. But my Sd card reader wouldn’t eject my Sd card and didn’t register when it was installed. So the product gets a 1. I ended up buying a used original card reader and I’ll see if that works instead.
you are a genius! my switch works perfectly! now I can download many more games. THANKS DUDE!!!
Guida perfetta per cambiare il lettore di micro sd non più funzionante...ora la switch è di nuovo utilizzabile a pieno! Grazie ancora per la precisione
AMAZING GUIDE!! I thought my micro sd reader had gone bust but I followed this AMAZING guide and reseated reader and followed it backwards just for it too work and allow me to use my new sd card. THANK YOU IFIXIT
I followed these steps to attempt my first electronics repair - reseating the micro SD card reader in my AC Switch that had never worked, as far as I knew.
It was very easy to follow the steps - I wrote them out in a repair log and labeled the magnetic mat beforehand with step numbers and drawn boxes where the screws would go.
Unfortunately, that didn't fix my problem. But now I've ordered the part, and hopefully that will take care of the problem. Thanks for the inspiration to repair instead of just living with the problem!
I had a memory card alert. The memory card slot wasn't reading the memory card. IFIXIT walked me through replacing it! I'm a 66 year old "Nintendo Gramma" . Even my shaky hands got it fixed!! I need my game machines to work. So much faster and affordable then sending it out. Thank you!!
Liz Pitman - 回复
SD card wasn’t staying fixed in the slot. So ordered this replacement. First time round I didn’t ensure the port and connecter in the memory card holder were properly connected and the switch froze when I tried to select memory card. Redid it and ensured a small click when they did connect. Powered up and works perfectly. Really pleased with this - actually very easy and clear instructions.
I advise folks to open up the Switch before ordering the part to see if the connector hasn't just disconnected because of a drop or some kind of force having popped the connector. When I opened mine to replace with the new part, the connector wasn't properly seated. I didn't bother to check that it was still working, having already ordered the part.
The tabs on the top and bottom edges of the rear cover are incredibly flimsy. One of them broke when I opened the back cover. The top and bottom screws also don't seem to screw into anything other than soft plastic.
Also odd: the new card reader didn't seem to want to attach to the motherboard's FPC connector, but the existing reader was able to be reconnected just fine. It feels like the new one was misaligned from the connector by a fraction of a millimeter.
Does this repair hold true for the Switch Lite? TIA
RR Treviño - 回复
Followed all the instructions, took me about three hours, still didn’t work 😞😞😞
Kann ich diese Anleitung auch für die OLED anwenden? Habe im INet sonst leider nichts brauchbares gefunden.
Ina Barz - 回复
backup all your sd card data i had to format mine after this tutorial and lost all my game data
JustForThisComment?ComeOn - 回复
do not watch the video! i broke the metal shielding on my switch because they didn't mention a screw!!!
Macro Man - 回复