跳转到主内容

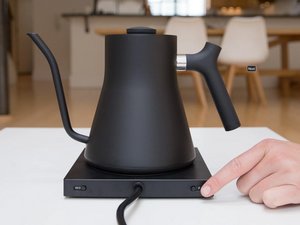
Hot water kettle with digital temperature control.

3 个问题 查看全部

Kettle won’t heat, base is fine

Hello,

Fellow has sent me thru the normal rigamorole with descaling, and when that didn’t work, sending a replacement base. The kettle is the problem, and now they are offering to replace the kettle. But I want mine to work, I don’t want to throw another unrecyclable piece of trash into the landfills.

Does anyone know how to start investigating what’s wrong with it, or anyone else who has successfully repaired a Fellow Kettle?

Thank you!
回答此问题 我也有这个问题

这是一个好问题吗?

得分 0
2条评论

@valentine89505 can you post some good pictures of the base and the bottom of the kettle.? Let's see how this all comes together. Do you have a multimeter and some basic hand tools, like screwdrivers etc?

在已经存在的问题里加入图片

完成的

Have you opened up the kettle? I know there's a fuse or maybe a diode that can go bad. Looking at how this is working may solve your issue.

完成的

添加一条评论

1个答案

最有帮助的答案

Based on what you're describing and what I was able to gather online, it sounds like your heating element has failed and you will need to replace the thermal fuse.

If you decide to attempt this repair yourself I strongly encourage you to document your repair so fellow (get it) Fellow Stagg EKG owners can benefit in the future. Learn how to create a guide on iFixit here.

I created some general guidance on what you can do below.

Safety First! Before you begin, remember that safety is paramount. Always disconnect your kettle from the power source before attempting any repairs or diagnostics. This precaution is crucial to prevent electric shock or damage to your device.

  1. Remove the screws. At the bottom of the base should be 3 triangle head screws, 2 3mm and 1 2mm. You can find the bit in your iFixit Pro Tech Toolkit, or feel free to buy one here and here.
    1. You can also use a Torx T7 and Torx T8 bit if you have those handy.
  2. Open the base. The bottom should open up easily once you've removed the screws, but you may need to pry it open using an opening tool (also found in the iFixit Pro Tech Toolkit). Prop it against something sturdy or hold it open with your wrist using your less-dominant hand. You'll need your other hand to turn more screws in the next step.
    1. Be careful! There is a blue wire that connects the base to the rest of the device, on the side where the spout is.
  3. Access the fuse. In the base, on the end nearest the handle, you'll find a white-sheath with a red wire coming out of it going into what looks like a wire nut. Beneath this wire is a small Phillips screw you need to remove in order to access the fuse. Once the screw is removed, you can remove the sheath around the fuse coming from the red wire.
    1. You may need to use tweezers to remove the screw as a magnetized driver doesn't always pick it up.
  4. Replace the fuse. The fuse is made by Microtemp, and the model number is G4a00 184C. G4 line is for 10A 250v which is 15A 120v. Aupo brand (Aupo BF184 10A) is another option.
    1. Use Crimp Connectors to remove the old fuse and attach the new one.
    2. If you don't have Crimp Connectors, you can use electrical tape to hold the new fuse together temporarily.
      1. Note that this is not a good option long-term and you should properly connect the new fuse with Crimp Connectors.
Micro Connector Crimper图片

产品

Micro Connector Crimper

$44.99

Pro Tech Toolkit图片

产品

Pro Tech Toolkit

$74.95

iFixit Opening Tool图片

产品

iFixit Opening Tool

$4.99

iFixit Precision 4 mm Screwdriver Bit图片

产品

iFixit Precision 4 mm Screwdriver Bit

$2.99

这个答案有帮助吗?

得分 3
添加一条评论

添加你的答案

Valentine 将永远感激不已
浏览统计数据:

过去 24 小时: 11

过去 7 天: 52

过去 30 天: 323

总计 1,170