跳转到主内容

iPod Touch 第5代 屏幕组件替换

你所需要的

  1. iPod Touch 第5代 屏幕组件替换, 前面板: 步骤 1 中的图像 1,3 iPod Touch 第5代 屏幕组件替换, 前面板: 步骤 1 中的图像 2,3 iPod Touch 第5代 屏幕组件替换, 前面板: 步骤 1 中的图像 3,3
    • 如果您的显示屏玻璃已经破裂,为了避免进一步的破损以及保护您的安全,请给破损的玻璃上粘贴胶带。

    • 在iPod的显示屏上贴上透明包装胶带,直到整个面板被覆盖。

    • 这样就不会在撬起和提起显示屏时造成额外的伤害。

    • 在维修过程中请戴上安全眼镜来保护您的眼睛避免细小的玻璃碎屑伤害到您的眼睛。

  2. iPod Touch 第5代 屏幕组件替换, 使用吹风机软化粘合剂。: 步骤 2 中的图像 1,1
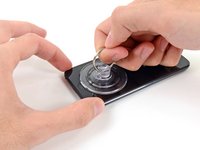
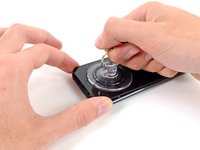
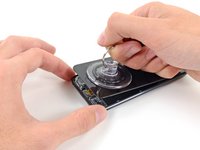
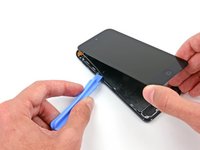
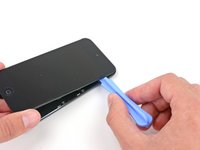
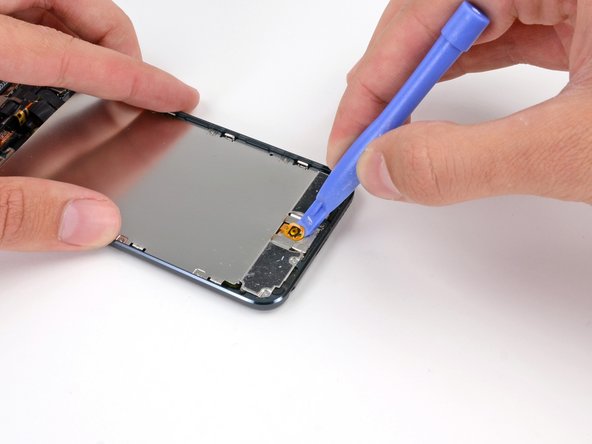
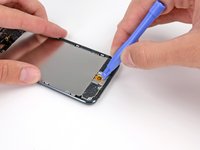
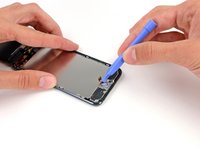
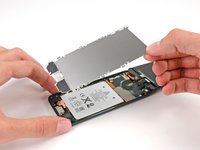
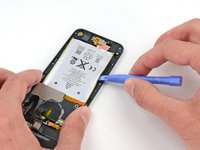
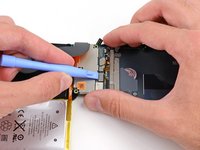
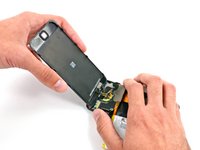
    • 屏幕的底部(接近Home键位置)粘合剂最强。

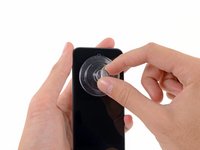
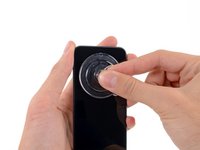
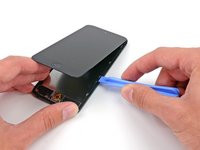
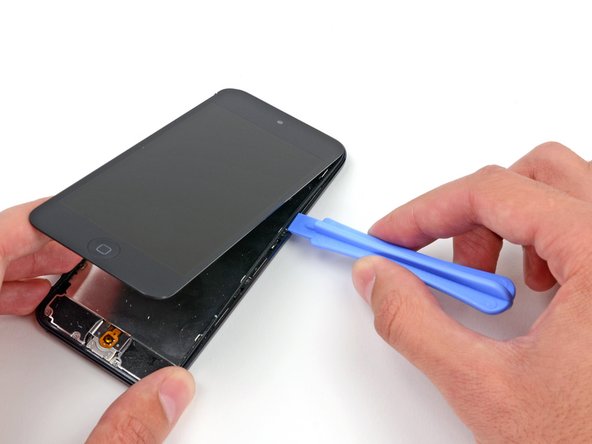
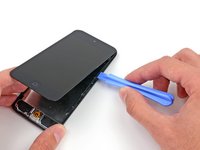
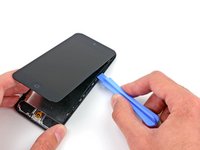
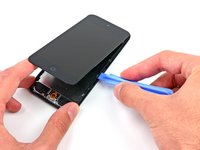
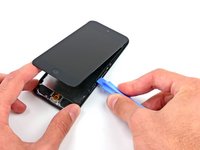
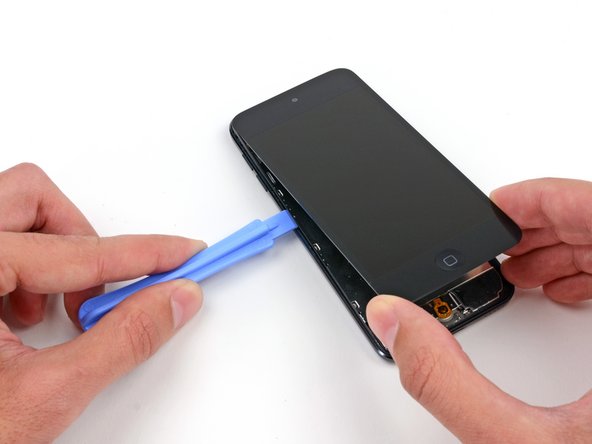
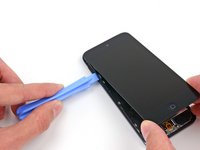
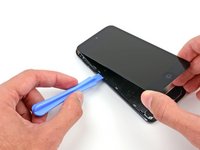
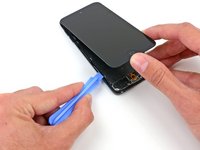
    • 使用热风枪或者吹风机(低档位)来软化粘合剂。

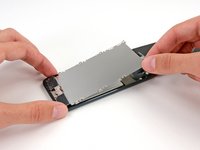
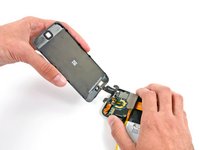
    • 在您进行下一步骤撬起屏幕前,您有可能需要再进一步加热来让粘合剂加温变得软化。
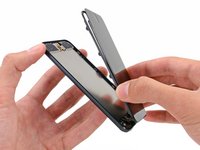
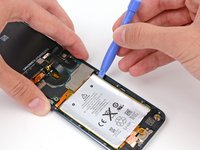
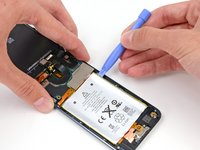
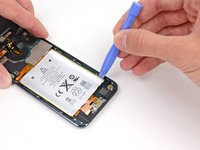
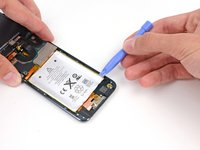
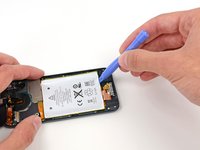
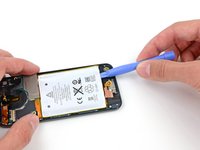
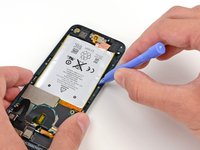
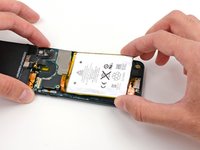
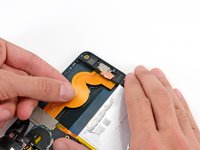
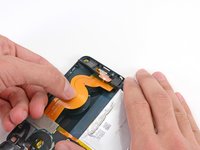
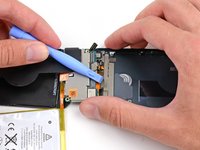
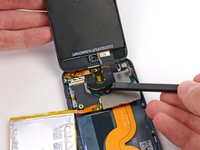
  3. iPod Touch 第5代 屏幕组件替换: 步骤 3 中的图像 1,2 iPod Touch 第5代 屏幕组件替换: 步骤 3 中的图像 2,2
    • 将吸盘放置于玻璃底部中心位置,Home键略微向上位置。

    • 按压吸盘,确保吸盘已经牢固吸住玻璃。

  4. iPod Touch 第5代 屏幕组件替换: 步骤 4 中的图像 1,3 iPod Touch 第5代 屏幕组件替换: 步骤 4 中的图像 2,3 iPod Touch 第5代 屏幕组件替换: 步骤 4 中的图像 3,3
    • 紧紧抓住桌面上的iPod。

    • 将拇指和食指放在显示屏的下角,以防止粘合剂断裂时显示屏打开得太远。

    • 将吸盘向上提起,朝向iPod的顶部。 耐心等待,并用力拉紧,直到粘合剂破裂,显示器从后壳上出来。

    • 可能需要使用热风枪来软化粘合剂(特别是在较冷的气候条件下)。 如果您可以将屏幕分开,但粘合剂仍然粘在一起,像披萨上的奶酪一样,您可以用剃刀刀片轻轻地切割粘合剂。

    • 显示器从后壳开始抬起之后,请小心不要抬起超过一英寸 - 一个易碎的塑料框架仍将显示屏组件连接到后壳。

  5. iPod Touch 第5代 屏幕组件替换: 步骤 5 中的图像 1,3 iPod Touch 第5代 屏幕组件替换: 步骤 5 中的图像 2,3 iPod Touch 第5代 屏幕组件替换: 步骤 5 中的图像 3,3
    • 在以下步骤中,您将松动并释放屏幕周围的塑料框架。 它用几个夹子连接到后壳。

    • 从设备的右上方开始,将塑料打开工具插入塑料框架和铝后壳之间的间隙中。

    • 将工具向下滑动,从外壳中松开框架。

  6. iPod Touch 第5代 屏幕组件替换: 步骤 6 中的图像 1,2 iPod Touch 第5代 屏幕组件替换: 步骤 6 中的图像 2,2
    • 将塑料打开工具插入框架和后壳之间的第一个夹子后面。

    • 将工具横向晃动,将夹子从后面的间隙中释放,并将其与后壳分开。

    • 释放一个夹子是不够的,每个夹子都需要重复以上的操作。

  7. iPod Touch 第5代 屏幕组件替换: 步骤 7 中的图像 1,2 iPod Touch 第5代 屏幕组件替换: 步骤 7 中的图像 2,2
    • 对这一侧的两个夹子重复刚才的操作。

    • 您可能设备之间来回撬动所有这些夹子。 花时间,小心且耐心,因为塑料框架很脆弱。

  8. iPod Touch 第5代 屏幕组件替换: 步骤 8 中的图像 1,3 iPod Touch 第5代 屏幕组件替换: 步骤 8 中的图像 2,3 iPod Touch 第5代 屏幕组件替换: 步骤 8 中的图像 3,3
    • 移步到设备的左边,将塑料打开工具插入到顶部塑料框架和铝制后壳的缝隙之间。

    • 向下滑动,来将框架从后壳中分离。

  9. iPod Touch 第5代 屏幕组件替换: 步骤 9 中的图像 1,2 iPod Touch 第5代 屏幕组件替换: 步骤 9 中的图像 2,2
    • 将塑料打开工具插入到左侧框架和后壳之间的第一个卡扣上。

    • 摆动工具,来将卡扣从缝隙之间松开。

  10. iPod Touch 第5代 屏幕组件替换: 步骤 10 中的图像 1,2 iPod Touch 第5代 屏幕组件替换: 步骤 10 中的图像 2,2
    • 在接下来的两个卡扣上重复先前的操作。

    • 在塑料框架和铝制后壳上的第二个卡扣之间插入塑料打开工具。

    • 晃动工具,来使得卡扣从外壳上释放。

  11. iPod Touch 第5代 屏幕组件替换: 步骤 11 中的图像 1,2 iPod Touch 第5代 屏幕组件替换: 步骤 11 中的图像 2,2
    • 按照相同方法。松开最后一个将塑料框架与外壳固定的卡扣。

  12. iPod Touch 第5代 屏幕组件替换: 步骤 12 中的图像 1,3 iPod Touch 第5代 屏幕组件替换: 步骤 12 中的图像 2,3 iPod Touch 第5代 屏幕组件替换: 步骤 12 中的图像 3,3
    • 将塑料打开工具插入到iPod顶部 显示组件和后壳之中。

    • 轻轻转动打开工具来将前面板从后壳上撬起。

    • 将显示组件与iPod分离。

    • 切勿尝试完全分离前面板,他仍连接着许多条线缆。

  13. iPod Touch 第5代 屏幕组件替换, LCD 屏蔽板: 步骤 13 中的图像 1,2 iPod Touch 第5代 屏幕组件替换, LCD 屏蔽板: 步骤 13 中的图像 2,2
    • 轻轻地将显示屏折叠远离iPod的其余部分,注意不要断开或断开任何带状电缆。 将两半平放在桌子或长凳上。

    • 使用塑料打开工具从LCD板上撬起Home键开关。

    • 可能需要使用热风枪或吹风机来软化Home键背面的粘合剂。 始终用低热。

    • 因为仍连接到LCD板下面的组件,所以不要尝试移走Home键。

  14. iPod Touch 第5代 屏幕组件替换: 步骤 14 中的图像 1,1
    • 移除下列将LCD板与后壳固定的螺丝。

    • 2颗1.2mm #00 十字螺丝

    • 9颗 1.6mm #00 十字螺丝

    • 1颗 2.3 mm #00 十字螺丝

  15. iPod Touch 第5代 屏幕组件替换: 步骤 15 中的图像 1,2 iPod Touch 第5代 屏幕组件替换: 步骤 15 中的图像 2,2
    • 将LCD板从iPod上抬起。

  16. iPod Touch 第5代 屏幕组件替换, 电池: 步骤 16 中的图像 1,1
    • 移除三颗将后壳与逻辑板相固定的 1.6 mm #00 十字螺丝

  17. iPod Touch 第5代 屏幕组件替换, 使用热风枪和吹风机来加热iPod的背面。: 步骤 17 中的图像 1,1
    • 这里有两条胶带将电池固定到位。

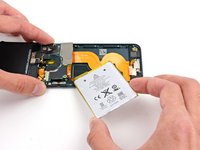
    • 将iPod翻转到背面,铝制后壳上。 切勿加热电池。

    • 铝合金外壳不必太烫; 随时使用手指触碰确保不会加热过热。

  18. iPod Touch 第5代 屏幕组件替换: 步骤 18 中的图像 1,2 iPod Touch 第5代 屏幕组件替换: 步骤 18 中的图像 2,2
    • 电池两侧有三个凹口。 在接下来的几个步骤中,您将使用这些凹槽逐渐从后盖撬起电池。

    • 电池用大量的粘合剂固定,所以您需要慢慢地小心,以避免刺伤或弯折电池。

    • 将塑料打开工具插入右上角的凹槽,轻轻地撬起电池。

    • 此时不要试图撬起整个电池; 您只需要依次开始在每个撬动点松开粘合剂。

  19. iPod Touch 第5代 屏幕组件替换: 步骤 19 中的图像 1,2 iPod Touch 第5代 屏幕组件替换: 步骤 19 中的图像 2,2
    • 继续在右下角。 将塑料打开工具插入凹口,轻轻地撬起电池侧面。

  20. iPod Touch 第5代 屏幕组件替换: 步骤 20 中的图像 1,2 iPod Touch 第5代 屏幕组件替换: 步骤 20 中的图像 2,2
    • 继续从底部撬起电池。

    • 沿着底部撬动时,请注意不要过度用力压到扬声器或耳机插孔。

  21. iPod Touch 第5代 屏幕组件替换: 步骤 21 中的图像 1,2 iPod Touch 第5代 屏幕组件替换: 步骤 21 中的图像 2,2
    • 左侧也要撬动

    • 您可能需要在电池的侧面和底部之间来回移动,一次撬动少量电池,直到电池完全脱离胶粘剂。

  22. iPod Touch 第5代 屏幕组件替换: 步骤 22 中的图像 1,3 iPod Touch 第5代 屏幕组件替换: 步骤 22 中的图像 2,3 iPod Touch 第5代 屏幕组件替换: 步骤 22 中的图像 3,3
    • 一旦所有的粘合剂松动,将电池从底部提起并将其从背面的左侧区取出。

    • 确保不要把它弄出来,因为它被焊接到逻辑板上。

    • 将电池翻转以拉直电缆并将其放下。

  23. iPod Touch 第5代 屏幕组件替换, 前置摄像头: 步骤 23 中的图像 1,2 iPod Touch 第5代 屏幕组件替换, 前置摄像头: 步骤 23 中的图像 2,2
    • 使用撬棒扁平一端来将前置摄像头从显示组件的插座中撬出。

  24. iPod Touch 第5代 屏幕组件替换, Lightning 连接头组件: 步骤 24 中的图像 1,1
    • 使用撬棒的尖端将一小块覆盖耳机插孔侧面螺丝的胶带剥离。

  25. iPod Touch 第5代 屏幕组件替换: 步骤 25 中的图像 1,1
    • 移除将耳机孔 Lighting接口 和扬声器 固定的螺丝。

    • 3颗2.6mm #00 十字螺丝。

    • 2颗2.0mm #00十字螺丝。

  26. iPod Touch 第5代 屏幕组件替换: 步骤 26 中的图像 1,1
    • 使用撬棒扁平一端将扬声器从后壳上撬起。

    • 切勿尝试完全移走扬声器,其仍与Lighting插头组件连接。

  27. iPod Touch 第5代 屏幕组件替换: 步骤 27 中的图像 1,2 iPod Touch 第5代 屏幕组件替换: 步骤 27 中的图像 2,2
    • 抓住大的排线,轻轻地拉动排线将Lighting连接组件从后壳中拉出。

  28. iPod Touch 第5代 屏幕组件替换, 屏幕组件: 步骤 28 中的图像 1,2 iPod Touch 第5代 屏幕组件替换, 屏幕组件: 步骤 28 中的图像 2,2
    • 将整个组件翻转平放,露出整个逻辑板。

    • 使用塑料打开工具来断开逻辑板上的数字化线缆。

  29. iPod Touch 第5代 屏幕组件替换: 步骤 29 中的图像 1,2 iPod Touch 第5代 屏幕组件替换: 步骤 29 中的图像 2,2
    • 使用塑料打开工具来从逻辑板上的插座中断开数字化线缆。

  30. iPod Touch 第5代 屏幕组件替换: 步骤 30 中的图像 1,3 iPod Touch 第5代 屏幕组件替换: 步骤 30 中的图像 2,3 iPod Touch 第5代 屏幕组件替换: 步骤 30 中的图像 3,3
    • 将Lightning连接器/逻辑板组件翻转来露出逻辑板的顶部。

    • 显示线缆轻轻地粘在逻辑板的顶部。

    • 使用撬棒扁平一端来将显示线缆从逻辑板上剥下来。

  31. iPod Touch 第5代 屏幕组件替换: 步骤 31 中的图像 1,2 iPod Touch 第5代 屏幕组件替换: 步骤 31 中的图像 2,2
    • 从iPod的上移走显示组件。

结论

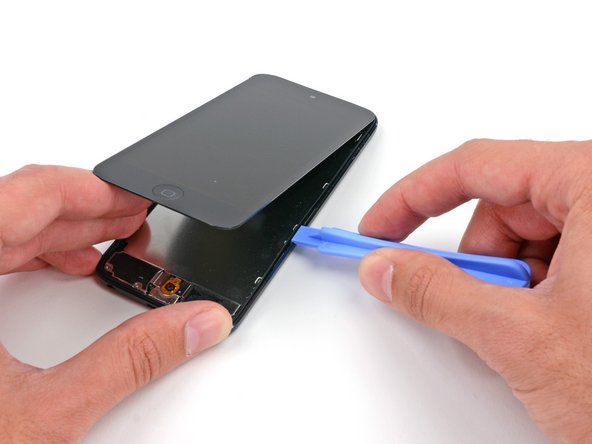
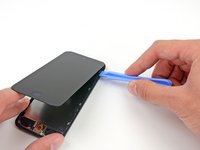
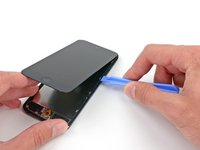
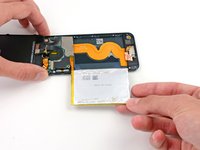
若要重新组装你的设备,按照以下步骤逆序操作。

200等其他人完成本指南。

由衷感谢以下译者:

en zh

100%

这些译者帮助我们修补全世界! 您也想加入吗?
开始翻译 ›

团队

iFixit iFixit 的会员

Staff

135 名成员

创作了16,476篇指南

32条评论

There is a major problem with the information provided here.

I followed the advice of the staff and purchased on eBay a replacement glass with tools for our cracked glass problem. I then began to follow the guide shown here.

The first major problem is that the suction cup will not pull off the glass. I tried the suction on various surfaces, and it's very strong. So no doubt, the problem is the fact that the glass is cracked. But that's the whole reason we're trying to take it apart. Secondly, if this guide doesn't apply to cracked glass, that should be clearly stated and possible another guide should be provided.

As it is now, removing the "glass" from the foamy "gasket" underneath was nearly impossible, and the local tech now tells me that in this condition, it's essentially worthless.

Dave Kitabjian - 回复

I don't know about Ipods, but I have worked on Samsung phones in their repair facility and to lift our digitizers from the lcd assembly you have to heat them up a little bit with a heat gun first. The heat loosens the adhesive tape that holds the digitizer down. Once that glue on the tape becomes pliable you should be able to lift it up. Hope this helps.

pau -

One more thing - ignore your local tech. Anything can be fixed unless its been sitting in water. They just want their service fee.

If you've got the confidence to try this repair (which it sounds like you do) and google and youtube too - you can do this.

pau -

I tried multiple times to remove the screen after heating it thoroughly with a hair drier. True, not a heat gun, but the display was well heated. The screen wouldn't budge with a suction cup a bit smaller than the one pictured above. My eureka moment was when I remembered the suction-cup on a car cellphone holder. The edges of the cup just exceed the size of the display, but I was able to turn the ring that "tightened" the suction. I pulled firmly on the base of the cellphone holder, and after a minute or so the display started pulling away. The key was being able to apply an even, slow pull.

Lance -

would Covering entire display with the packaging tape change anything?

Or you did & still thumbs down?

Prosit

PURCHASE -

添加评论

浏览统计数据:

过去 24 小时: 12

过去 7 天: 62

过去 30 天: 323

总计 281,788