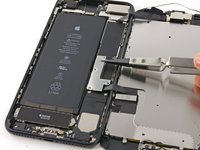
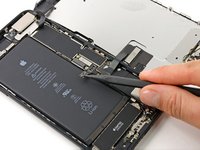
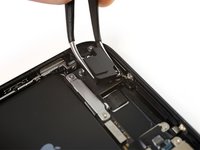
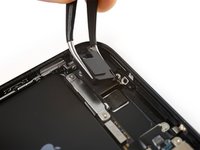
跳转到主内容

iPhone 7 Plus 顶端左天线更换

你所需要的

  1. iPhone 7 Plus 顶端左天线更换, 五角梅花螺丝: 步骤 1 中的图像 1,1
    • 开始这一过程前,请将iPhone电量放至25%以下,电量过高可能使得锂电池在意外情况下更容易起火或爆炸。

    • 在拆解前,确保你的iPhone已经关机。

    • 移除位于手机底部的两颗3.4 mm五角梅花螺丝

    • 打开iPhone的显示屏将导致防水密封被破坏。 所以请准备好新的密封胶。未更换密封胶的情况下重新组装的iPhone将不再具有防泼溅功能。

  2. iPhone 7 Plus 顶端左天线更换, 拆机步骤: 步骤 2 中的图像 1,1
    • 加热 iPhone 的下方可以软化粘合剂,让拆解更轻松。

    • 用吹风机或者准备一个 iOpener 来加热 iPhone 下方大概一分钟,以软化屏幕下方的粘合剂

  3. iPhone 7 Plus 顶端左天线更换: 步骤 3 中的图像 1,2 iPhone 7 Plus 顶端左天线更换: 步骤 3 中的图像 2,2
    • 在前面板的下半部分放置一个吸盘,正好位于Home按钮的上方。

    • 确保吸盘与Home按钮不重叠,以确保吸盘和前玻璃之间能形成密封状态。

    • 如果您的屏幕已经严重损坏,使用透明胶带将其粘好可以让吸盘固定。或者您也可以用非常强力的胶带来替代吸盘。如果这些都失败的话,您可以用万能胶将吸盘和破损的屏幕粘在一起。

  4. iPhone 7 Plus 顶端左天线更换: 步骤 4 中的图像 1,3 iPhone 7 Plus 顶端左天线更换: 步骤 4 中的图像 2,3 iPhone 7 Plus 顶端左天线更换: 步骤 4 中的图像 3,3
    • 以固定的恒定拉力上拉吸盘,来使得前面板和后壳之间产生轻微的间隙。

    • 将撬起工具的扁端插入间隙。

    • 固定显示器的防水粘合剂非常坚固; 创造这个初始差距需要很大的力量。 如果你很难打开缝隙,上下摇晃屏幕以削弱粘合剂,直到你可以插入撬起工具。

    • 在向上拉起吸盘的同时,旋转撬起工具以加宽屏幕和后壳之间的开口。

  5. iPhone 7 Plus 顶端左天线更换: 步骤 5 中的图像 1,3 iPhone 7 Plus 顶端左天线更换: 步骤 5 中的图像 2,3 iPhone 7 Plus 顶端左天线更换: 步骤 5 中的图像 3,3
    • 在iPhone左下角的前面板和后壳之间插入撬起工具的扁端。

    • 沿着手机的左边缘滑动撬起工具,从下方开始朝向音量控制按钮和静音开关移动,来将显示屏的粘合剂破开。

    • 不要尝试将显示器顶部从后壳上撬开,因为那里有塑料卡勾固定,可能会被损坏。

  6. iPhone 7 Plus 顶端左天线更换: 步骤 6 中的图像 1,2 iPhone 7 Plus 顶端左天线更换: 步骤 6 中的图像 2,2
    • 将撬起工具从左边取出,再从右下角插入。

    • 从下至上的滑动撬起工具来破开固定显示器的背胶。

  7. iPhone 7 Plus 顶端左天线更换: 步骤 7 中的图像 1,2 iPhone 7 Plus 顶端左天线更换: 步骤 7 中的图像 2,2
    • 上拉吸盘来上提显示屏以及打开iPhone。

    • 不要将显示屏提起超多10°,因为沿着设备右边有连接显示屏和逻辑板的细软性电路板。

  8. iPhone 7 Plus 顶端左天线更换: 步骤 8 中的图像 1,2 iPhone 7 Plus 顶端左天线更换: 步骤 8 中的图像 2,2
    • 上拉吸盘上的小突块,将吸盘从前面板上取下。

  9. iPhone 7 Plus 顶端左天线更换: 步骤 9 中的图像 1,2 iPhone 7 Plus 顶端左天线更换: 步骤 9 中的图像 2,2
    • 沿着手机顶部的边缘开口,使用开启塑料片滑动,以松开最后粘合剂。

  10. iPhone 7 Plus 顶端左天线更换: 步骤 10 中的图像 1,3 iPhone 7 Plus 顶端左天线更换: 步骤 10 中的图像 2,3 iPhone 7 Plus 顶端左天线更换: 步骤 10 中的图像 3,3
    • 将显示屏组件拉到略微远离手机的顶部边缘,使其脱离将显示器固定至后壳上的卡勾。

    • 通过从左侧摆动显示屏来打开iPhone,就像翻开一本书的封底页。

    • 此时,先不要尝试将显示屏完全取开,因为还有一些脆弱的排线仍然连接着iPhone的主板。

  11. iPhone 7 Plus 顶端左天线更换, 电池的连接器: 步骤 11 中的图像 1,1
    • 卸下四颗将下方显示线缆保护片固定至逻辑版的三端Y000螺丝:

    • 三颗1.2 mm螺丝

    • 一颗2.6 mm螺丝

  12. iPhone 7 Plus 顶端左天线更换: 步骤 12 中的图像 1,2 iPhone 7 Plus 顶端左天线更换: 步骤 12 中的图像 2,2
    • 卸下下方显示线缆保护片

  13. iPhone 7 Plus 顶端左天线更换: 步骤 13 中的图像 1,3 iPhone 7 Plus 顶端左天线更换: 步骤 13 中的图像 2,3 iPhone 7 Plus 顶端左天线更换: 步骤 13 中的图像 3,3
    • 使用撬棒的尖端从逻辑板的插座上撬起并断开电池的连接。

    • 向上轻轻翻开连接器线缆,以防止其意外触碰连接到插座并给手机供电。

  14. iPhone 7 Plus 顶端左天线更换, 显示屏总成: 步骤 14 中的图像 1,3 iPhone 7 Plus 顶端左天线更换, 显示屏总成: 步骤 14 中的图像 2,3 iPhone 7 Plus 顶端左天线更换, 显示屏总成: 步骤 14 中的图像 3,3
    • 确保电池接口是断开的。

    • 使用撬棒的平端或者指甲以撬开两个下部显示连接器,笔直地从逻辑版的插座上撬起。

    • 若要重新安装连接器,向下按压直到其到位,接着重复按下另一端。请不要按压中部。若连接器未对准,可能会弯曲从而造成永久损伤。

    • 如果你在重新组装手机时有空白屏幕,显示屏上有白线,或部分、完全没有触摸响应,请尝试断开连接并小心地重新连接这两根电缆,并确保它们完全就位。

  15. iPhone 7 Plus 顶端左天线更换: 步骤 15 中的图像 1,3 iPhone 7 Plus 顶端左天线更换: 步骤 15 中的图像 2,3 iPhone 7 Plus 顶端左天线更换: 步骤 15 中的图像 3,3
    • 卸下三颗固定前部面板传感器组件连接器的保护盖的三端Y000螺丝。

    • 一颗1.3mm螺丝

    • 两颗1.0mm螺丝

    • 卸下保护盖。

  16. iPhone 7 Plus 顶端左天线更换: 步骤 16 中的图像 1,2 iPhone 7 Plus 顶端左天线更换: 步骤 16 中的图像 2,2
    • 从逻辑板的插座上断开前部面板传感器总成连接器。

    • 这种按压连接器应该小心避免弯曲损伤。

  17. iPhone 7 Plus 顶端左天线更换: 步骤 17 中的图像 1,1
  18. iPhone 7 Plus 顶端左天线更换, 左 Wi-Fi 天线: 步骤 18 中的图像 1,1
    • 移除三颗固定天线的十字螺丝。

    • 两颗 1.3 mm 螺丝

    • 一颗 1.2 mm 螺丝

  19. iPhone 7 Plus 顶端左天线更换: 步骤 19 中的图像 1,1
    • 移除 1.3 mm 十字螺丝,此螺丝把天线固定到后盖的顶端。

  20. iPhone 7 Plus 顶端左天线更换: 步骤 20 中的图像 1,3 iPhone 7 Plus 顶端左天线更换: 步骤 20 中的图像 2,3 iPhone 7 Plus 顶端左天线更换: 步骤 20 中的图像 3,3
    • 这个螺丝是藏在 iPhone 顶端的边缘。

    • 朝手机的顶端转动天线。

    • 把螺丝划出来。

  21. iPhone 7 Plus 顶端左天线更换: 步骤 21 中的图像 1,1
    • 移除顶端左天线。

结论

请按照逆序重组你的设备。

22等其他人完成本指南。

由衷感谢以下译者:

en zh

100%

Yuting Zhao正在帮助我们修复这个世界! 您也想加入吗?
开始翻译 ›

Paige Reisman

于04/07/14注册

23,586 声望

创作了15篇指南

5条评论

thank you so much…

Muhammed AÇIKGÖZ - 回复

my phone has not been saying no service and when i opened it up this piece was missing. Is this piece missing causing me to not get service?

Neamul Islam - 回复

great guide, works for the regular 7 too

Bryan Cruse - 回复

Very precise ,thank you Paige

Tony 8/11/20

tony vital - 回复

This is only the antenna cover. Why is it sold and labeled as top left antenna ?

Jean-Claude Cantave - 回复

添加评论

浏览统计数据:

过去 24 小时: 11

过去 7 天: 52

过去 30 天: 233

总计 56,217