跳转到主内容

iPad Mini CDMA LCD 组件更换

仅作为前提条件
本指南仅用作其他指南的先决条件。不能单独食用。

你所需要的

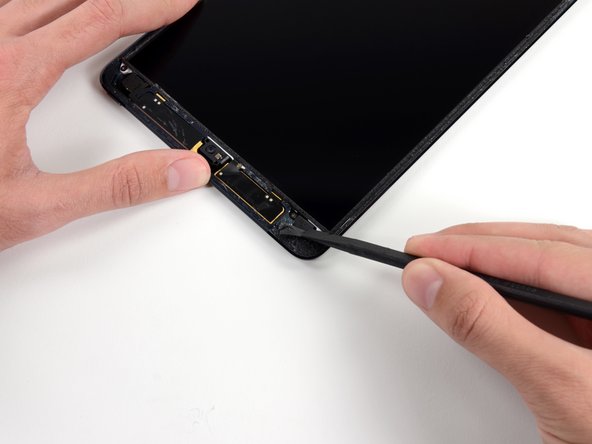
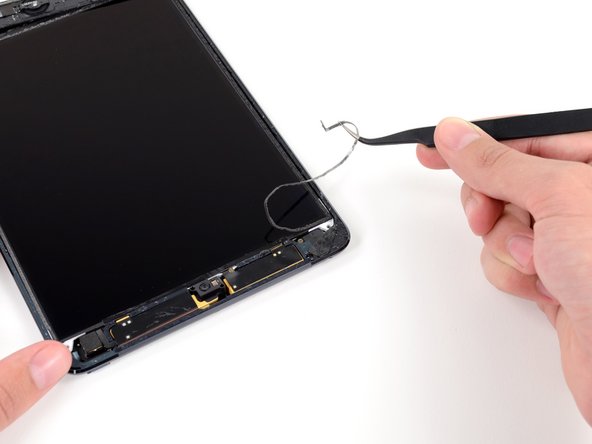
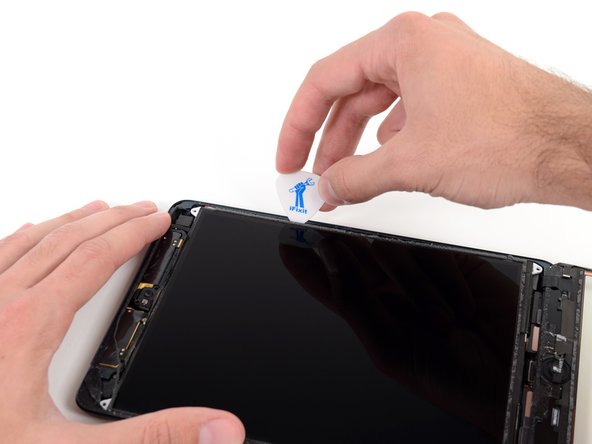
  1. iPad Mini CDMA LCD 组件更换, LCD 组件: 步骤 1 中的图像 1,3 iPad Mini CDMA LCD 组件更换, LCD 组件: 步骤 1 中的图像 2,3 iPad Mini CDMA LCD 组件更换, LCD 组件: 步骤 1 中的图像 3,3
    • 小的海绵胶带保护着顶部,底部右手边有螺丝将LCD与后壳相固定。

    • 使用镊子取下保护右上侧LCD螺丝的长方形海绵胶带。

    • 取下右下方LCD螺丝上的长方形胶带。

  2. iPad Mini CDMA LCD 组件更换: 步骤 2 中的图像 1,2 iPad Mini CDMA LCD 组件更换: 步骤 2 中的图像 2,2
    • 左上方的LCD螺丝有可能被胶带所覆盖。

    • 如果有的话,使用撬棒扁平的一端来撬起,露出下方的LCD螺丝。

  3. iPad Mini CDMA LCD 组件更换: 步骤 3 中的图像 1,1
    • 移除将LCD与后壳固定的四颗3.9 mm Phillips #000 螺丝。

    In my case the 4 screws are not the same. One is 4mm, and 3 of 3.5mm, or better 2 x 3.5mm and one 3.45mm. I put the longest one at the left edge at left of the LCD flat cable.

    mitja

    Mitja Jankovic - 回复

    Hi Mitja. I just checked the measurements with an electronic digital caliper. I got 3.9 mm for all four screws. Are you sure it was the same model? Thanks.

    Walter Galan -

    The top left screw is longer than the other 3 - iPad mini Retina Wi-Fi.

    sandro - 回复

    On mine the top right screw is longer

    oliver - 回复

    top right is longer on an ipad mini 2 retina wifi 32GB

    sagert - 回复

    ipad mini wifi no screws are longer

    iliketrains kid - 回复

  4. iPad Mini CDMA LCD 组件更换: 步骤 4 中的图像 1,2 iPad Mini CDMA LCD 组件更换: 步骤 4 中的图像 2,2
    • 使用镊子来将LCD框架与右侧扬声器连接的胶带剥离。

    I wonder what does this sticker stands for…

    K8L - 回复

  5. iPad Mini CDMA LCD 组件更换: 步骤 5 中的图像 1,3 iPad Mini CDMA LCD 组件更换: 步骤 5 中的图像 2,3 iPad Mini CDMA LCD 组件更换: 步骤 5 中的图像 3,3
    • LCD框架上贴着一条薄薄的海绵胶带,将LCD面板下方的胶带相连接。 要继续,你需要将其破坏然后剥离一些,暴露下方的胶带。

    • 使用薄口镊子拉起LCD周围的泡沫胶带的顶部。

    • 不要用镊子触碰液晶显示器,否则可能会损坏显示屏。

    • 使用镊子将泡沫胶带剥去以暴露液晶显示屏的顶部。

  6. iPad Mini CDMA LCD 组件更换: 步骤 6 中的图像 1,3 iPad Mini CDMA LCD 组件更换: 步骤 6 中的图像 2,3 iPad Mini CDMA LCD 组件更换: 步骤 6 中的图像 3,3
    • 在LCD框与LCD顶部胶带之间插入撬棒的尖端。

    • 在LCD框与胶带之间滑动,将胶带与LCD框相分离。

    I finished a successful replacement of my screen following these instructions. Thanks.

    Step 36 (remove tape from LCD perimeter), however, seems unnecessary. I ended up spending a lot of time separating the tape from the LCD frame only to discover it was not necessary for steps 37-44 and actually made things really difficult for step 45-46 (removing the tape near the speakers). Finally, steps 45-46 can be skipped since it is much easier to remove this tape once you flip the LCD over (Step 55).

    Kenneth Snyder - 回复

  7. iPad Mini CDMA LCD 组件更换: 步骤 7 中的图像 1,2 iPad Mini CDMA LCD 组件更换: 步骤 7 中的图像 2,2
    • LCD金属屏蔽版与LCD使用胶水在其顶部左侧和右侧的边角相粘连。 为了安全分离这些粘合剂,你需要使用吉他拨片来移动几毫米。

    • 在LCD与后壳靠近左上角的位置插入吉他拨片

    • 小心向外弯曲拨片,不需要撬开过大的缝隙。

    I found a very simple method for removing the LCD from the metal shield. Slightly lift one of the top corners and insert a 1' piece of fishing line. Insert the line under the other top corner placing the length between the LCD and shield. Once in place, gently pull each end toward the bottom of the LCD breaking the adhesive as you go. This will make things much easier than using the picks and possibly breaking the LCD.

    bababooey - 回复

    The fishing line trick is amazing… although i had already broken the LCD when i saw that comment. Good Learn!

    Brandon Lukasik - 回复

    This step is what destroys my LCDs :(

    Dan Harris - 回复

    Just destroyed my LCD as well. A red warning remarking is missing here! The LCD assembly is very fragile an cannot be bent, even slightly!!

    brauliox - 回复

    I have broken about 10 of the 50 or so iPad minis that I have repaired. I always try to have a LCD on hand. I’ll have to try the fishing line trick!

    northstar - 回复

    I also recommend doing step 45 first (removing the two pieces of foam tape at the bottom).

    northstar - 回复

    I was able to do this the first time w/out damaging the LCD simply by following the instructions to the letter, slowly and carefully. The only thing I did differently was to follow Northstar’s instructions to remove the two pieces of tape at the bottom of the LCD before beginning.

    Jenny Lawson - 回复

    I found a good way to remove the LCD without breaking it. Once you finish to clean up around the LCD just lift a bit one of the white metal backing plate and insert in the gap a plastified playing card under le LCD and slowly make your way to the center of the LCD. Repeat on the other side and the LCD will lift up intact.

    lemerise - 回复

    nothing Brocken after

    (I did not read the comments before doing it lol)

    iliketrains kid - 回复

  8. iPad Mini CDMA LCD 组件更换: 步骤 8 中的图像 1,3 iPad Mini CDMA LCD 组件更换: 步骤 8 中的图像 2,3 iPad Mini CDMA LCD 组件更换: 步骤 8 中的图像 3,3
    • 将吉他拨片器入液晶显示屏左侧的三个位置,并在每个位置弯曲,将液晶显示转到后壳的右侧。

  9. iPad Mini CDMA LCD 组件更换: 步骤 9 中的图像 1,3 iPad Mini CDMA LCD 组件更换: 步骤 9 中的图像 2,3 iPad Mini CDMA LCD 组件更换: 步骤 9 中的图像 3,3
    • 现在到了液晶显示屏的右侧,并沿着旁边的几个地方使用吉他拨片撬动,将液晶显示屏移回左边。

    • 重复此操作和上一步骤几次,直到LCD容易左右移动。

  10. iPad Mini CDMA LCD 组件更换: 步骤 10 中的图像 1,3 iPad Mini CDMA LCD 组件更换: 步骤 10 中的图像 2,3 iPad Mini CDMA LCD 组件更换: 步骤 10 中的图像 3,3
    • 在接下来几步中,你将使用撬棒在LCD与金属背板之间滑动来将LCD从下方的粘合剂中分离出来。

    • 将撬棒扁平的一端插入LCD框与金属背板之间。

    • 确保撬棒位于LCD框与背板之间,而不是在背板的下方。 撬起背板将会损坏部件,因为在LCD下方螺丝将背板与后壳固定。

  11. iPad Mini CDMA LCD 组件更换: 步骤 11 中的图像 1,3 iPad Mini CDMA LCD 组件更换: 步骤 11 中的图像 2,3 iPad Mini CDMA LCD 组件更换: 步骤 11 中的图像 3,3
    • 从设备的右上角开始,将撬棒滑入LCD框和金属背板之间,当您推动撬棒时也会分离两者之间的粘合剂。

    • 我们的目标是分离粘合剂,而不是撬起LCD。 所以尽量小角度撬动,防止损伤LCD。

    • 如果在LCD边角处深入撬棒会使得LCD弯曲,使用吉他拨片来重复上述动作来进一步分离粘合剂。

    These steps were hard. I was too scared that I was going to brake the LCD. Luckily I got it off! Don’t know how delicate these things are and how much force they can take.

    Padraic Hoselton - 回复

  12. iPad Mini CDMA LCD 组件更换: 步骤 12 中的图像 1,3 iPad Mini CDMA LCD 组件更换: 步骤 12 中的图像 2,3 iPad Mini CDMA LCD 组件更换: 步骤 12 中的图像 3,3
    • 重复先前的步骤来分离LCD顶部。

    • 将撬棒扁平的一端插入LCD框与金属背板之间,小心地在顶部推动撬棒,分离粘合剂。

  13. iPad Mini CDMA LCD 组件更换: 步骤 13 中的图像 1,3 iPad Mini CDMA LCD 组件更换: 步骤 13 中的图像 2,3 iPad Mini CDMA LCD 组件更换: 步骤 13 中的图像 3,3
    • 在LCD左侧继续进行相同的操作,将撬棒扁平的一端尽可能深的插入LCD和背板之间。

    • 这时,LCD应该与固定的粘合剂分离了,如果没有的话,重新在右侧或者顶部插入撬棒来完全分离LCD。

  14. iPad Mini CDMA LCD 组件更换: 步骤 14 中的图像 1,1
    • 从后壳上抬起LCD几英寸,来确保它已完全与粘合剂相分离。

    When I did it I found that the adhesive sticking was mainly on the edges, so if you take a spudger and just break that adhesive carefully it will help. Be gentle lifting the lcd as it’s very breakable.

    Jasper Holden - 回复

  15. iPad Mini CDMA LCD 组件更换: 步骤 15 中的图像 1,2 iPad Mini CDMA LCD 组件更换: 步骤 15 中的图像 2,2
    • 两条宽胶带将LCD与扬声器相连。

    • 一只手拿着LCD, 另一只手将撬棒扁平一端插入左扬声器与胶带之间的空隙之间。

    • 将液晶显示器从扬声器中轻轻拉出,同时向外旋转撬棒将胶带与扬声器分离。

    I recommend removing these two pieces of foam tape prior to loosening and lifting the LCD.

    northstar - 回复

  16. iPad Mini CDMA LCD 组件更换: 步骤 16 中的图像 1,2 iPad Mini CDMA LCD 组件更换: 步骤 16 中的图像 2,2
    • 将撬棒扁平一端插入右扬声器与胶带之间的空隙之间。

    • 将液晶显示器从扬声器中轻轻拉出,同时向外旋转撬棒将胶带与扬声器分离。

  17. iPad Mini CDMA LCD 组件更换: 步骤 17 中的图像 1,2 iPad Mini CDMA LCD 组件更换: 步骤 17 中的图像 2,2
    • 将LCD翻转并放在前面板玻璃的顶部。

    • 不要尝试从iPad上取下LCD,因为它仍有排线线连接。

结论

要重新组装您的设备,请按照本指南的相反顺序进行操作。

另外一个人完成了本指南。

由衷感谢以下译者:

en zh

100%

Leon赵国鑫正在帮助我们修复这个世界! 您也想加入吗?
开始翻译 ›

团队

iFixit iFixit 的会员

Staff

135 名成员

创作了16,817篇指南

0条评论

添加评论

浏览统计数据:

过去 24 小时: 0

过去 7 天: 0

过去 30 天: 0

总计 345