跳转到主内容

iMac Intel 27" Retina 5K Display Heat Sink Replacement

你所需要的

  1. iMac Intel 27" Retina 5K Display Heat Sink Replacement, Display: 步骤 1 中的图像 1,1
    在这个步骤中使用的工具:
    iMac Intel 27" Cardboard Service Wedge
    $4.99
    购买
    • With the hinge free to move, the iMac will be unbalanced and hard to work on. Repairs can be completed with the iMac laying down, but are faster and easier with an iMac service wedge.

    • If you are using the iFixit cardboard service wedge, follow these assembly directions to put it together.

  2. iMac Intel 27" Retina 5K Display Heat Sink Replacement: 步骤 2 中的图像 1,3 iMac Intel 27" Retina 5K Display Heat Sink Replacement: 步骤 2 中的图像 2,3 iMac Intel 27" Retina 5K Display Heat Sink Replacement: 步骤 2 中的图像 3,3
    • Starting on the left of the display, near the power button, insert the iMac Opening Tool into the gap between the glass panel and the rear case.

    • The hub on the iMac Opening Tool will keep you from pushing the wheel in too far. If using a different tool, insert no more than 3/8" (9.5 mm) into the display. You risk severing antenna cables and causing serious damage.

  3. iMac Intel 27" Retina 5K Display Heat Sink Replacement: 步骤 3 中的图像 1,3 iMac Intel 27" Retina 5K Display Heat Sink Replacement: 步骤 3 中的图像 2,3 iMac Intel 27" Retina 5K Display Heat Sink Replacement: 步骤 3 中的图像 3,3
    • Use the tool like a pizza cutter—roll it along through the gap, and it will cut the foam adhesive through the center.

    • Be sure to always push with the handle behind the cutting wheel. If you pull, the wheel might get pulled out of the handle.

    • Run the tool up along the left side of the display.

  4. iMac Intel 27" Retina 5K Display Heat Sink Replacement: 步骤 4 中的图像 1,3 iMac Intel 27" Retina 5K Display Heat Sink Replacement: 步骤 4 中的图像 2,3 iMac Intel 27" Retina 5K Display Heat Sink Replacement: 步骤 4 中的图像 3,3
    • Continue wheeling the tool up around the top left corner.

  5. iMac Intel 27" Retina 5K Display Heat Sink Replacement: 步骤 5 中的图像 1,2 iMac Intel 27" Retina 5K Display Heat Sink Replacement: 步骤 5 中的图像 2,2
    • Cut the adhesive along the top left of the display.

  6. iMac Intel 27" Retina 5K Display Heat Sink Replacement: 步骤 6 中的图像 1,2 iMac Intel 27" Retina 5K Display Heat Sink Replacement: 步骤 6 中的图像 2,2
    • Continue along the top of the display.

    • You may want to run the tool back and forth through what you've already cut a few times, to ensure you get as much of the adhesive separated as possible.

  7. iMac Intel 27" Retina 5K Display Heat Sink Replacement: 步骤 7 中的图像 1,3 iMac Intel 27" Retina 5K Display Heat Sink Replacement: 步骤 7 中的图像 2,3 iMac Intel 27" Retina 5K Display Heat Sink Replacement: 步骤 7 中的图像 3,3
    • Push the tool around the top right corner of the display.

  8. iMac Intel 27" Retina 5K Display Heat Sink Replacement: 步骤 8 中的图像 1,2 iMac Intel 27" Retina 5K Display Heat Sink Replacement: 步骤 8 中的图像 2,2
    • Wheel the tool down along the right side of the display.

  9. iMac Intel 27" Retina 5K Display Heat Sink Replacement: 步骤 9 中的图像 1,2 iMac Intel 27" Retina 5K Display Heat Sink Replacement: 步骤 9 中的图像 2,2
    • Finish pushing the opening tool to the bottom of the right side of the display.

    • At this point, you'll want to run the tool back around the entire display, to ensure you cut as much adhesive as possible.

  10. iMac Intel 27" Retina 5K Display Heat Sink Replacement: 步骤 10 中的图像 1,3 iMac Intel 27" Retina 5K Display Heat Sink Replacement: 步骤 10 中的图像 2,3 iMac Intel 27" Retina 5K Display Heat Sink Replacement: 步骤 10 中的图像 3,3
    在这个步骤中使用的工具:
    Plastic Cards
    $2.99
    购买
    • While the opening tool did the lion's share of the work, the display will still be slightly adhered to the case. A plastic card will be necessary to free up the last of this adhesive.

    • Set the iMac face-up on a table.

    • Starting from the top right corner of the iMac, insert a plastic card between the display and frame.

    • Be careful not to insert it more than 3/8" (9.5 mm), or you may damage internal components.

  11. iMac Intel 27" Retina 5K Display Heat Sink Replacement: 步骤 11 中的图像 1,2 iMac Intel 27" Retina 5K Display Heat Sink Replacement: 步骤 11 中的图像 2,2
    • Gently twist the plastic card to open the space between the display and frame, and cut any remaining adhesive near the corner.

    • Using too much force will crack the glass. Work carefully, and don't try to create a gap any larger than about 1/4" (6 mm).

  12. iMac Intel 27" Retina 5K Display Heat Sink Replacement: 步骤 12 中的图像 1,3 iMac Intel 27" Retina 5K Display Heat Sink Replacement: 步骤 12 中的图像 2,3 iMac Intel 27" Retina 5K Display Heat Sink Replacement: 步骤 12 中的图像 3,3
    • Be sure to stop cutting before the iSight camera in this step, or you may damage it.

    • Slide the card toward the center of the display, to cut any remaining adhesive.

  13. iMac Intel 27" Retina 5K Display Heat Sink Replacement: 步骤 13 中的图像 1,2 iMac Intel 27" Retina 5K Display Heat Sink Replacement: 步骤 13 中的图像 2,2
    • Put the card into the corner again and let it stay there to keep the adhesive from resettling.

  14. iMac Intel 27" Retina 5K Display Heat Sink Replacement: 步骤 14 中的图像 1,3 iMac Intel 27" Retina 5K Display Heat Sink Replacement: 步骤 14 中的图像 2,3 iMac Intel 27" Retina 5K Display Heat Sink Replacement: 步骤 14 中的图像 3,3
    • Insert a second card into the gap between the display and frame in the top left corner.

  15. iMac Intel 27" Retina 5K Display Heat Sink Replacement: 步骤 15 中的图像 1,2 iMac Intel 27" Retina 5K Display Heat Sink Replacement: 步骤 15 中的图像 2,2
    • Gently twist the card, slightly increasing the space between the display and frame.

    • As with the other side, move slowly to allow the adhesive to break, and be careful not to over-stress the display glass.

  16. iMac Intel 27" Retina 5K Display Heat Sink Replacement: 步骤 16 中的图像 1,3 iMac Intel 27" Retina 5K Display Heat Sink Replacement: 步骤 16 中的图像 2,3 iMac Intel 27" Retina 5K Display Heat Sink Replacement: 步骤 16 中的图像 3,3
    • Slide the plastic card toward the center, again stopping just before the iSight camera.

  17. iMac Intel 27" Retina 5K Display Heat Sink Replacement: 步骤 17 中的图像 1,2 iMac Intel 27" Retina 5K Display Heat Sink Replacement: 步骤 17 中的图像 2,2
    • Insert the card back into the top left corner.

  18. iMac Intel 27" Retina 5K Display Heat Sink Replacement: 步骤 18 中的图像 1,3 iMac Intel 27" Retina 5K Display Heat Sink Replacement: 步骤 18 中的图像 2,3 iMac Intel 27" Retina 5K Display Heat Sink Replacement: 步骤 18 中的图像 3,3
    • Only lift the display a few inches—it is still attached to the iMac by data and power cables.

    • With the cards inserted as shown near the corners, gently twist the cards to increase the gap between display and case.

    • If there are any sections that seem to stick and won't separate, stop twisting and use one of the cards to cut the adhesive in the problem area.

    • Begin to lift the top of the display up from the frame.

  19. iMac Intel 27" Retina 5K Display Heat Sink Replacement: 步骤 19 中的图像 1,2 iMac Intel 27" Retina 5K Display Heat Sink Replacement: 步骤 19 中的图像 2,2
    • While holding the display up with one hand, use the other to unplug the display power cable.

    • Lift the display up enough to have easy access to the connections, but not so much that you stretch the cables and stress their connections (about 8").

  20. iMac Intel 27" Retina 5K Display Heat Sink Replacement: 步骤 20 中的图像 1,3 iMac Intel 27" Retina 5K Display Heat Sink Replacement: 步骤 20 中的图像 2,3 iMac Intel 27" Retina 5K Display Heat Sink Replacement: 步骤 20 中的图像 3,3
    • Flip up the metal retaining bracket on the display data cable.

    • Disconnect the display data cable.

    • This is a delicate connection that can easily be broken. Be sure to pull the display data cable connector straight out of its socket, toward the top of the iMac.

  21. iMac Intel 27" Retina 5K Display Heat Sink Replacement: 步骤 21 中的图像 1,2 iMac Intel 27" Retina 5K Display Heat Sink Replacement: 步骤 21 中的图像 2,2
    • Lift the display up to a near-vertical position.

    • At this point there is still a strip of adhesive along the bottom of the display, that will hold the display to the frame like a hinge. You can loosen this adhesive by working the display up and down a few times.

    • Remove as much of the adhesive as possible by grabbing it at the outer edges, and then pulling or rolling it towards the middle.

  22. iMac Intel 27" Retina 5K Display Heat Sink Replacement: 步骤 22 中的图像 1,3 iMac Intel 27" Retina 5K Display Heat Sink Replacement: 步骤 22 中的图像 2,3 iMac Intel 27" Retina 5K Display Heat Sink Replacement: 步骤 22 中的图像 3,3
    • Be very careful not to touch the capacitor leads or any exposed solder joints on the back of the power supply (boxed in red).

    • If necessary, a plastic card can be used to cut any remaining sections of the bottom adhesive strip.

  23. iMac Intel 27" Retina 5K Display Heat Sink Replacement: 步骤 23 中的图像 1,3 iMac Intel 27" Retina 5K Display Heat Sink Replacement: 步骤 23 中的图像 2,3 iMac Intel 27" Retina 5K Display Heat Sink Replacement: 步骤 23 中的图像 3,3
    • Be very careful handling the display—it's big, heavy, and made of glass. The display has fragile edges. Avoid lifting the display by the corners.

    • Lift the display up from the frame and remove it from the iMac. Lay the display face down on a flat, soft surface.

    • It may be necessary to slowly lift from one side, to peel against the remaining adhesive.

    • After the adhesive is cut, it cannot be used to re-seal the display in place. Follow this guide when your repair is complete to replace the adhesive strips that secure the display to the rear enclosure.

  24. iMac Intel 27" Retina 5K Display Heat Sink Replacement: 步骤 24 中的图像 1,1
    • If you are replacing the display panel, you may need to transfer additional components from the old panel to the new one. Compare the back of the old display with the replacement display. Note all cables, sensors, and foam cushioning that are missing from the new display.

    • If there is a wire or cable underneath adhesive tape, always pull the tape off first.

    • If the cable is glued to the chassis, use a heated iOpener or a hair dryer to soften the adhesive first. You can then slide an opening pick underneath the cable to loosen it. Never pull directly on the delicate connectors.

    • Slide an opening pick underneath the foam cushion pieces to separate them from the display, and gently pull them off. You may need some double sided tape to re-attach them to the new display.

  25. iMac Intel 27" Retina 5K Display Heat Sink Replacement, Remove the support bracket: 步骤 25 中的图像 1,2 iMac Intel 27" Retina 5K Display Heat Sink Replacement, Remove the support bracket: 步骤 25 中的图像 2,2
    • Use a Phillips screwdriver to remove the nine 3.2 mm screws securing the support bracket.

    • You may need to peel up the display adhesive lining the bottom edge of the iMac enclosure to access the screws.

  26. iMac Intel 27" Retina 5K Display Heat Sink Replacement: 步骤 26 中的图像 1,1
    • Remove the lower support bracket (a.k.a. "chin strap") from the iMac enclosure.

  27. iMac Intel 27" Retina 5K Display Heat Sink Replacement, Remove the left speaker: 步骤 27 中的图像 1,1
    • Remove two 10 mm T10 screws.

  28. iMac Intel 27" Retina 5K Display Heat Sink Replacement: 步骤 28 中的图像 1,3 iMac Intel 27" Retina 5K Display Heat Sink Replacement: 步骤 28 中的图像 2,3 iMac Intel 27" Retina 5K Display Heat Sink Replacement: 步骤 28 中的图像 3,3
    • Unplug the left speaker cable by pulling it straight up out of its socket on the logic board.

    • De-route the cable from the gap between the hard drive and logic board.

    • If the gap between the hard drive and logic board is too narrow for the speaker cable, disconnect it and leave the cable in place.

  29. iMac Intel 27" Retina 5K Display Heat Sink Replacement: 步骤 29 中的图像 1,3 iMac Intel 27" Retina 5K Display Heat Sink Replacement: 步骤 29 中的图像 2,3 iMac Intel 27" Retina 5K Display Heat Sink Replacement: 步骤 29 中的图像 3,3
    • Be careful not to touch any solder joints on the back of the power supply. Capacitors may be charged enough to give you a dangerous shock.

    • Use a spudger to disconnect the power button connector from its socket on the logic board.

  30. iMac Intel 27" Retina 5K Display Heat Sink Replacement: 步骤 30 中的图像 1,2 iMac Intel 27" Retina 5K Display Heat Sink Replacement: 步骤 30 中的图像 2,2
    • Lift the left speaker straight up, until the power button cable is exposed (about 0.5 inches).

  31. iMac Intel 27" Retina 5K Display Heat Sink Replacement: 步骤 31 中的图像 1,3 iMac Intel 27" Retina 5K Display Heat Sink Replacement: 步骤 31 中的图像 2,3 iMac Intel 27" Retina 5K Display Heat Sink Replacement: 步骤 31 中的图像 3,3
    • Gently de-route the power button cable from its groove in the left speaker.

  32. iMac Intel 27" Retina 5K Display Heat Sink Replacement: 步骤 32 中的图像 1,3 iMac Intel 27" Retina 5K Display Heat Sink Replacement: 步骤 32 中的图像 2,3 iMac Intel 27" Retina 5K Display Heat Sink Replacement: 步骤 32 中的图像 3,3
    • Lift the left speaker straight up and remove it from the iMac.

    • If the gap between the hard drive and logic board was too narrow to free the speaker cable earlier, gently pull it free as you remove the speaker.

    • Push from the connector end as you pull from the speaker end to thread the cable under the hard drive's right bracket.

  33. iMac Intel 27" Retina 5K Display Heat Sink Replacement, Hard Drive: 步骤 33 中的图像 1,2 iMac Intel 27" Retina 5K Display Heat Sink Replacement, Hard Drive: 步骤 33 中的图像 2,2
    • Pull straight up on the SATA data/power cable to disconnect it from the drive.

  34. iMac Intel 27" Retina 5K Display Heat Sink Replacement: 步骤 34 中的图像 1,1
    • Remove two 7.3 mm T10 screws securing the left hard drive bracket to the rear case.

  35. iMac Intel 27" Retina 5K Display Heat Sink Replacement: 步骤 35 中的图像 1,3 iMac Intel 27" Retina 5K Display Heat Sink Replacement: 步骤 35 中的图像 2,3 iMac Intel 27" Retina 5K Display Heat Sink Replacement: 步骤 35 中的图像 3,3
    • Grab the hard drive and left hard drive bracket together.

    • Tilt the left side up away from the rear case, and slide the assembly to the left.

    • Remove the hard drive and left hard drive bracket from the iMac.

  36. iMac Intel 27" Retina 5K Display Heat Sink Replacement: 步骤 36 中的图像 1,2 iMac Intel 27" Retina 5K Display Heat Sink Replacement: 步骤 36 中的图像 2,2
    • Remove the left hard drive bracket.

  37. iMac Intel 27" Retina 5K Display Heat Sink Replacement, Remove the power supply: 步骤 37 中的图像 1,2 iMac Intel 27" Retina 5K Display Heat Sink Replacement, Remove the power supply: 步骤 37 中的图像 2,2
    • When working on the power supply, be very careful not to touch the capacitor leads or any exposed solder joints on the back of the power supply. Only handle the board by the edges.

    • Disconnect the power supply control cable from the power supply.

  38. iMac Intel 27" Retina 5K Display Heat Sink Replacement: 步骤 38 中的图像 1,1
    • Remove the following four screws securing the power supply to the rear case (size T8 or T10 depending on the exact model):

    • Two 23.7 mm Torx screws

    • Two 7.3 mm Torx screws

  39. iMac Intel 27" Retina 5K Display Heat Sink Replacement: 步骤 39 中的图像 1,3 iMac Intel 27" Retina 5K Display Heat Sink Replacement: 步骤 39 中的图像 2,3 iMac Intel 27" Retina 5K Display Heat Sink Replacement: 步骤 39 中的图像 3,3
    • Do not attempt to remove the power supply from the case; it is still attached to the logic board by two cables.

    • Move the power supply board towards the left edge of the case and up to free it from the notch in the logic board.

  40. iMac Intel 27" Retina 5K Display Heat Sink Replacement: 步骤 40 中的图像 1,2 iMac Intel 27" Retina 5K Display Heat Sink Replacement: 步骤 40 中的图像 2,2
    • Depress the tab on the DC power cable connector, then pull it straight out of its socket on the back of the logic board.

    • If the cable is too difficult to disconnect, you can remove the power supply board and motherboard together.

  41. iMac Intel 27" Retina 5K Display Heat Sink Replacement: 步骤 41 中的图像 1,3 iMac Intel 27" Retina 5K Display Heat Sink Replacement: 步骤 41 中的图像 2,3 iMac Intel 27" Retina 5K Display Heat Sink Replacement: 步骤 41 中的图像 3,3
    • Be very careful not to touch the capacitor leads or any exposed solder joints on the back of the power supply. Only handle the board by the edges.

    • Flip the top of the power supply towards you, like opening a mailbox, to reveal the AC inlet cable connector.

    • Disconnect the AC inlet cable connector.

  42. iMac Intel 27" Retina 5K Display Heat Sink Replacement, Right Speaker: 步骤 42 中的图像 1,1
    • Remove two 10.0 mm T10 screws.

  43. iMac Intel 27" Retina 5K Display Heat Sink Replacement: 步骤 43 中的图像 1,2 iMac Intel 27" Retina 5K Display Heat Sink Replacement: 步骤 43 中的图像 2,2
    • Gently rock the right speaker slightly to the right, to allow access to its cable's connection on the logic board.

  44. iMac Intel 27" Retina 5K Display Heat Sink Replacement: 步骤 44 中的图像 1,3 iMac Intel 27" Retina 5K Display Heat Sink Replacement: 步骤 44 中的图像 2,3 iMac Intel 27" Retina 5K Display Heat Sink Replacement: 步骤 44 中的图像 3,3
    • Use a spudger to loosen the right speaker cable's connector from its socket on the logic board.

    • Pull the connector to the right to remove it from its socket.

  45. iMac Intel 27" Retina 5K Display Heat Sink Replacement: 步骤 45 中的图像 1,3 iMac Intel 27" Retina 5K Display Heat Sink Replacement: 步骤 45 中的图像 2,3 iMac Intel 27" Retina 5K Display Heat Sink Replacement: 步骤 45 中的图像 3,3
    • Lift the speaker straight up and remove it from the iMac.

  46. iMac Intel 27" Retina 5K Display Heat Sink Replacement, Remove the fan: 步骤 46 中的图像 1,3 iMac Intel 27" Retina 5K Display Heat Sink Replacement, Remove the fan: 步骤 46 中的图像 2,3 iMac Intel 27" Retina 5K Display Heat Sink Replacement, Remove the fan: 步骤 46 中的图像 3,3
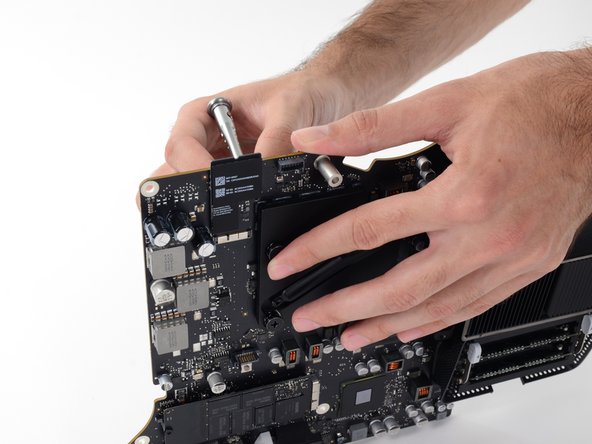
    • Use the tip of a spudger to disconnect the fan cable's connector from its socket on the logic board.

  47. iMac Intel 27" Retina 5K Display Heat Sink Replacement: 步骤 47 中的图像 1,2 iMac Intel 27" Retina 5K Display Heat Sink Replacement: 步骤 47 中的图像 2,2
    • Peel the black tape connecting the fan to the exhaust duct back slightly.

    • Leave the tape in place on the exhaust duct—you only need to expose the joint to free the fan.

  48. iMac Intel 27" Retina 5K Display Heat Sink Replacement: 步骤 48 中的图像 1,1
    • Remove three 12.4 mm T10 screws securing the fan to the rear case.

  49. iMac Intel 27" Retina 5K Display Heat Sink Replacement: 步骤 49 中的图像 1,2 iMac Intel 27" Retina 5K Display Heat Sink Replacement: 步骤 49 中的图像 2,2
    • Remove the fan from the iMac.

  50. iMac Intel 27" Retina 5K Display Heat Sink Replacement, Logic Board Assembly: 步骤 50 中的图像 1,3 iMac Intel 27" Retina 5K Display Heat Sink Replacement, Logic Board Assembly: 步骤 50 中的图像 2,3 iMac Intel 27" Retina 5K Display Heat Sink Replacement, Logic Board Assembly: 步骤 50 中的图像 3,3
    • Use the flat end of a spudger to disconnect each of the four antenna connectors from the AirPort/Bluetooth card.

    • Note the original positions for each connector when reconnecting the cables. From left to right on the card, the antennas are connected in the following order:

    • Leftmost

    • Top

    • Upper right

    • Lower right

  51. iMac Intel 27" Retina 5K Display Heat Sink Replacement: 步骤 51 中的图像 1,3 iMac Intel 27" Retina 5K Display Heat Sink Replacement: 步骤 51 中的图像 2,3 iMac Intel 27" Retina 5K Display Heat Sink Replacement: 步骤 51 中的图像 3,3
    • This is a delicate connection that can be easily broken.

    • Flip up the metal retaining bracket on the iSight camera cable.

    • Pull the camera cable connector straight out of its socket, toward the top of the iMac.

  52. iMac Intel 27" Retina 5K Display Heat Sink Replacement: 步骤 52 中的图像 1,3 iMac Intel 27" Retina 5K Display Heat Sink Replacement: 步骤 52 中的图像 2,3 iMac Intel 27" Retina 5K Display Heat Sink Replacement: 步骤 52 中的图像 3,3
    • Use the flat end of a spudger to disconnect the headphone jack cable connector from its socket on the logic board.

    • Gently push the cable out of the way.

  53. iMac Intel 27" Retina 5K Display Heat Sink Replacement: 步骤 53 中的图像 1,2 iMac Intel 27" Retina 5K Display Heat Sink Replacement: 步骤 53 中的图像 2,2
    • Remove the following screws from the front of the logic board:

    • Two 23.7 mm T10 screws

    • Four 7.4 mm T10 screws

    • One 20.8 mm T25 spacer screw

    • One captive T10 screw

    • This screw is beneath a hole in the logic board. You'll need a fixed screwdriver or the 60 mm extension from an iFixit driver kit to reach it.

  54. iMac Intel 27" Retina 5K Display Heat Sink Replacement: 步骤 54 中的图像 1,3 iMac Intel 27" Retina 5K Display Heat Sink Replacement: 步骤 54 中的图像 2,3 iMac Intel 27" Retina 5K Display Heat Sink Replacement: 步骤 54 中的图像 3,3
    • The hard drive SATA cable can't be removed just yet, but will get in the way of removing the logic board.

    • Pull the cable and connector through the right hard drive bracket. Move the cable to the right side of the iMac, out of the way of the exhaust port.

  55. iMac Intel 27" Retina 5K Display Heat Sink Replacement: 步骤 55 中的图像 1,1
    • Remove two 5.7 mm T10 screws from the top of the heat sink exhaust duct.

  56. iMac Intel 27" Retina 5K Display Heat Sink Replacement: 步骤 56 中的图像 1,3 iMac Intel 27" Retina 5K Display Heat Sink Replacement: 步骤 56 中的图像 2,3 iMac Intel 27" Retina 5K Display Heat Sink Replacement: 步骤 56 中的图像 3,3
    • Tilt the logic board slightly forward.

    • Lift the logic board straight up and out of the iMac. Be careful not to snag on any of the screw posts attached to the inside of the rear case.

  57. iMac Intel 27" Retina 5K Display Heat Sink Replacement: 步骤 57 中的图像 1,2 iMac Intel 27" Retina 5K Display Heat Sink Replacement: 步骤 57 中的图像 2,2
    • When reassembling your iMac, be very careful to align the exterior I/O ports correctly. The logic board can sit crooked even when secured with all its screws.

    • You can use a USB flashdrive or ethernet cable to ensure the logic board is seated correctly while you screw it in.

  58. iMac Intel 27" Retina 5K Display Heat Sink Replacement, Heat Sink: 步骤 58 中的图像 1,3 iMac Intel 27" Retina 5K Display Heat Sink Replacement, Heat Sink: 步骤 58 中的图像 2,3 iMac Intel 27" Retina 5K Display Heat Sink Replacement, Heat Sink: 步骤 58 中的图像 3,3
    • Remove the four 7.5 mm T8 screws from behind the GPU on the logic board.

    • These screws are set inside large, spring-loaded Phillips #2 screws. To prevent the larger screws from spinning when you loosen the T8 screws, hold them with a fingertip or Phillips #2 screwdriver.

  59. iMac Intel 27" Retina 5K Display Heat Sink Replacement: 步骤 59 中的图像 1,1
    • Remove the bracket from behind the GPU heat sink.

  60. iMac Intel 27" Retina 5K Display Heat Sink Replacement: 步骤 60 中的图像 1,1
    • Remove four black stickers from the back of the CPU heat sink.

  61. iMac Intel 27" Retina 5K Display Heat Sink Replacement: 步骤 61 中的图像 1,1
    • Remove four 12.3 mm T10 screws from the back of the CPU heat sink.

  62. iMac Intel 27" Retina 5K Display Heat Sink Replacement: 步骤 62 中的图像 1,3 iMac Intel 27" Retina 5K Display Heat Sink Replacement: 步骤 62 中的图像 2,3 iMac Intel 27" Retina 5K Display Heat Sink Replacement: 步骤 62 中的图像 3,3
    • Remove the spring plate from behind the CPU heat sink.

    • Lift and remove the backing plate from behind the CPU heat sink. The backing plate has two posts that fit into alignment holes in the logic board.

  63. iMac Intel 27" Retina 5K Display Heat Sink Replacement: 步骤 63 中的图像 1,3 iMac Intel 27" Retina 5K Display Heat Sink Replacement: 步骤 63 中的图像 2,3 iMac Intel 27" Retina 5K Display Heat Sink Replacement: 步骤 63 中的图像 3,3
    • Lift the heat sink up from the logic board.

    • The CPU will most likely stick to the heat sink, so be careful about where you put it down.

  64. iMac Intel 27" Retina 5K Display Heat Sink Replacement, Heat Sink Replacement: 步骤 64 中的图像 1,3 iMac Intel 27" Retina 5K Display Heat Sink Replacement, Heat Sink Replacement: 步骤 64 中的图像 2,3 iMac Intel 27" Retina 5K Display Heat Sink Replacement, Heat Sink Replacement: 步骤 64 中的图像 3,3
    • The CPU will most likely be stuck to the heat sink with thermal compound.

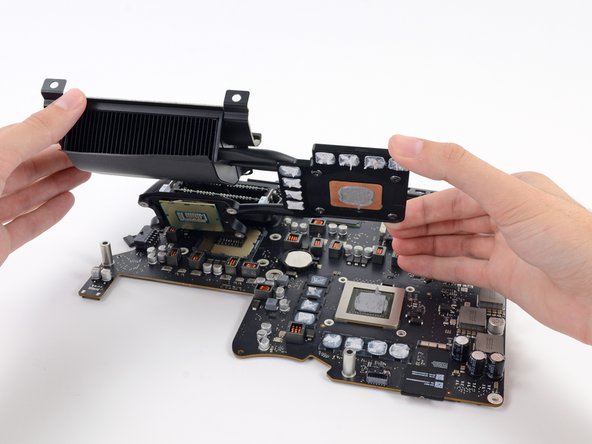
    • Insert the flat end of a spudger between the CPU and heat sink.

    • Gently pry the CPU up by slightly twisting the spudger.

    • Remove the CPU from the heat sink. Be careful not to touch the contacts.

    • To reinstall the heat sink, see our thermal paste guide for instructions on cleaning and preparing the thermal surfaces and applying a new layer of thermal compound onto the CPU and GPU dies.

    • For the VRAM chips surrounding the GPU, install thermal pads or a thick thermal paste such as K5-PRO, rather than regular thermal paste.

    • Install your CPU into its socket on the board, not on the heat sink. Check the orientation and make sure it lines up correctly in the socket. Follow the instructions specific to your CPU type to apply fresh thermal paste to the surface of your CPU. Then, reinstall the heat sink over the top.

结论

To reassemble your device, follow these instructions in reverse and use our Adhesive Strips Guide to reattach the display glass.

Take your e-waste to an R2 or e-Stewards certified recycler.

Repair didn’t go as planned? Try some basic troubleshooting, or ask our Answers community for help.

7等其他人完成本指南。

Sam Goldheart

于10/18/12注册

465,119 声望

创作了538篇指南

团队

iFixit iFixit 的会员

Staff

135 名成员

创作了16,476篇指南

5条评论

Hi All,

did you notice something unusual in the contact surfaces between GPU and Heatsink ?

Some unit are hotter than others, we are discussing in a forum if it may be a problem with the cooling system. My 5K with the M295X can top at 100°C and others even 108° with consistent louder fan (+400rpms for the same task).

Massimiliano Parisotto - 回复

Can you tell me if the high temps, 106 Celsius, in the iMac retina GPU should be a big concern or not? I am considering returning my iMac in the next few days because of this.

Anthony Barone -

I would highly recommend using at the very least, an anti-static wrist band when attempting any computer repair to this level.

In the 1980's I ran Commodore UK's service department. At that time we suffered a 30% failure rate of PC's that were being configured and assembled in our factory. The failures ceased the moment anti-static precaution were introduced!

jerrypank - 回复

Asking a question for this since my iMac 17,1 is due for an upgrade.

Does anyone know how thick of a thermal pad can be used on the VRAM chips? I am not a fan of using compound for these. (Still in the learning stages of this topic)

Also has anyone attempted to use a graphite thermal pad for the CPU or GPU?

Thanks in advance!

Andrew R. Reimisch - 回复

what size thermal pad works best on a 2014 imac 27 inch retna for the gpu memory?

thanks

Chris

Murphy Brown - 回复

添加评论

浏览统计数据:

过去 24 小时: 1

过去 7 天: 21

过去 30 天: 76

总计 11,735