跳转到主内容

当前版本的文档还未经巡查,您可以查看最新的已查核版本

你所需要的

  1. , 维修孔盖: 步骤 1 中的图像 1,1
    • 将iMac正面朝下平放在桌面上,将底部对准自己。

    • 将维修孔盖中间的一个十字螺丝拧松。

    • 螺丝是固定在维修孔盖上的。

    • 移除维修孔盖。

  2. , 玻璃面板: 步骤 2 中的图像 1,2 , 玻璃面板: 步骤 2 中的图像 2,2
    在这个步骤中使用的工具:
    Heavy-Duty Suction Cups (Pair)
    $14.95
    购买
    • 玻璃面板固定在前挡板上, 周围有十四块磁铁。

    • 将两个吸盘固定在玻璃面板的对角上。

    • 要连接我们销售的吸盘, 首先将吸盘口与玻璃面板表面平行放置。轻轻握住吸盘并转动可动手柄, 直到它与其他手柄平行。

    • 如果你的吸盘无法吸附,尝试清理玻璃面板和吸盘的接触面。

  3. : 步骤 3 中的图像 1,1
    • 轻轻地将玻璃面板直接拉出 iMac。

    • 玻璃面板外围有多个定位点。为了避免把这些针脚从玻璃面板上扯下来, 一定要在拆卸过程中直接拉直。

    • 在重新安装前, 务必要一丝不苟地清洗液晶屏和玻璃面板的内侧面, 因为在显示屏上的任何指纹或灰尘都将会令人讨厌。

    • 更换玻璃时, 要确保玻璃和框架之间没有任何东西。杂乱电缆可能损坏玻璃。

  4. , 嵌玻璃凹槽: 步骤 4 中的图像 1,1
    • 移除以下固定嵌玻璃凹槽的12颗螺丝:

    • 8颗13mm T8星形螺丝

    • 4颗25mm T8星形螺丝

    • 在24" iMac Intel Model A1225上,底部中央的两颗螺丝长度较长(26mm),两边的四颗螺丝(左边两颗,右边两颗)长度中等(18mm),剩余的六颗螺丝(顶部四颗,底部角落两颗)长度较短(14mm)。

  5. : 步骤 5 中的图像 1,2 : 步骤 5 中的图像 2,2
    • 嵌玻璃凹槽上的麦克风排线仍与机身相连。

    • 轻轻地从后壳提起凹槽的顶端。

    • 当凹槽从后壳提起后,将其向自己的一侧旋转立起。

    • 将整个凹槽旋转远离机身,然后将其平放在机身上方。

    • 重新安装凹槽时,先将凹槽的底部与后壳齐平,然后再将凹槽顶部放下。

  6. : 步骤 6 中的图像 1,1
    • 断开麦克风排线的连接,必要时移除胶带。

    • 为了能让嵌玻璃凹槽放好,确保将麦克风排线塞入摄像头旁的空隙中。

  7. 这个步骤还没有翻译 帮忙翻译一下

    : 步骤 7 中的图像 1,3 : 步骤 7 中的图像 2,3 : 步骤 7 中的图像 3,3
    • Remove the two 5.3 mm T6 torx screws from the LCD connector.

    • Firmly grasp the pull tab on top of the connector and pull it straight up out of its port.

    • Make sure that you are pulling the tab and not the connector cable.

  8. 这个步骤还没有翻译 帮忙翻译一下

    : 步骤 8 中的图像 1,1
    • Remove the eight T8 Torx screws securing the display panel to the rear case.

    • The iMac shown is a 20" model, but the screw locations should be approximately correct.

  9. 这个步骤还没有翻译 帮忙翻译一下

    : 步骤 9 中的图像 1,3 : 步骤 9 中的图像 2,3 : 步骤 9 中的图像 3,3
    • Place your hands on either side of the bottom of the display panel, and lift it up enough that you can reach the connectors inside.

    • Do not try to remove the display panel completely as it is still connected to the rest of the device.

    • While holding the display panel up with one hand, locate and remove the display thermal sensor cable from its connector.

  10. 这个步骤还没有翻译 帮忙翻译一下

    : 步骤 10 中的图像 1,2 : 步骤 10 中的图像 2,2
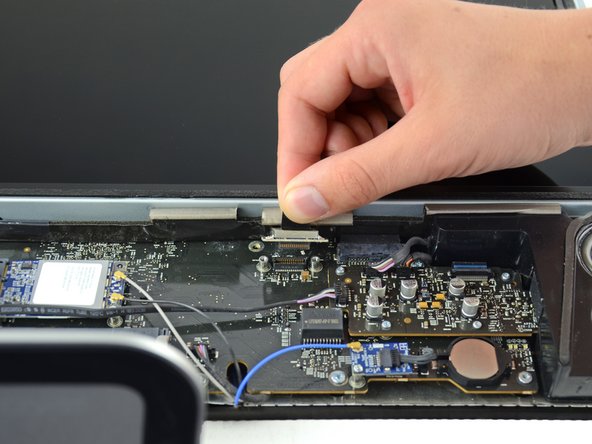
    • While still holding the display panel up, use two fingers to firmly push down on the power supply cable connector from its socket.

    • Be very careful not to touch the exposed face of the power supply to avoid electric shock from the many large capacitors attached to the other side of the board.

  11. 这个步骤还没有翻译 帮忙翻译一下

    : 步骤 11 中的图像 1,1
    • Lift and remove the display panel from the device.

  12. , 硬盘: 步骤 12 中的图像 1,3 , 硬盘: 步骤 12 中的图像 2,3 , 硬盘: 步骤 12 中的图像 3,3
    • 首先来移除硬盘支架,捏住支架中间部分的同时,将支架左侧向自己一侧提起。

    • 提起支架左侧后,再将右侧提起。

    • 将硬盘支架从底座移出。

  13. : 步骤 13 中的图像 1,1
    • 移除覆盖在硬盘和光驱温度感应器排线上的胶带(如果有的话)。

  14. : 步骤 14 中的图像 1,1
    • 将硬盘温度感应器排线插头从主板拔除。

    • 移除插头时,可用手指甲来捏住插头两边将其抠出。

  15. : 步骤 15 中的图像 1,2 : 步骤 15 中的图像 2,2
    • 将硬盘顶端向自己一侧旋转,并将其从下面的插脚拔出。

    • 硬盘仍与SATA排线相连。

    • 重新安装硬盘时,小心不要将橡胶圈掉入硬盘插脚旁的底座开口中,否则您可能需要将主板移除后才能将其取出。

  16. : 步骤 16 中的图像 1,2 : 步骤 16 中的图像 2,2
    • 将撬棒平直端插入SATA数据排线和硬盘边缘中间。

    • 扭动撬棒来将SATA数据排线与硬盘分离。

    • 断开SATA数据排线与硬盘的连接。

    • 使用同样的操作来断开SATA电源排线的连接。

    • 将硬盘移出您的iMac,小心有可能刮到热感应器排线。

  17. , 硬盘: 步骤 17 中的图像 1,1
    • 将两个T8 Torx螺丝拧下来,并把它们旁边的橡胶垫圈也拿下来

  18. : 步骤 18 中的图像 1,1
    • 将2个 T8梅花支座从接近电源和数据链接头附近处取下。

  19. : 步骤 19 中的图像 1,1
    • 将覆盖着温度传感器的胶带剥下。

  20. : 步骤 20 中的图像 1,2 : 步骤 20 中的图像 2,2
    • 取下硬盘温度传感器需要使用挑线器的尖头来翘起传感器支架的中部,同时也要拉紧温度传感器排线。

    • 如果温度传感器卡在硬盘上,跳过此步骤到下一步。

  21. : 步骤 21 中的图像 1,1
    • 使用撬棒的扁平端将硬盘驱动器温度传感器支架从将其固定在硬盘的粘合剂上取下。

    • 如果粘合剂变脏或不会粘到新的硬盘驱动器上,请将一些双面胶带贴在热传感器支架的两个半圆形耳部下方。

  22. : 步骤 22 中的图像 1,1
    • 使用挑线器来将硬盘顶部EMI泡沫

    • 别忘了将其转移到您的新的硬盘上。

    • 如果安装了新的硬盘,我们的OS X安装指南来指导您安装系统。

终点

206等其他人完成本指南。

Brittany McCrigler

于03/05/12注册

89,017 声望

创作了131篇指南

团队

iFixit iFixit 的会员

Staff

135 名成员

创作了17,198篇指南

17条评论

Exellent instructions....

jgtechnology - 回复

I just installed a new HD on my iMac 8,1. Intalled the OS from original disc, it was 10.5.2, I don't know how to upgrade the OS.

I did software update, but only got 10.5.8. ¿what can I do? I would like to install Yosemite at least...

Any help?

Dan N. - 回复

You need to get to 10.6.8 via physical media, then app store update from there. I have read that Apple will send you a dvd for no cost, but the official price is $19.

Milk Manson -

I has a 8.1 as well , running Ubuntu 22.04 is great ! Stop obsolete OSX

EkimiaMichel -

Compatibilité du capteur thermique avec un SSD ?

DUBOIS - 回复

添加评论

浏览统计数据:

过去 24 小时: 8

过去 7 天: 97

过去 30 天: 494

总计 210,759