跳转到主内容

Xbox One S All Digital Edition Hard Drive Replacement

你所需要的

  1. Xbox One S All Digital Edition Hard Drive Replacement, Plastic Enclosure: 步骤 1 中的图像 1,3 Xbox One S All Digital Edition Hard Drive Replacement, Plastic Enclosure: 步骤 1 中的图像 2,3 Xbox One S All Digital Edition Hard Drive Replacement, Plastic Enclosure: 步骤 1 中的图像 3,3
    • Position the iFixit Opening Tool's riveted edge in between the top and bottom cover of the plastic enclosure.

    • Apply downward pressure on the iFixit Opening Tool until the security clip unlocks.

    • Repeat on different points of the plastic enclosure until the bottom cover is removed.

  2. Xbox One S All Digital Edition Hard Drive Replacement: 步骤 2 中的图像 1,2 Xbox One S All Digital Edition Hard Drive Replacement: 步骤 2 中的图像 2,2
    • Remove the six 50 mm green screws (labeled F1-F6) from the metal chassis using a Torx 10 screwdriver.

    • These screws hold the top cover of the plastic enclosure to the chassis.

  3. Xbox One S All Digital Edition Hard Drive Replacement: 步骤 3 中的图像 1,2 Xbox One S All Digital Edition Hard Drive Replacement: 步骤 3 中的图像 2,2
    • Apply pressure to peel off the sides of the casing.

    • Separate the metal chassis from the top cover, lifting the back of the chassis up and away from the top cover.

    • The plastic back panel is meant to stay attached to the metal chassis.

  4. Xbox One S All Digital Edition Hard Drive Replacement: 步骤 4 中的图像 1,1
    • Flip the metal enclosure so that the fan cover is on top.

  5. Xbox One S All Digital Edition Hard Drive Replacement, Top Metal Shield: 步骤 5 中的图像 1,2 Xbox One S All Digital Edition Hard Drive Replacement, Top Metal Shield: 步骤 5 中的图像 2,2
    • Remove the two 15mm screws from the front panel using the Torx T8 screwdriver.

  6. Xbox One S All Digital Edition Hard Drive Replacement: 步骤 6 中的图像 1,3 Xbox One S All Digital Edition Hard Drive Replacement: 步骤 6 中的图像 2,3 Xbox One S All Digital Edition Hard Drive Replacement: 步骤 6 中的图像 3,3
    • Carefully slide the top metal case off the frame.

    • This may require shifting the case side to side as you slide up.

  7. Xbox One S All Digital Edition Hard Drive Replacement, Hard Drive: 步骤 7 中的图像 1,2 Xbox One S All Digital Edition Hard Drive Replacement, Hard Drive: 步骤 7 中的图像 2,2
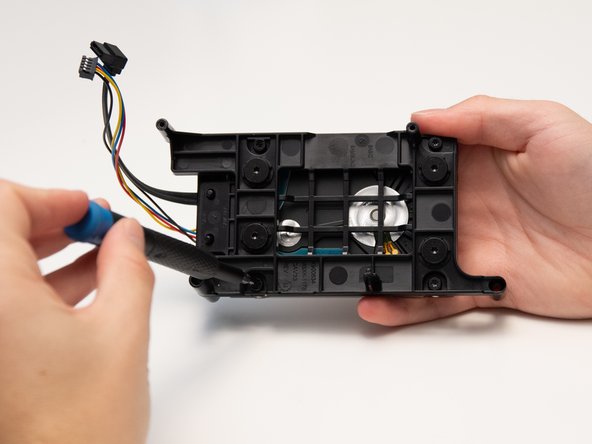
    • Remove the two 10mm screws, labeled C3 and C4, attaching the plastic hard drive case to the metal chassis with the Torx T10 Security screwdriver.

  8. Xbox One S All Digital Edition Hard Drive Replacement: 步骤 8 中的图像 1,3 Xbox One S All Digital Edition Hard Drive Replacement: 步骤 8 中的图像 2,3 Xbox One S All Digital Edition Hard Drive Replacement: 步骤 8 中的图像 3,3
    • Lift the hard drive and the black plastic casing from the chassis.

    • Remove the two sets of wires from the motherboard by gently pulling them directly upward.

  9. Xbox One S All Digital Edition Hard Drive Replacement: 步骤 9 中的图像 1,2 Xbox One S All Digital Edition Hard Drive Replacement: 步骤 9 中的图像 2,2
    • Remove the four 10mm screws attaching the hard drive to the plastic casing with the Torx T8 Security screwdriver.

  10. Xbox One S All Digital Edition Hard Drive Replacement: 步骤 10 中的图像 1,1
    • Carefully remove the hard drive from its plastic case.

  11. Xbox One S All Digital Edition Hard Drive Replacement: 步骤 11 中的图像 1,2 Xbox One S All Digital Edition Hard Drive Replacement: 步骤 11 中的图像 2,2
    • Carefully remove the black wire connection from the hard drive by gently pulling away from the hard drive.

结论

To reassemble your device, follow these instructions in reverse order.

13等其他人完成本指南。

Jules Hajjar

于10/10/19注册

1,531 声望

创作了8篇指南

团队

Cal Poly, Team S12-G6, Regan Fall 2019 Cal Poly, Team S12-G6, Regan Fall 2019 的会员

CPSU-REGAN-F19S12G6

4 名成员

创作了26篇指南

一条评论

Great guide, did though run into problems when using a SSD under 500GB (Kioxia 480GB), seems that the drive must be 500+GB because it did work with Kioxia 960GB. Use the official link for software reinstallation not the broken links in the guide.

Peter H - 回复

添加评论

浏览统计数据:

过去 24 小时: 7

过去 7 天: 51

过去 30 天: 196

总计 9,212