跳转到主内容

Xbox One 无线控制器底部主板更换

你所需要的

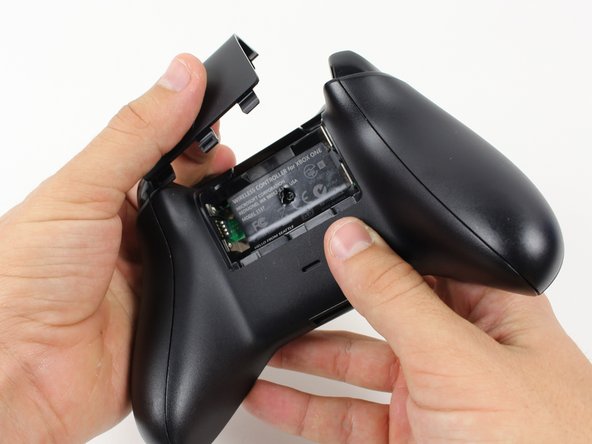
  1. Xbox One 无线控制器底部主板更换, 电池: 步骤 1 中的图像 1,1
    • 移除电池盖

    • 拆下电池

  2. Xbox One 无线控制器底部主板更换, 侧背板: 步骤 2 中的图像 1,2 Xbox One 无线控制器底部主板更换, 侧背板: 步骤 2 中的图像 2,2
    • 我们建议使用尼龙撬棒完成以下工作,图示为金属撬棒

    • 紧握手柄,将撬棒插入前后面板的缝隙中

    • 使用撬棒小心的撬开边上的卡扣,然后拆除后面的塑料侧背板

  3. Xbox One 无线控制器底部主板更换, 螺丝: 步骤 3 中的图像 1,2 Xbox One 无线控制器底部主板更换, 螺丝: 步骤 3 中的图像 2,2
    • 在标签下有一个隐藏的螺丝

    • 用螺丝刀穿透标签,卸下这颗螺丝

    • 如果不想穿透标签的话,你也可以将标签撕下来

    • 使用T8梅花螺丝刀把剩余的五个用于固定手柄后盖的 10 mm 螺丝拆卸下来。

  4. Xbox One 无线控制器底部主板更换, 背板: 步骤 4 中的图像 1,1
    • 把背板拿下来

  5. Xbox One 无线控制器底部主板更换, 前面板: 步骤 5 中的图像 1,1
    • 把前面板拿下来

  6. Xbox One 无线控制器底部主板更换, 顶部主板: 步骤 6 中的图像 1,2 Xbox One 无线控制器底部主板更换, 顶部主板: 步骤 6 中的图像 2,2
    • 你可以让振动马达从插座中松开。

    • 脱焊 焊接接头,同时将红色和黑色电线按在顶部主板上。

    • 脱焊 焊接在顶部主板上的黑色和灰色线。

    • 拆下振动马达并将其放在一边。

    • 使用烙铁时要小心,不要损坏其他部件或伤害自己。

    • 有关如何焊接的信息,请点击此处

  7. Xbox One 无线控制器底部主板更换: 步骤 7 中的图像 1,1
    • 移除振动马达插座附近的两颗7mm T6螺丝。

  8. Xbox One 无线控制器底部主板更换: 步骤 8 中的图像 1,1
    • 牢牢抓住主板靠近中间的两侧。

    • 向上抬起,同时向前和向后稍微摆动主板。

    • 抬起主板将需要一些力量。

  9. Xbox One 无线控制器底部主板更换, 底部主板: 步骤 9 中的图像 1,2 Xbox One 无线控制器底部主板更换, 底部主板: 步骤 9 中的图像 2,2
    • 移除位于底部主板上的六颗T6梅花螺丝。

  10. Xbox One 无线控制器底部主板更换: 步骤 10 中的图像 1,2 Xbox One 无线控制器底部主板更换: 步骤 10 中的图像 2,2
    • 使用撬棒将其从固定它们的销子上撬开,从而取下保险杠。 它们位于控制器的前面和后面。

    • 推荐使用标准的塑料撬棒。 如图所示,在主板附近使用金属撬棒可能会损坏设备。

  11. Xbox One 无线控制器底部主板更换: 步骤 11 中的图像 1,2 Xbox One 无线控制器底部主板更换: 步骤 11 中的图像 2,2
    • 将主键周围的部件从其销子上提起。

    • 使用撬棒在销子上,从另一侧撬起。

    • 推荐使用标准的塑料撬棒。 如图所示,在主板附近使用金属撬棒可能会损坏设备。

    • 取出这个东西可能需要很大的力气。

  12. Xbox One 无线控制器底部主板更换: 步骤 12 中的图像 1,1
    • 移除底部主板。

结论

要重新组装您的设备,请按照本指南的相反顺序进行操作。

28等其他人完成本指南。

由衷感谢以下译者:

en zh

100%

Leon赵国鑫正在帮助我们修复这个世界! 您也想加入吗?
开始翻译 ›

Liam Gow

于01/22/15注册

5,284 声望

创作了3篇指南

团队

Cal Poly, Team 20-15, Maness Winter 2015 Cal Poly, Team 20-15, Maness Winter 2015 的会员

CPSU-MANESS-W15S20G15

5 名成员

创作了50篇指南

11条评论

Is de-soldering optional?

John Gonzalez - 回复

Considering the placement of wires attached by solder on both sides of the top board, it would be quite difficult to reach anything beneath it otherwise. I suppose it depends on what you're trying to achieve.

In any case, you might as well try to move it without desoldering if desoldering is going to be an issue. Make sure not to pull hard, though.

Liam Gow -

I have a question... Will the motherboard you can get at the store here work it the newer controllers with built in headphone jack?

ETHREAL1 - 回复

I would expect not, I'm afraid. The motherboards will probably have different circuitry, even if the shapes are the same, which they may not be.

Liam Gow -

The position/mounting of the LB and RB buttons on the motherboard piece between the day-one/sans-jack and the newer 3.5mm jack (non-Slim) boards are completely different.

The older revision motherboard has the mountings inverted (pointing downwards to the south end-headset attachment port- of the controller) compared to the newer ones.

The newer ones have the circuit with the bumper buttons mounted pointing to the north end toward the bumpers on the top of the controller.
icho - 回复

添加评论

浏览统计数据:

过去 24 小时: 6

过去 7 天: 57

过去 30 天: 302

总计 58,173