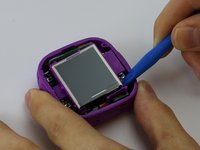
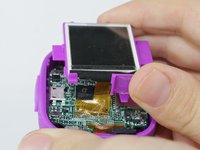
跳转到主内容
加入维修社区 - 创建账户

VTech Kidizoom Action Cam Lens Replacement

你所需要的

  1. VTech Kidizoom Action Cam Lens Replacement, Display Assembly: 步骤 1 中的图像 1,1
    • Make sure that the master power switch is set to the (O) position.

    询问修复机器人
  2. VTech Kidizoom Action Cam Lens Replacement: 步骤 2 中的图像 1,1
    • Using a plastic opening tool, gently pry off the circular plating over the camera lens.

    • The circular plating is held by a mild adhesive. It will not be necessary to replace this adhesive during the reassembly process.

    询问修复机器人
  3. VTech Kidizoom Action Cam Lens Replacement: 步骤 3 中的图像 1,1
    在这个步骤中使用的工具:
    Magnetic Project Mat
    $19.95
    • Use a #0 screwdriver to remove the two 2.5mm Phillips head screws located on the second layer of plating.

    • Remove the second layer of plating previously held down by the screws by gripping it with your fingers and pulling upward.

    • As there will be many screws being removed from the device, we recommend using a magnetic device such as the iFixit Magnetic Project Mat.

    询问修复机器人
  4. VTech Kidizoom Action Cam Lens Replacement: 步骤 4 中的图像 1,1
    • Pry off the transparent plating and paper design using a plastic opening tool.

    询问修复机器人
  5. VTech Kidizoom Action Cam Lens Replacement: 步骤 5 中的图像 1,1
    • Unscrew the (4) 2.5mm Phillips head screws from the third layer of plating using a #0 screwdriver.

    询问修复机器人
  6. VTech Kidizoom Action Cam Lens Replacement: 步骤 6 中的图像 1,1
    • Turn the camera around and gently remove the plating that surrounds the LCD screen by grasping it with your fingers and pulling away from the device.

    询问修复机器人
  7. VTech Kidizoom Action Cam Lens Replacement: 步骤 7 中的图像 1,3 VTech Kidizoom Action Cam Lens Replacement: 步骤 7 中的图像 2,3 VTech Kidizoom Action Cam Lens Replacement: 步骤 7 中的图像 3,3
    • Use the plastic opening tool to lift the LCD screen, including the purple casing and set it aside, revealing the motherboard and connector ribbon.

    • Exercise caution while performing this step, as any excessive pulling may tear the connector ribbon from the motherboard.

  8. VTech Kidizoom Action Cam Lens Replacement, Lens: 步骤 8 中的图像 1,1
    • Use the plastic opening tool to pry the lens from it's holder.

    • This can be the final step before reassembling, but doing this before removing the ribbon makes the process easier.

    询问修复机器人
  9. VTech Kidizoom Action Cam Lens Replacement: 步骤 9 中的图像 1,2 VTech Kidizoom Action Cam Lens Replacement: 步骤 9 中的图像 2,2
    • Heat the iOpener tool, then press the iOpener tool onto the connectors to heat the glue on the connector ribbon.

    • If the iOpener tool is not available, use a hair dryer to heat the glue on the connector ribbon and then use a Q-tip dabbed in Isopropyl alcohol to dab the heated glue.

    询问修复机器人
  10. VTech Kidizoom Action Cam Lens Replacement: 步骤 10 中的图像 1,1
    • Gently peel the connector ribbon being held down by the heated glue until it is completely removed.

    • Be cautious of very hot glue when peeling the connector ribbon off of the motherboard

    • When connecting the new camera lense, press the new connector ribbon to the original ribbon's position.

    询问修复机器人
结论

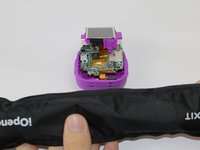
To reassemble your device, follow these instructions in reverse order.

另外一个人完成了本指南。

团队

USF Tampa, Team 3-5, Sullivan Spring 2016 USF Tampa, Team 3-5, Sullivan Spring 2016 的会员

USFT-SULLIVAN-S16S3G5

3 名成员

创作了6篇指南

0指南评论

添加评论

浏览统计数据:

过去 24 小时: 2

过去 7 天: 10

过去 30 天: 68

总计 1,405