跳转到主内容
UE BOOM 2电池更换

UE BOOM 2电池更换

Brandon Yowakim

Brandon Yowakim8 其他贡献者

最后更新于 November 15, 2024

35 - 50 分钟
困难
特色学生指南

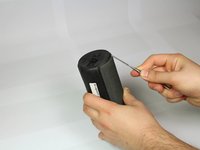
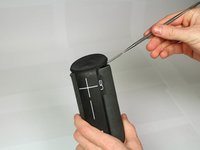
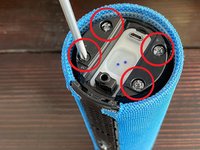
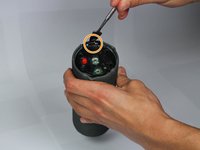
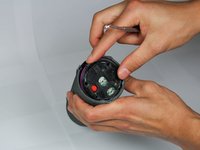
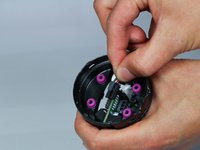
UE Boom 2电池位于顶盖下方。它被4个螺丝固定并且可以被一把螺丝刀和撬棒取下。

你所需要的

当你通过这些链接购买商品时,iFixit 会赚取佣金。
  1. UE BOOM 2电池更换, 电池: 步骤 1 中的图像 1,2 UE BOOM 2电池更换, 电池: 步骤 1 中的图像 2,2
    • 首先,取下位于 UE Boom 2 底部的 D 形环,也就是电源按钮相反一端的那个 D 形环。

    • 通过逆时针旋转的方式将其取下。

  2. UE BOOM 2电池更换: 步骤 2 中的图像 1,2 UE BOOM 2电池更换: 步骤 2 中的图像 2,2
    • 卸下 D 形环后,取下橡胶端口盖。

  3. UE BOOM 2电池更换: 步骤 3 中的图像 1,3 UE BOOM 2电池更换: 步骤 3 中的图像 2,3 UE BOOM 2电池更换: 步骤 3 中的图像 3,3
    • 用金属撬棒拆除橡胶条。

    • 沿着橡胶条的边缘慢慢撬动其边缘。

    • 没必要完全拆除橡胶条。只需撬开盖子就足够了。

  4. UE BOOM 2电池更换: 步骤 4 中的图像 1,1
    • 如果你打算更换橡胶条,那就继续沿着侧面拆除它。

  5. UE BOOM 2电池更换: 步骤 5 中的图像 1,3 UE BOOM 2电池更换: 步骤 5 中的图像 2,3 UE BOOM 2电池更换: 步骤 5 中的图像 3,3
    • 使用一把十字 #2 螺丝刀拧下扬声器底部的四颗 15 毫米螺丝。不要打开带有红色盖子的那一侧(如图片所示),电池在另一侧。

    • 使用金属撬棒撬起塑料盖子。

  6. UE BOOM 2电池更换: 步骤 6 中的图像 1,2 UE BOOM 2电池更换: 步骤 6 中的图像 2,2
    • 小心地将电池电线从固定柱上取下。

    • 捏住电池接头上的黑色小夹子,然后提起接头将其拔出。

    • 慢慢地取出电池,并小心拿放。

结论

为了达到最佳性能,在完成本指南的操作后,请对新安装的电池进行校准(点击此处可查看校准方法:Battery Calibration ,会在新窗口打开)。

将新更换的部件与原来的部件进行对比 —— 在安装之前,你可能需要把原来部件上剩余的零件转移到新部件上,或者去掉新部件上的背胶贴纸。

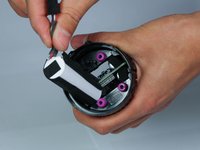
要重新组装你的设备,请按照上述步骤的相反顺序进行操作。

请将你的电子废弃物送到经 R2 或电子管家(e-Stewards)认证的回收机构(点击此处可查看相关信息:How to Recycle End-of-Life Electronics ,会在新窗口打开)。

50等其他人完成本指南。

由衷感谢以下译者:

en zh

100%

xuzai030正在帮助我们修复这个世界! 您也想加入吗?
开始翻译 ›

Brandon Yowakim

于01/18/18注册

1,230 声望

创作了2篇指南

团队

Cal Poly, Team S1-G3, Zimmerman Spring 2020 Cal Poly, Team S1-G3, Zimmerman Spring 2020 的会员

CPSU-ZIMMERMAN-S20S1G3

5 名成员

创作了11篇指南

27指南评论

what kind of battery ?and do you have a link to buy one

wrig5235 - 回复

I was looking for a battery replacement all over the place. Came up with this site that carries parts for the Boom 2:

https://www.joesge.com/products/ue-ultim...

Frederic - 回复

Why is this set to difficult though? It doesn’t look THAT hard… And will this affect waterproofing of the feature?

Frederic - 回复

Because you do not simply stick the plunger in and pop those tabs. They are a force of evil and I even bent my metal tools to open mine.

Joseph Murphy -

It isn't that hard if you've done a couple of repairs, although you gotta work slow and really make sure you got yourself like 3-4 spudger like items (butter knife) and look at reference images where the tabs are. Btw. You don't need to remove more than the bottom plastics and the plate with 4 screws to change the battery. Managed to change my battery while not damaging a single plastic tab

Lucas Schießl -

添加评论

浏览统计数据:

过去 24 小时: 23

过去 7 天: 234

过去 30 天: 1,046

总计 131,361