跳转到主内容

Sony Xperia TL Display Assembly Replacement

你所需要的

  1. Sony Xperia TL Display Assembly Replacement, Remove Top Plastic Section: 步骤 1 中的图像 1,3 Sony Xperia TL Display Assembly Replacement, Remove Top Plastic Section: 步骤 1 中的图像 2,3 Sony Xperia TL Display Assembly Replacement, Remove Top Plastic Section: 步骤 1 中的图像 3,3
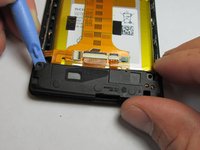
    • Use the plastic opening tool to pry the top plastic section off.

  2. Sony Xperia TL Display Assembly Replacement, Remove Bottom Plastic Section: 步骤 2 中的图像 1,2 Sony Xperia TL Display Assembly Replacement, Remove Bottom Plastic Section: 步骤 2 中的图像 2,2
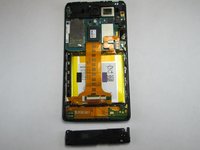
    • Use the plastic opening tool to pry the bottom plastic section off.

  3. Sony Xperia TL Display Assembly Replacement, Unscrewing the Back Off: 步骤 3 中的图像 1,3 Sony Xperia TL Display Assembly Replacement, Unscrewing the Back Off: 步骤 3 中的图像 2,3 Sony Xperia TL Display Assembly Replacement, Unscrewing the Back Off: 步骤 3 中的图像 3,3
    • Remove the four 5mm screws.

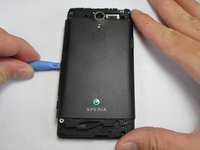
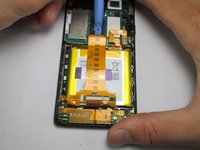
    • Use the plastic opening tool to pry off the back.

  4. Sony Xperia TL Display Assembly Replacement, Loud Speaker: 步骤 4 中的图像 1,3 Sony Xperia TL Display Assembly Replacement, Loud Speaker: 步骤 4 中的图像 2,3 Sony Xperia TL Display Assembly Replacement, Loud Speaker: 步骤 4 中的图像 3,3
    • Use the plastic opening tool to remove the loud speaker module.

  5. Sony Xperia TL Display Assembly Replacement, Battery: 步骤 5 中的图像 1,3 Sony Xperia TL Display Assembly Replacement, Battery: 步骤 5 中的图像 2,3 Sony Xperia TL Display Assembly Replacement, Battery: 步骤 5 中的图像 3,3
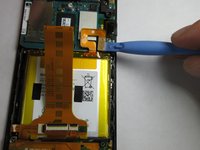
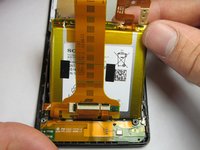
    • Use the plastic opening tool to detach the ribbon running across the battery.

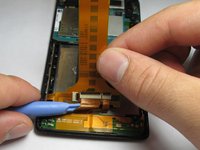
    • Use the plastic opening tool to detach the ribbon connecting the battery to the motherboard.

  6. Sony Xperia TL Display Assembly Replacement, Battery Harness: 步骤 6 中的图像 1,3 Sony Xperia TL Display Assembly Replacement, Battery Harness: 步骤 6 中的图像 2,3 Sony Xperia TL Display Assembly Replacement, Battery Harness: 步骤 6 中的图像 3,3
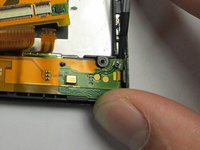
    • Unhook the 2 connections between the harness and phone shell.

    • Using the plastic opening tool, pry the harness up and remove it.

    • There is an adhesive on the bottom half of the battery harness.

  7. Sony Xperia TL Display Assembly Replacement: 步骤 7 中的图像 1,1
    • The final step is taking the entire harness off of the phone.

  8. Sony Xperia TL Display Assembly Replacement, Motherboard: 步骤 8 中的图像 1,3 Sony Xperia TL Display Assembly Replacement, Motherboard: 步骤 8 中的图像 2,3 Sony Xperia TL Display Assembly Replacement, Motherboard: 步骤 8 中的图像 3,3
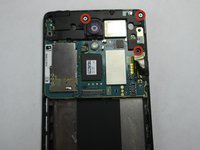
    • Use the Phillips #00 to remove the 3 5mm screws.

    • Lift the plastic cover off.

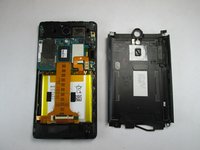
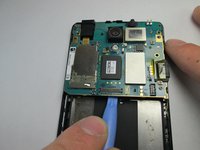
    • Use the plastic opening tool to pry the motherboard out of the phone shell.

  9. Sony Xperia TL Display Assembly Replacement, Ear Speaker: 步骤 9 中的图像 1,1
    • Use the plastic opening tool to detach the ear piece speaker.

    • Avoid majorly bending the tiny metal hooks holding the ear piece in.

  10. Sony Xperia TL Display Assembly Replacement, Display Assembly: 步骤 10 中的图像 1,1
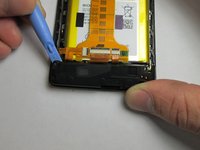
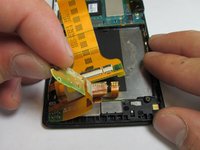
    • Once every single piece is removed from the main screen/digitizer this will be the only remaining piece. Nothing else can be removed. If you need to replace your screen this entire piece must be replaced.

结论

To reassemble your device, follow these instructions in reverse order.

另外一个人完成了本指南。

Adam Giniger

于09/22/14注册

1,303 声望

创作了8篇指南

团队

USF Tampa, Team 4-4, Brown Fall 2014 USF Tampa, Team 4-4, Brown Fall 2014 的会员

USFT-BROWN-F14S4G4

3 名成员

创作了10篇指南

0条评论

添加评论

浏览统计数据:

过去 24 小时: 0

过去 7 天: 0

过去 30 天: 1

总计 539