跳转到主内容

Sony BDP-BX520 Disc Tray Replacement

你所需要的

  1. Sony BDP-BX520 Disc Tray Replacement, Disc Tray Cover: 步骤 1 中的图像 1,1
    • Plug in the Blu-Ray player, then press the power button, making sure the Blu-Ray player is powered on.

    • Press the eject button on either the top of the Blu-Ray player or on the remote to open the disc tray.

  2. Sony BDP-BX520 Disc Tray Replacement: 步骤 2 中的图像 1,1
    • Grab the sides of the disc tray cover and carefully pull each side upwards, starting with the left side. This will unhook the cover from the tray.

  3. Sony BDP-BX520 Disc Tray Replacement: 步骤 3 中的图像 1,1
    • Close the disc tray, then power off and unplug the Blu-Ray player.

  4. Sony BDP-BX520 Disc Tray Replacement, Top Case: 步骤 4 中的图像 1,1
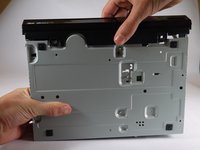
    • Locate the three 8 mm screws on the back of the Blu-Ray player.

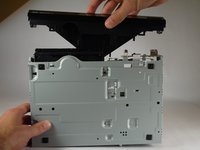
    • Using the Phillips #2 screwdriver, unscrew each of the screws and set them aside.

  5. Sony BDP-BX520 Disc Tray Replacement: 步骤 5 中的图像 1,2 Sony BDP-BX520 Disc Tray Replacement: 步骤 5 中的图像 2,2
    • Gently pull the top case back to remove it from the Blu-Ray player.

  6. Sony BDP-BX520 Disc Tray Replacement, Front Panel: 步骤 6 中的图像 1,1
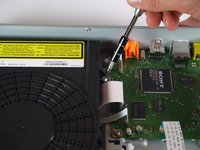
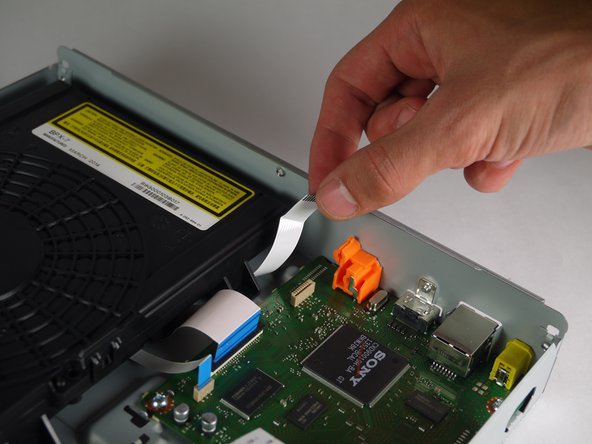
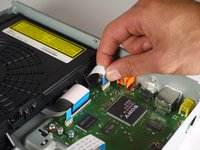
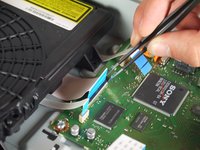
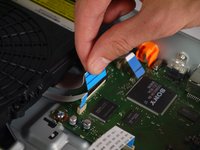
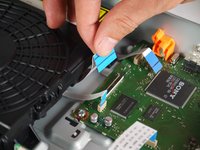
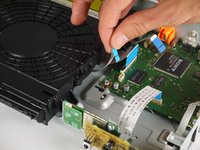
    • Insert the nylon or metal spudger under the clip on the side near the front of the device. Lift the clip so it is free from the device.

    • Lifting these clips may require you to hold one clip open while you move on to the next clip.

  7. Sony BDP-BX520 Disc Tray Replacement: 步骤 7 中的图像 1,1
    • Flip device over so the bottom faces you.

    • Insert the nylon or metal spudger and lift the two clips on the bottom of the device.

  8. Sony BDP-BX520 Disc Tray Replacement: 步骤 8 中的图像 1,1
    • Lift the clip on the opposite side of the device with the nylon or metal spudger.

  9. Sony BDP-BX520 Disc Tray Replacement: 步骤 9 中的图像 1,2 Sony BDP-BX520 Disc Tray Replacement: 步骤 9 中的图像 2,2
    • Grasp the front case firmly and lift from the rest of the device.

    • Lifting may require some force.

  10. Sony BDP-BX520 Disc Tray Replacement, Disc Tray: 步骤 10 中的图像 1,2 Sony BDP-BX520 Disc Tray Replacement, Disc Tray: 步骤 10 中的图像 2,2
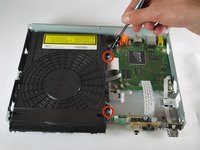
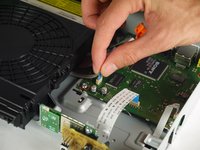
    • Using a Phillips #2 screwdriver, remove the two silver 8 mm screws on the right side of the disk tray .

  11. Sony BDP-BX520 Disc Tray Replacement: 步骤 11 中的图像 1,2 Sony BDP-BX520 Disc Tray Replacement: 步骤 11 中的图像 2,2
    • Pull the medium-sized 9 pin ribbon cable out of its connector on the motherboard.

  12. Sony BDP-BX520 Disc Tray Replacement: 步骤 12 中的图像 1,3 Sony BDP-BX520 Disc Tray Replacement: 步骤 12 中的图像 2,3 Sony BDP-BX520 Disc Tray Replacement: 步骤 12 中的图像 3,3
    • Using tweezers, lift up the tab of the large 45 pin connector on the motherboard.

    • Pull the large 45 pin ribbon cable out of its connector.

  13. Sony BDP-BX520 Disc Tray Replacement: 步骤 13 中的图像 1,2 Sony BDP-BX520 Disc Tray Replacement: 步骤 13 中的图像 2,2
    • Pull the small 5 pin ribbon cable out of its connector on the motherboard.

  14. Sony BDP-BX520 Disc Tray Replacement: 步骤 14 中的图像 1,2 Sony BDP-BX520 Disc Tray Replacement: 步骤 14 中的图像 2,2
    • Slide the disk tray out from under the tabs on the case holding it down while lifting it out of the case.

结论

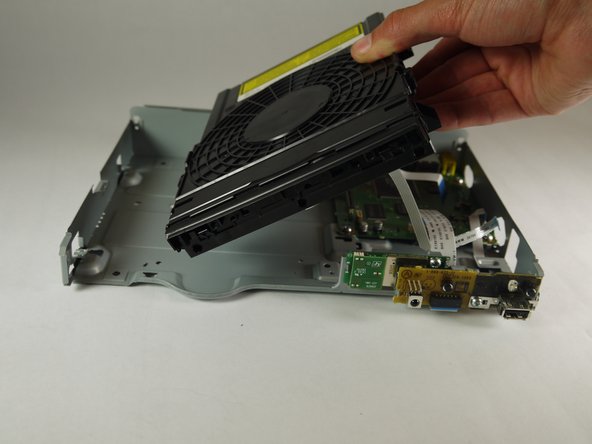
To reassemble your device, follow these instructions in reverse order.

6等其他人完成本指南。

团队

Cal Poly, Team 8-41, Amido Winter 2015 Cal Poly, Team 8-41, Amido Winter 2015 的会员

CPSU-AMIDO-W15S8G41

4 名成员

创作了8篇指南

2条评论

Thanks, this helped a lot. I still cant get the DVD drawer to eject with the eject button. The power light will not turn off.

tomcerecedes - 回复

Thank you thank you thank you. I spent an hour on the phone with Sony “technical support “ and was told nothing could be done except to send it off for servicing. This worked PERFECTLY!!!! THANKS AGAIN ?

Susan Brown - 回复

添加评论

浏览统计数据:

过去 24 小时: 0

过去 7 天: 0

过去 30 天: 6

总计 7,387