跳转到主内容

三星 Galaxy S5 主板更换

你所需要的

  1. 三星 Galaxy S5 主板更换, 后盖: 步骤 1 中的图像 1,3 三星 Galaxy S5 主板更换, 后盖: 步骤 1 中的图像 2,3 三星 Galaxy S5 主板更换, 后盖: 步骤 1 中的图像 3,3
    • 把指甲盖或塑料开启划片插入后置摄像头左边的凹槽。

    • 轻轻地从手机背部撬动拉起弹性的后盖。

  2. 三星 Galaxy S5 主板更换, 电池: 步骤 2 中的图像 1,3 三星 Galaxy S5 主板更换, 电池: 步骤 2 中的图像 2,3 三星 Galaxy S5 主板更换, 电池: 步骤 2 中的图像 3,3
    • 把手指或塑料开启工具插入电池底部右侧的凹槽中向上掀。

    • 把电池从手机中移出

  3. 三星 Galaxy S5 主板更换, micro SD 卡: 步骤 3 中的图像 1,2 三星 Galaxy S5 主板更换, micro SD 卡: 步骤 3 中的图像 2,2
    • 使用指尖,把microSD卡直接向下拉出卡槽。

    • 将microSD卡从手机移除。

  4. 三星 Galaxy S5 主板更换, SIM 卡: 步骤 4 中的图像 1,1
    • 重复以上步骤移除 SIM 卡。

  5. 三星 Galaxy S5 主板更换, 显示屏组件: 步骤 5 中的图像 1,3 三星 Galaxy S5 主板更换, 显示屏组件: 步骤 5 中的图像 2,3 三星 Galaxy S5 主板更换, 显示屏组件: 步骤 5 中的图像 3,3
    • 使用塑料撬棒翘起塑料的连接器面板。

    • 用镊子取下连接器面板。

    • 在重装时应该准备足够的胶水来粘住面板,或者使用少量的双面胶带。

  6. 三星 Galaxy S5 主板更换: 步骤 6 中的图像 1,2 三星 Galaxy S5 主板更换: 步骤 6 中的图像 2,2
    • 使用一个尖头撬棒撬起home按键排线插头。

  7. 三星 Galaxy S5 主板更换: 步骤 7 中的图像 1,2 三星 Galaxy S5 主板更换: 步骤 7 中的图像 2,2
    • 在接下来的步骤中你将需要使用一个iOpener工具来加热附着在显示屏组件上的粘合剂,这样可以更加安全轻松地拆去屏幕。为了更好地使用iOpener工具,请参照我们的iOpener加热指南,确保注意所有的警告。

    • 将一个加热的iOpener放在手机左侧至少90秒钟。

    • 重新加热iOpener并且把它放在手机的右侧。

  8. 三星 Galaxy S5 主板更换: 步骤 8 中的图像 1,2 三星 Galaxy S5 主板更换: 步骤 8 中的图像 2,2
    • 在接下来的步骤中你将需要使用一个起子来分离由粘和剂固定的前面板玻璃。只翘起松动的地方,如果你感觉到阻力,停止滑动起子并重新加热。

    • 把开启片的边缘插入前面板玻璃右侧的底部。

  9. 三星 Galaxy S5 主板更换: 步骤 9 中的图像 1,3 三星 Galaxy S5 主板更换: 步骤 9 中的图像 2,3 三星 Galaxy S5 主板更换: 步骤 9 中的图像 3,3
    • 沿着显示屏右侧向上划动三角划片。

  10. 三星 Galaxy S5 主板更换: 步骤 10 中的图像 1,3 三星 Galaxy S5 主板更换: 步骤 10 中的图像 2,3 三星 Galaxy S5 主板更换: 步骤 10 中的图像 3,3
    • 在边角处小心滑动划片,在手机顶部的扬声器栅格处停下。

  11. 三星 Galaxy S5 主板更换: 步骤 11 中的图像 1,3 三星 Galaxy S5 主板更换: 步骤 11 中的图像 2,3 三星 Galaxy S5 主板更换: 步骤 11 中的图像 3,3
    • 胶水固定的手机顶部近是在听筒扬声器上方的窄条。滑动划片沿着扬声器的顶部避免破坏内部组件。

    • 滑动划片通过手机顶部,千万注意不要把划片插得太深。

  12. 三星 Galaxy S5 主板更换: 步骤 12 中的图像 1,3 三星 Galaxy S5 主板更换: 步骤 12 中的图像 2,3 三星 Galaxy S5 主板更换: 步骤 12 中的图像 3,3
    • 沿着左上角小心滑动划片。

    • 如果你因为冷却的粘合剂遇到任何阻力,把一个重新加热的iOpener放在手机的左边。

  13. 三星 Galaxy S5 主板更换: 步骤 13 中的图像 1,3 三星 Galaxy S5 主板更换: 步骤 13 中的图像 2,3 三星 Galaxy S5 主板更换: 步骤 13 中的图像 3,3
    • 沿着手机的左侧向下滑动划片并在左下角处停下。

  14. 三星 Galaxy S5 主板更换: 步骤 14 中的图像 1,2 三星 Galaxy S5 主板更换: 步骤 14 中的图像 2,2
    • 沿着手机左下角滑动划片一路,确保它被安全的放好。

    • 在接下来的步骤中你需要把iOpener放在手机底部的home键上方,不要让划片划出。

  15. 三星 Galaxy S5 主板更换: 步骤 15 中的图像 1,1
    • 把一个重新加热的iOpener放在显示屏组件的底部。

    • 在手机的这个部分有精密的组件,你要确保粘和剂是热的并且容易松开来保护手机。

  16. 三星 Galaxy S5 主板更换: 步骤 16 中的图像 1,3 三星 Galaxy S5 主板更换: 步骤 16 中的图像 2,3 三星 Galaxy S5 主板更换: 步骤 16 中的图像 3,3
    • 手机底部包含虚拟按键和home键的带状接线。如果你把划片插得太深就有可能把这些线弄断。

    • 用划片的最外边缘通过显示屏的底部边缘来分离剩余最后的粘合剂。

  17. 三星 Galaxy S5 主板更换: 步骤 17 中的图像 1,2 三星 Galaxy S5 主板更换: 步骤 17 中的图像 2,2
    • 扭转划片将屏幕与手机分离。

    • 如果前面板不容易分离,可能需要额外工作来分离粘合剂。

  18. 三星 Galaxy S5 主板更换: 步骤 18 中的图像 1,2 三星 Galaxy S5 主板更换: 步骤 18 中的图像 2,2
    • 如果前面板不容易分离,可能需要分离虚拟按键接线。

    • 这些线很细而且容易断,因此确保只把它从显示屏组件中分离开而不是把它拉断。

    • 把一个划片插到显示屏上虚拟按键的底部,把接线从前面板内部的插槽中撬起。

  19. 三星 Galaxy S5 主板更换: 步骤 19 中的图像 1,2 三星 Galaxy S5 主板更换: 步骤 19 中的图像 2,2
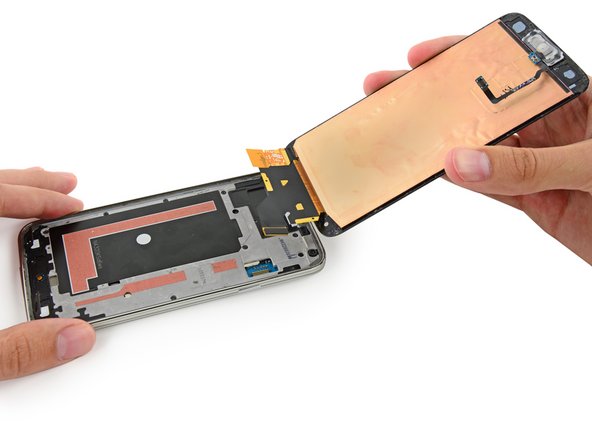
    • 轻轻抬起,但不要移去显示屏底部的home键。

    • 不要把前面板整个移除,它仍然连接到一个连接器。

    • 如果你重新使用home键的柔性线缆,确保线缆没有与home键分离开。粘合剂会导致线缆从home键插槽撕开,这样home键依然工作但是指纹识别器可能无法正常使用。

  20. 三星 Galaxy S5 主板更换: 步骤 20 中的图像 1,3 三星 Galaxy S5 主板更换: 步骤 20 中的图像 2,3 三星 Galaxy S5 主板更换: 步骤 20 中的图像 3,3
    • 用撬棒的尖端从主板插槽直接掀起前面板的连线。

    • 安全地将前面板从手机中分离出来。

    • 若果你更换的屏幕没有Home健的话,按照 Home键安装教程 步骤来将旧Home键装到新的屏幕上或者换一个新的Home键。

  21. 三星 Galaxy S5 主板更换, 内部中框组件: 步骤 21 中的图像 1,1
    • 从屏幕一边从中框架移除十个 3.4 mm Phillips #000 螺丝。

  22. 三星 Galaxy S5 主板更换: 步骤 22 中的图像 1,1
    • 把手机翻面并且从中框架移除以下螺丝。

    • 两个靠近USB接口和电池一边的4.4 mm Phillips #000 螺丝

    • 一个4.4 mm Phillips #000 螺丝

  23. 三星 Galaxy S5 主板更换: 步骤 23 中的图像 1,3 三星 Galaxy S5 主板更换: 步骤 23 中的图像 2,3 三星 Galaxy S5 主板更换: 步骤 23 中的图像 3,3
    • 小心的使用塑料开启工具往左下中框架的内部移动来分离三个白色塑料卡扣。

  24. 三星 Galaxy S5 主板更换: 步骤 24 中的图像 1,2 三星 Galaxy S5 主板更换: 步骤 24 中的图像 2,2
    • 中框架由嵌入与主板两部分组合而成。

    • 小心的拉动较长的银色斜面来分离中框的两部分。

    • 从电池部件轻轻的往里推动可能会对操作有帮助,但是注意不要弯曲中框架的内半部分,因为主板安装在中框架上。

  25. 三星 Galaxy S5 主板更换: 步骤 25 中的图像 1,2 三星 Galaxy S5 主板更换: 步骤 25 中的图像 2,2
    • 在右边银色斜面持续这个操作,把中框架的内部结构分离成两半。

  26. 三星 Galaxy S5 主板更换: 步骤 26 中的图像 1,2 三星 Galaxy S5 主板更换: 步骤 26 中的图像 2,2
    • 使用一个塑料开启器来撬开剩下的银色斜面。

  27. 三星 Galaxy S5 主板更换: 步骤 27 中的图像 1,2 三星 Galaxy S5 主板更换: 步骤 27 中的图像 2,2
    • 仔细的把移除内部中框架/主板组件从白色的中框架移除。

  28. 三星 Galaxy S5 主板更换, 主板集成: 步骤 28 中的图像 1,2 三星 Galaxy S5 主板更换, 主板集成: 步骤 28 中的图像 2,2
    • 小心用尖头撬棒伸到天线连接器下。

    • 向上拨动,将天线与主板分离。

  29. 三星 Galaxy S5 主板更换: 步骤 29 中的图像 1,1
    • 移除连接主板和中框的3.0 mm Phillips #000 螺丝。

  30. 三星 Galaxy S5 主板更换: 步骤 30 中的图像 1,2 三星 Galaxy S5 主板更换: 步骤 30 中的图像 2,2
    • 从中框拉起主板相机一端,但是不要移开,你可以看到尾部的连接器。

    • 不要试图完全移除主板,当他还在与USB小板连接的时候。

  31. 三星 Galaxy S5 主板更换: 步骤 31 中的图像 1,2 三星 Galaxy S5 主板更换: 步骤 31 中的图像 2,2
    • 用扁平撬棒敲起小板的连接线,分离小板和主板。

  32. 三星 Galaxy S5 主板更换, 主板: 步骤 32 中的图像 1,3 三星 Galaxy S5 主板更换, 主板: 步骤 32 中的图像 2,3 三星 Galaxy S5 主板更换, 主板: 步骤 32 中的图像 3,3
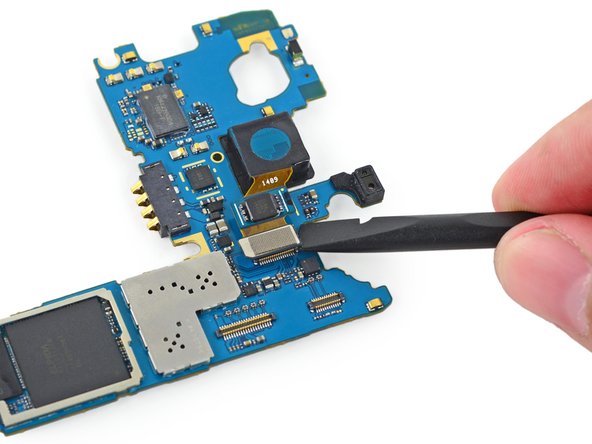
    • 使用撬棒的平端将前置摄像头接口从主板上的插座上断开。

    • 从主板上移除前置摄像头。

  33. 三星 Galaxy S5 主板更换: 步骤 33 中的图像 1,3 三星 Galaxy S5 主板更换: 步骤 33 中的图像 2,3 三星 Galaxy S5 主板更换: 步骤 33 中的图像 3,3
    • 使用撬棒的平端将后置摄像头接口直接从主板上的插座中断开。

    • 从主板上移除后置摄像头。

结论

要重新组装您的设备,请按相反的顺序进行这些说明。

87等其他人完成本指南。

由衷感谢以下译者:

en zh

100%

Yanqi Wang正在帮助我们修复这个世界! 您也想加入吗?
开始翻译 ›

Sam Goldheart

于10/18/12注册

467,548 声望

创作了538篇指南

团队

iFixit iFixit 的会员

Staff

140 名成员

创作了18,077篇指南

25条评论

Do you know if I can put a g900p motherboard in the G900I in order to get FM radio. Cheers.

James Dean - 回复

In Step 28 you will figure out that there is a second antenna cable that is brown and needs to be detached as well. It is alligned in one row with the blue antenna cable.

Manuel Moebius - 回复

I want to use the motherboard from a T-Mobile galaxy s5 on an AT&T galaxy s5 I just wanted to know if it fits inside the att version because my SIM card reader is broken so I wanted to know if I could use one from T-Mobile and that it would fix and work

Ernesto Rosales -

It would fit and work

Ernesto Rosales - 回复

I dropped my Galaxy S5, gps for maps, compass etc... works fine, but for Endomondo and Strava that requires a location is not working, before the problem it showed GPS signal Ready, Now it just keeps ideling looking for location (GPS), dissasemble to check for any loose connector or loose screw and found nothing, What can be wrong and how to fix it?

Regards

Ralph Wall - 回复

添加评论

浏览统计数据:

过去 24 小时: 6

过去 7 天: 25

过去 30 天: 90

总计 126,800