跳转到主内容

当前版本的文档还未经巡查,您可以查看最新的已查核版本

三星盖乐世 S10 后置摄像头更换

你所需要的

  1. 三星盖乐世 S10 后置摄像头更换, SIM卡槽: 步骤 1 中的图像 1,3 三星盖乐世 S10 后置摄像头更换, SIM卡槽: 步骤 1 中的图像 2,3 三星盖乐世 S10 后置摄像头更换, SIM卡槽: 步骤 1 中的图像 3,3
    • 将一个SIM卡针插入SIM卡槽旁边的洞里,或是一个拉直的回形针插入SIM卡槽旁边的洞里,SIM卡槽位于手机顶部边缘的塑料天线带旁边。

    • 如果你将工具插入手机顶部边缘的另一个孔中,也不要担心——麦克风外面装了一个线圈,不会把它不小心戳坏的。

    • 稍用力按下去,把卡槽按出。

    • 拿开SIM卡卡槽。

    • 在插入手机前,请确认SIM卡已经固定好并且未错位。

  2. 三星盖乐世 S10 后置摄像头更换, 加热后盖: 步骤 2 中的图像 1,3 三星盖乐世 S10 后置摄像头更换, 加热后盖: 步骤 2 中的图像 2,3 三星盖乐世 S10 后置摄像头更换, 加热后盖: 步骤 2 中的图像 3,3
    • 在开始之前拔下电源插头并关闭电源。

    • 加热iOpener并将其涂在后盖的右边缘两分钟。

    • 也可以使用吹风机、热风枪或热板,但要注意不要使手机过热 —— 显示器和内部电池都易受热损坏。

    • 等待时,请查看拆下的后盖的图像,并记下粘合剂的位置。

  3. 三星盖乐世 S10 后置摄像头更换, 制造一个打开的空隙: 步骤 3 中的图像 1,3 三星盖乐世 S10 后置摄像头更换, 制造一个打开的空隙: 步骤 3 中的图像 2,3 三星盖乐世 S10 后置摄像头更换, 制造一个打开的空隙: 步骤 3 中的图像 3,3
    • 将手机的加热右边缘放在约0.5英寸(13毫米)厚的物体上。这使手机成为打开工具的角度。

    • 用手指支撑手机的左边缘,这样手机就不会滑动。用坚固的压力拉动吸盘。

    • 将打开工具的边缘按入后盖和框架之间的接缝中。

    • 沿着接缝来回几次滑动撬棒工具。

    • 重复之前的步骤,再次试着插入撬棒。

  4. 三星盖乐世 S10 后置摄像头更换, 插入一个三角撬片: 步骤 4 中的图像 1,3 三星盖乐世 S10 后置摄像头更换, 插入一个三角撬片: 步骤 4 中的图像 2,3 三星盖乐世 S10 后置摄像头更换, 插入一个三角撬片: 步骤 4 中的图像 3,3
    • 加热 iOpener 并将其涂抹在手机的同一边缘两分钟。

    • 在手机背面使用一个吸盘,尽可能靠近右边缘的中心(粘合剂最窄的地方)。

    • 用强力,稳定的力拉动吸盘,在后盖和框架之间形成间隙。

    • 将开口三角撬片的尖端插入间隙。

    • 由于很紧,这可能需要多次尝试。

    • 如果你在撬开时遇到困难,最好的办法是向边缘施加更多热量并再次尝试上一步。

    • 你可以尝试在接缝中涂几滴高浓度(超过90%)的异丙醇,以帮助软化粘合剂。

    • 请勿过度用力使用三角撬片,否则可能会使后盖玻璃破裂。

  5. 三星盖乐世 S10 后置摄像头更换, 划过粘合剂: 步骤 5 中的图像 1,3 三星盖乐世 S10 后置摄像头更换, 划过粘合剂: 步骤 5 中的图像 2,3 三星盖乐世 S10 后置摄像头更换, 划过粘合剂: 步骤 5 中的图像 3,3
    • 沿着手机边缘滑动三角撬片,切开粘合剂。

    • 在施加热量之前,不要尝试切割保持角落的粘合剂。如果你这样做,你可能会破坏后盖。

    • 在接缝处留下一个三角撬片,以防止粘合剂重新密封。

  6. 三星盖乐世 S10 后置摄像头更换: 步骤 6 中的图像 1,2 三星盖乐世 S10 后置摄像头更换: 步骤 6 中的图像 2,2
    • 将加热的 iOpener 应用到手机的底部边缘两分钟。

    • 将三角撬片插入右下角附近的右边缘。

    • 小心翼翼地将三角撬片放在拐角处。沿着底边和左下角继续切割。

    • 如果感觉切割困难,请在继续之前重新加热边缘。

    • 在接缝处留下三角撬片,以防止粘合剂重新密封。

  7. 三星盖乐世 S10 后置摄像头更换: 步骤 7 中的图像 1,3 三星盖乐世 S10 后置摄像头更换: 步骤 7 中的图像 2,3 三星盖乐世 S10 后置摄像头更换: 步骤 7 中的图像 3,3
    • 继续加热并切割手机的剩余边缘。

    • 切割角落时,请确保角落被彻底加热。

  8. 三星盖乐世 S10 后置摄像头更换: 步骤 8 中的图像 1,3 三星盖乐世 S10 后置摄像头更换: 步骤 8 中的图像 2,3 三星盖乐世 S10 后置摄像头更换: 步骤 8 中的图像 3,3
    • 在手机上划开之后,扭动其中一个边缘的三角撬片,以帮助将后盖与框架分开。

    • 慢慢抬起后盖。使用三角撬片切割任何剩余的粘合剂。

    • 取下后盖。

    • 在重新安装后盖之前,务必清除框架上的所有粘合剂残留物。在继续工作之前,请确保完全关闭手机电源。

    • 在重新组装过程中,在将后盖密封到位之前,这是打开手机电源并测试所有功能的号时机。在继续工作之前,请务必将手机完全重新打开。

    • 要密封手机,请将预先切割的粘合剂或双面Tesa 胶带粘贴到框架周边,然后将后盖牢固地按入到位。

  9. 三星盖乐世 S10 后置摄像头更换, 移除中框: 步骤 9 中的图像 1,1
    • 拧下将顶部中框固定到电话的八颗 4毫米十字螺丝。

  10. 三星盖乐世 S10 后置摄像头更换: 步骤 10 中的图像 1,2 三星盖乐世 S10 后置摄像头更换: 步骤 10 中的图像 2,2
    • 中框仍通过边缘周围的几个塑料夹固定在适当的位置。

    • 将撬棒的尖端插入音量调高按钮附近的中框右边缘的槽口中。

    • 撬起以松开手机的中框。

  11. 三星盖乐世 S10 后置摄像头更换: 步骤 11 中的图像 1,3 三星盖乐世 S10 后置摄像头更换: 步骤 11 中的图像 2,3 三星盖乐世 S10 后置摄像头更换: 步骤 11 中的图像 3,3
    • 从顶角提起中框,然后将其从手机中取出。

    • 顶部中框可能会在其底部右下角粘到底部中框。如果发生这种情况,请慢慢将其剥离。

    • 要重新安装顶部中框:

    • 将中框的上边缘对准手机,然后将框放在手机上。

    • 用手指在中框周围施加压力,以将中框夹卡回原位。边缘应与手机边缘齐平。

  12. 三星盖乐世 S10 后置摄像头更换, 断开电池: 步骤 12 中的图像 1,3 三星盖乐世 S10 后置摄像头更换, 断开电池: 步骤 12 中的图像 2,3 三星盖乐世 S10 后置摄像头更换, 断开电池: 步骤 12 中的图像 3,3
    • 将撬棒的扁平端插入电池接口下方,该电池接口连接至后置摄像头下方的主板。

    • 向上撬以将连接器从其插座上断开。

    • 当断开此类接口的连接时,请注意不要移动插座周围的小型表面安装组件。

    • 轻轻将电池的柔性电缆推离主板插槽,以防止意外接触。

  13. 三星盖乐世 S10 后置摄像头更换, 移除扬声器: 步骤 13 中的图像 1,1
    • 拧下固定下部中框的7颗4毫米十字螺丝。

  14. 三星盖乐世 S10 后置摄像头更换: 步骤 14 中的图像 1,2 三星盖乐世 S10 后置摄像头更换: 步骤 14 中的图像 2,2
    • 中框仍通过边缘周围的几个塑料夹固定在适当的位置。

    • 将撬棒的尖端插入下中框的右上角下方。

    • 撬起手机中的中框。

  15. 三星盖乐世 S10 后置摄像头更换: 步骤 15 中的图像 1,3 三星盖乐世 S10 后置摄像头更换: 步骤 15 中的图像 2,3 三星盖乐世 S10 后置摄像头更换: 步骤 15 中的图像 3,3
    • 用手指抓住中框松动的一端,然后慢慢向上提起。

    • 稍微摆动中间框架,以帮助打开剩余的边缘夹。

    • 移除底部中框。扬声器在底部中框上。

  16. 这个步骤还没有翻译 帮忙翻译一下

    三星盖乐世 S10 后置摄像头更换: 步骤 16 中的图像 1,2 三星盖乐世 S10 后置摄像头更换: 步骤 16 中的图像 2,2
    • Use the flat end of a spudger to pry up and disconnect the display connector from its motherboard socket, located near the bottom right corner of the phone.

  17. 这个步骤还没有翻译 帮忙翻译一下

    三星盖乐世 S10 后置摄像头更换: 步骤 17 中的图像 1,2 三星盖乐世 S10 后置摄像头更换: 步骤 17 中的图像 2,2
    • Use the point of a spudger to pry up and disconnect the headphone jack's connector from its motherboard socket.

  18. 这个步骤还没有翻译 帮忙翻译一下

    三星盖乐世 S10 后置摄像头更换: 步骤 18 中的图像 1,1
    • Remove the three 3.7 mm Phillips screws securing the motherboard to the phone.

  19. 这个步骤还没有翻译 帮忙翻译一下

    三星盖乐世 S10 后置摄像头更换: 步骤 19 中的图像 1,2 三星盖乐世 S10 后置摄像头更换: 步骤 19 中的图像 2,2
    • Insert the point of a spudger underneath the right edge of the motherboard, near the volume down button.

    • Pry up gently to loosen the motherboard from its recess.

  20. 这个步骤还没有翻译 帮忙翻译一下

    三星盖乐世 S10 后置摄像头更换: 步骤 20 中的图像 1,2 三星盖乐世 S10 后置摄像头更换: 步骤 20 中的图像 2,2
    • Insert the point of a spudger under bottom left corner of the motherboard.

    • Pry up gently to loosen the motherboard from its recess.

  21. 这个步骤还没有翻译 帮忙翻译一下

    三星盖乐世 S10 后置摄像头更换: 步骤 21 中的图像 1,3 三星盖乐世 S10 后置摄像头更换: 步骤 21 中的图像 2,3 三星盖乐世 S10 后置摄像头更换: 步骤 21 中的图像 3,3
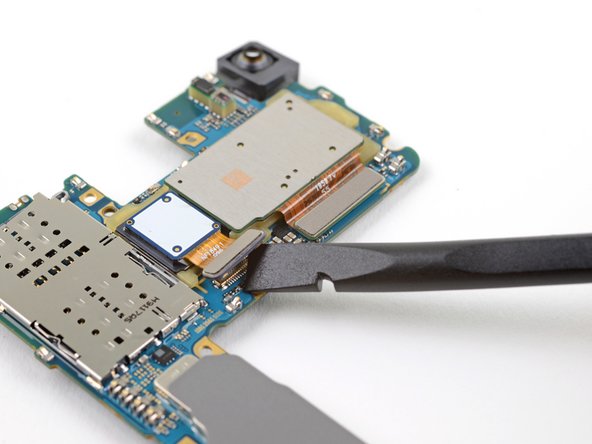
    • Using your fingers, grasp the motherboard by the top corners.

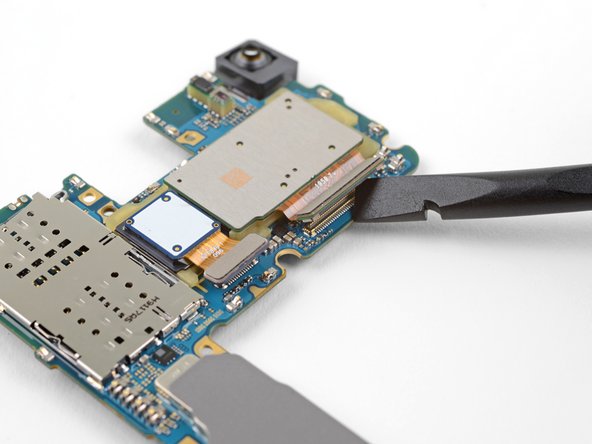
    • Swing the motherboard slightly out of its recess. Be careful not to snag any cables along the way.

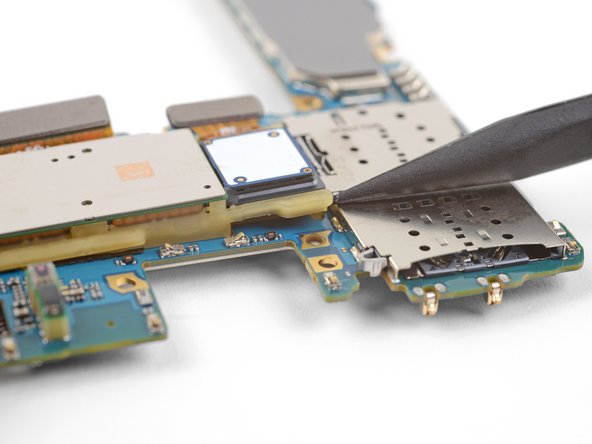
    • Pull the motherboard towards the top edge of the phone while wiggling the board slightly. This will loosen the charging port from its socket.

    • Once the charging port is freed from its socket, remove the motherboard.

    • To reinstall the motherboard:

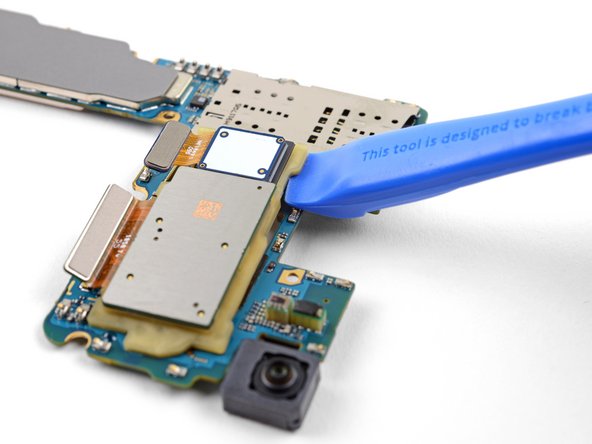
    • Align the motherboard's charging port with the bottom edge of the phone.

    • Gently push the motherboard against the bottom edge of the phone until the charging port is completely seated.

    • Lower the motherboard and press into place. Be careful not to trap any cables underneath the motherboard. The board should sit flush against the frame.

  22. 三星盖乐世 S10 后置摄像头更换, 后置摄像头: 步骤 22 中的图像 1,3 三星盖乐世 S10 后置摄像头更换, 后置摄像头: 步骤 22 中的图像 2,3 三星盖乐世 S10 后置摄像头更换, 后置摄像头: 步骤 22 中的图像 3,3
    • 翻转主板。

    • 使用撬棒的平端撬起两个摄像头接口,并将其从主板上的插槽中断开。

  23. 三星盖乐世 S10 后置摄像头更换: 步骤 23 中的图像 1,1
    • 加热 iOpener 并将其放在后置摄像头模块上一分钟。

  24. 三星盖乐世 S10 后置摄像头更换: 步骤 24 中的图像 1,2 三星盖乐世 S10 后置摄像头更换: 步骤 24 中的图像 2,2
    • 将撬棒的尖端插入相机模块左上角的小缺口处。

    • 从主板上撬起以松开摄像头模块。

  25. 三星盖乐世 S10 后置摄像头更换: 步骤 25 中的图像 1,2 三星盖乐世 S10 后置摄像头更换: 步骤 25 中的图像 2,2
    • 将打开工具的边缘插入摄像机模块松动的角下。

    • 从主板上撬起以松开摄像头模块。

  26. 三星盖乐世 S10 后置摄像头更换: 步骤 26 中的图像 1,1
    • 卸下后置摄像头模块。

结论

请按逆序重组设备。

11等其他人完成本指南。

由衷感谢以下译者:

en zh

100%

Yuting Zhao正在帮助我们修复这个世界! 您也想加入吗?
开始翻译 ›

Arthur Shi

于01/03/18注册

254,808 声望

创作了529篇指南

团队

iFixit iFixit 的会员

Staff

137 名成员

创作了17,457篇指南

8条评论

I only wanted to know, what cameras are used in Galaxy S10/e, are they from Sony or Samsung used its own?

Hanif Ali Baloch - 回复

I’m sure I could combine info and figure it out on my own, but is there anywhere I can find instructions on only replacing the camera lens glass? I’m not the best at figuring this stuff out and getting it right. Any help is appreciated.

Riley Crawley - 回复

Hi, I had to replace the cover on my lens, and now the only one that focuses clear is .5. The rest are blurry. IF I replace this, will it fix that?

Jeanie Compton - 回复

i having camera issue, camera failed . Even check with *#0*# camera still unable. Changing the camera module will solve this?

ngoh aywen - 回复

hello, if you have an authorized Samsung dealer around you they can diagnose the problem at a very affordable fee

mcsmart pain -

添加评论

浏览统计数据:

过去 24 小时: 8

过去 7 天: 42

过去 30 天: 220

总计 24,835