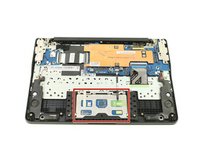
跳转到主内容

Samsung Chromebook 3 Trackpad Replacement

你所需要的

  1. Samsung Chromebook 3 Trackpad Replacement, Bottom Case: 步骤 1 中的图像 1,2 Samsung Chromebook 3 Trackpad Replacement, Bottom Case: 步骤 1 中的图像 2,2
    • Place the Chromebook face down so that the bottom case is exposed.

    • Using a Phillips #00 screwdriver, remove nine 4.6mm screws from the back casing.

  2. Samsung Chromebook 3 Trackpad Replacement: 步骤 2 中的图像 1,3 Samsung Chromebook 3 Trackpad Replacement: 步骤 2 中的图像 2,3 Samsung Chromebook 3 Trackpad Replacement: 步骤 2 中的图像 3,3
    • Use a iFixit opening tool to gently pry the case up from the vent on the hinge side of the Chromebook.

    • You should hear a popping sound as the connectors disengage inside the case.

  3. Samsung Chromebook 3 Trackpad Replacement: 步骤 3 中的图像 1,1
    • Lift the case up and off the device

  4. Samsung Chromebook 3 Trackpad Replacement, Battery: 步骤 4 中的图像 1,2 Samsung Chromebook 3 Trackpad Replacement, Battery: 步骤 4 中的图像 2,2
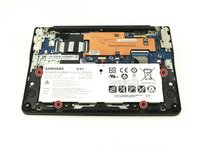
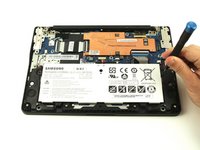
    • Locate the battery and remove the four 4.6mm screws at the corners which attach it to case using a Phillips #00 screwdriver.

  5. Samsung Chromebook 3 Trackpad Replacement: 步骤 5 中的图像 1,2 Samsung Chromebook 3 Trackpad Replacement: 步骤 5 中的图像 2,2
    • Use a spudger to gently pry the power cable cord upwards from the motherboard.

  6. Samsung Chromebook 3 Trackpad Replacement: 步骤 6 中的图像 1,1
    • Lift the battery up and out from the case.

  7. Samsung Chromebook 3 Trackpad Replacement, Trackpad: 步骤 7 中的图像 1,3 Samsung Chromebook 3 Trackpad Replacement, Trackpad: 步骤 7 中的图像 2,3 Samsung Chromebook 3 Trackpad Replacement, Trackpad: 步骤 7 中的图像 3,3
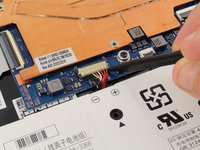
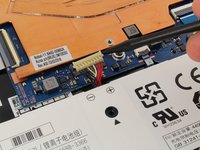
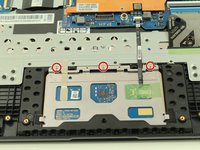
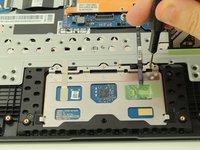
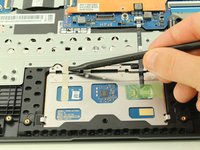
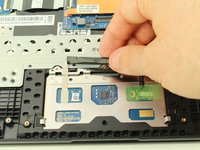
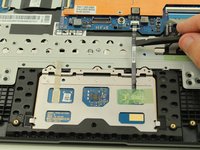
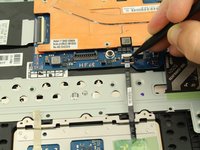
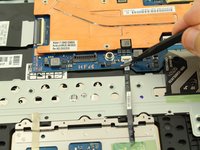
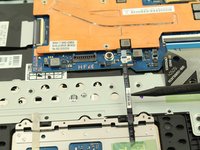
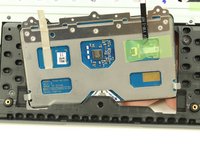
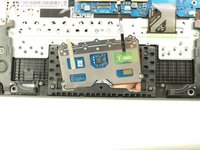
    • Remove the three 2.3mm screws along the top of the trackpad using a Phillips #00 screwdriver.

  8. Samsung Chromebook 3 Trackpad Replacement: 步骤 8 中的图像 1,2 Samsung Chromebook 3 Trackpad Replacement: 步骤 8 中的图像 2,2
    • Use a spudger to gently remove the adhesive tape on the upper left side of the trackpad.

  9. Samsung Chromebook 3 Trackpad Replacement: 步骤 9 中的图像 1,2 Samsung Chromebook 3 Trackpad Replacement: 步骤 9 中的图像 2,2
    • There's more adhesive on the cable ribbon on the upper left side that connects the trackpad to the motherboard. Use your spudger to lift the cable ribbon up from the adhesive.

  10. Samsung Chromebook 3 Trackpad Replacement: 步骤 10 中的图像 1,3 Samsung Chromebook 3 Trackpad Replacement: 步骤 10 中的图像 2,3 Samsung Chromebook 3 Trackpad Replacement: 步骤 10 中的图像 3,3
    • Use a spudger to lift the grey plastic piece locking the cable ribbon in place to its connection on the motherboard.

    • The grey piece is on a hinge and should be able to be flipped up rather than removed completely. Removal doesn't damage anything, just makes putting everything back together a bit harder, so try not to remove if possible.

    • Take the end of the cable ribbon out from the connector.

  11. Samsung Chromebook 3 Trackpad Replacement: 步骤 11 中的图像 1,2 Samsung Chromebook 3 Trackpad Replacement: 步骤 11 中的图像 2,2
    • From the keyboard side, nudge the trackpad down and around the lip on the upper edge and finally pull your trackpad out to freedom!

结论

To reassemble your device, follow these instructions in reverse order.

Austin Blakely

于03/11/19注册

19,503 声望

创作了53篇指南

团队

iFixit iFixit 的会员

Staff

135 名成员

创作了16,767篇指南

0条评论

添加评论

浏览统计数据:

过去 24 小时: 1

过去 7 天: 2

过去 30 天: 10

总计 962