跳转到主内容

当前版本的文档还未经巡查,您可以查看最新的已查核版本

你所需要的

视频概述

  1. 这个步骤还没有翻译 帮忙翻译一下

    : 步骤 1 中的图像 1,1
    在这个步骤中使用的工具:
    Magnetic Project Mat
    $19.95
    购买
    • Before proceeding, unplug and power down your MacBook. Close the display and flip it upside-down.

    • Remove the following eight screws securing the lower case:

    • Two 1.8 mm P5 Pentalobe screws

    • Four 2.9 mm P5 Pentalobe screws

    • Two 6.1 mm P5 Pentalobe screws

    • Note the orientation of the screws as you remove them—they need to be reinstalled at a slight angle.

    • Throughout this repair, keep track of each screw and make sure it goes back exactly where it came from to avoid damaging your device.

  2. 这个步骤还没有翻译 帮忙翻译一下

    : 步骤 2 中的图像 1,3 : 步骤 2 中的图像 2,3 : 步骤 2 中的图像 3,3
    • Wedge your fingers between the upper case and the lower case, starting from the rear of the MacBook between the hinges.

    • Lift the lower case only slightly to avoid damaging the cables that connect the lower case to the upper case.

    • Keeping a firm grip, lift steadily until the lower case separates slightly from the upper case.

    • You may experience a lot of resistance when lifting the lower case. If necessary, slide an opening pick or other ESD-safe pry tool down the side edges of the lower case to pop the two hidden retaining clips free.

    • During reassembly, to re-engage the clips, press firmly near both side edges of the lower case (near where the pick is inserted in the third image) until you hear the clips snap into place.

  3. 这个步骤还没有翻译 帮忙翻译一下

    : 步骤 3 中的图像 1,1
    • While holding the lower case in place, carefully flip the MacBook over so the Apple logo faces up.

  4. 这个步骤还没有翻译 帮忙翻译一下

    : 步骤 4 中的图像 1,2 : 步骤 4 中的图像 2,2
    • Lift the upper case and display together from the front edge and raise it to about a 45˚ angle.

    • It may be helpful to prop the MacBook open in this position for the next step.

  5. 这个步骤还没有翻译 帮忙翻译一下

    : 步骤 5 中的图像 1,3 : 步骤 5 中的图像 2,3 : 步骤 5 中的图像 3,3
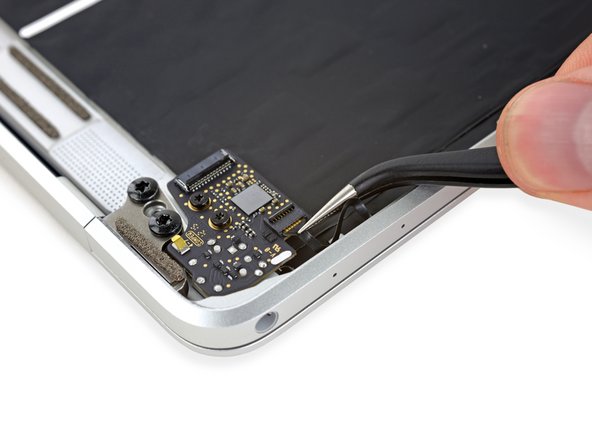
    • Use the flat end of a spudger to press and hold the small gold 'battery disconnect' button.

    • If the power LED is lit up, continue holding the button until the LED goes dark, and then release. This may take up to 10 seconds.

    • If the LED does not light, release the button after 5-10 seconds. Press and hold it again for 5-10 seconds, and release. Finally, press and hold it a third time for 5-10 seconds, and release.

    • This step ensures the MacBook is fully powered down and safe to work on.

  6. 这个步骤还没有翻译 帮忙翻译一下

    : 步骤 6 中的图像 1,1
    • Close the MacBook and carefully flip it upside-down.

  7. 这个步骤还没有翻译 帮忙翻译一下

    : 步骤 7 中的图像 1,1
    • Lifting from the front edge, open the lower case to an angle of about 45°.

    • Take care not to damage the ribbon cables that still attach the lower case to the MacBook.

  8. 这个步骤还没有翻译 帮忙翻译一下

    : 步骤 8 中的图像 1,2 : 步骤 8 中的图像 2,2
    在这个步骤中使用的工具:
    Tweezers
    $4.99
    购买
    • Use tweezers to peel back the tape covering the trackpad cable ZIF connector.

  9. 这个步骤还没有翻译 帮忙翻译一下

    : 步骤 9 中的图像 1,2 : 步骤 9 中的图像 2,2
    • Use a spudger to carefully flip up the retaining flap on the trackpad cable ZIF connector.

  10. 这个步骤还没有翻译 帮忙翻译一下

    : 步骤 10 中的图像 1,2 : 步骤 10 中的图像 2,2
    • Disconnect the trackpad ribbon cable from the trackpad by pulling it gently through its slot in the frame.

  11. 这个步骤还没有翻译 帮忙翻译一下

    : 步骤 11 中的图像 1,2 : 步骤 11 中的图像 2,2
    • Carefully turn the MacBook over, so that the lower case lays flat.

    • Raise the upper case/display assembly to about a 90° angle, and prop it up against something sturdy so you don't have to hold it.

    • Add a piece of tape near the track pad to secure the upper case and prevent accidental movement.

    • It's possible to open the MacBook all the way and lay both sides down flat, but this may damage the flex cables and is not recommended.

  12. 这个步骤还没有翻译 帮忙翻译一下

    : 步骤 12 中的图像 1,2 : 步骤 12 中的图像 2,2
    • Remove the single 2.9 mm T5 Torx screw securing the battery connector to the logic board.

    • 2015 models have a silver grounding clip with two foam pads directly under this screw, which may come loose. Be sure to reinstall it during reassembly.

  13. 这个步骤还没有翻译 帮忙翻译一下

    : 步骤 13 中的图像 1,2 : 步骤 13 中的图像 2,2
    在这个步骤中使用的工具:
    Battery Blocker
    $3.99
    购买
    • As an added precaution, you may physically disconnect the battery by inserting a battery isolation pick between the logic board and the battery connector.

  14. 这个步骤还没有翻译 帮忙翻译一下

    : 步骤 14 中的图像 1,1
    • Remove the two screws securing the USB-C port cable bracket:

    • 1.1 mm Tri-point Y00 screw

    • Some variations of this model may use a Phillips #00 screw.

    • 3.5 mm T5 Torx screw

  15. 这个步骤还没有翻译 帮忙翻译一下

    : 步骤 15 中的图像 1,2 : 步骤 15 中的图像 2,2
    • Use the flat end of a spudger to disconnect the USB-C port cable bracket by prying it straight up from the logic board.

    • To reconnect this cable, first line up the metal bracket over the screw holes, then press down on the middle of the bracket. Make sure it's aligned correctly, or you may damage the connector.

  16. 这个步骤还没有翻译 帮忙翻译一下

    : 步骤 16 中的图像 1,2 : 步骤 16 中的图像 2,2
    • Use a spudger to flip open the retaining flap on the audio jack board cable ZIF connector.

  17. 这个步骤还没有翻译 帮忙翻译一下

    : 步骤 17 中的图像 1,1
    • Disconnect the audio jack board ribbon cable by pulling it straight back out of the ZIF connector.

    • During reassembly, orient the ribbon cable so that the side with the white stripe faces you, as shown.

  18. 这个步骤还没有翻译 帮忙翻译一下

    : 步骤 18 中的图像 1,2 : 步骤 18 中的图像 2,2
    在这个步骤中使用的工具:
    Tweezers
    $4.99
    购买
    • Use tweezers to peel back the tape covering the display cable connector.

  19. 这个步骤还没有翻译 帮忙翻译一下

    : 步骤 19 中的图像 1,2 : 步骤 19 中的图像 2,2
    • It's possible the metal retaining flap on the display cable connector may flip open, remaining stuck to the tape.

    • If so, use the flat end of a spudger to hold down the retaining flap while peeling the tape away with the tweezers.

  20. 这个步骤还没有翻译 帮忙翻译一下

    : 步骤 20 中的图像 1,1
    • Use the flat end of a spudger to flip open the retaining flap on the display cable connector.

    • Try to keep it clear of the tape, or it may re-adhere and make cable removal difficult.

  21. 这个步骤还没有翻译 帮忙翻译一下

    : 步骤 21 中的图像 1,3 : 步骤 21 中的图像 2,3 : 步骤 21 中的图像 3,3
    在这个步骤中使用的工具:
    iOpener
    $12.99
    购买
    • Carefully slide the flat end of a spudger underneath the display cable to separate the adhesive holding it to the lower case.

    • Take care not to damage the cable. If it doesn't separate easily, heat the cable and/or the case directly beneath it with a hair dryer or iOpener to soften the adhesive, and try again.

  22. 这个步骤还没有翻译 帮忙翻译一下

    : 步骤 22 中的图像 1,1
    • Disconnect the display cable by gently pulling it straight out of its connector.

    • Immediately close the retaining flap.

    • The flap must remain closed when the cable is reinserted during reassembly. Carefully line up the cable with the gold contacts facing down, and gently slide it into the connector. Take care not to crimp or damage the cable. When fully inserted, the indentations on the sides should not be visible.

  23. 这个步骤还没有翻译 帮忙翻译一下

    : 步骤 23 中的图像 1,1
    • Separate the upper case assembly from the lower case assembly.

  24. 这个步骤还没有翻译 帮忙翻译一下

    : 步骤 24 中的图像 1,2 : 步骤 24 中的图像 2,2
    • Use a spudger to flip open the ZIF connector retaining flap for the dual microphone assembly ribbon cable.

  25. 这个步骤还没有翻译 帮忙翻译一下

    : 步骤 25 中的图像 1,2 : 步骤 25 中的图像 2,2
    在这个步骤中使用的工具:
    Tweezers
    $4.99
    购买
    • Use tweezers to pull the microphone assembly ribbon cable free of its connector.

  26. 这个步骤还没有翻译 帮忙翻译一下

    : 步骤 26 中的图像 1,1
    • Remove the two 3.2 mm T5 Torx screws securing the audio jack board to the case.

  27. 这个步骤还没有翻译 帮忙翻译一下

    : 步骤 27 中的图像 1,1
    • Remove the audio jack board.

  28. 这个步骤还没有翻译 帮忙翻译一下

    : 步骤 28 中的图像 1,1
    • Remove the two 3.3 mm T5 Torx screws securing the display cable assembly.

  29. 这个步骤还没有翻译 帮忙翻译一下

    : 步骤 29 中的图像 1,1
    • Remove the single 4.3 mm Phillips #00 screw securing the USB-C port ribbon cable.

  30. 这个步骤还没有翻译 帮忙翻译一下

    : 步骤 30 中的图像 1,3 : 步骤 30 中的图像 2,3 : 步骤 30 中的图像 3,3
    • Unfold the USB-C port ribbon cable until it lays flat, allowing access to the bracket beneath.

  31. 这个步骤还没有翻译 帮忙翻译一下

    : 步骤 31 中的图像 1,1
    • Lift and remove the metal bracket securing the USB-C port ribbon cable connector.

    • During reassembly, be sure the metal tab on the USB-C connector board slides through the slit on the metal bracket.

  32. 这个步骤还没有翻译 帮忙翻译一下

    : 步骤 32 中的图像 1,3 : 步骤 32 中的图像 2,3 : 步骤 32 中的图像 3,3
    • Use a spudger to disconnect the USB-C port ribbon cable by prying the connector straight up.

    • Pry from the side nearest the back edge of the MacBook.

    • Remove the ribbon cable.

  33. 这个步骤还没有翻译 帮忙翻译一下

    : 步骤 33 中的图像 1,1
    • Fully open the display.

    • Set the MacBook down on its right edge with the display facing away from you, as shown.

  34. 这个步骤还没有翻译 帮忙翻译一下

    : 步骤 34 中的图像 1,2 : 步骤 34 中的图像 2,2
    • Remove the four 4.8 mm T8 Torx screws securing the display hinges.

  35. 这个步骤还没有翻译 帮忙翻译一下

    : 步骤 35 中的图像 1,3 : 步骤 35 中的图像 2,3 : 步骤 35 中的图像 3,3
    • Holding the display assembly with one hand and the upper case with the other, push them together slightly to move the hinges out of their recesses in the the upper case.

    • There are only a few millimeters of play between the hinges and the case, so you won't need to push far.

    • Push the upper case forward while pulling back gently on the display.

    • Once the two display hinges have cleared the upper case, remove the display and set it aside.

终点

47等其他人完成本指南。

Geoff Wacker

于09/30/13注册

90,091 声望

创作了89篇指南

20条评论

thank you: very good and clear guiding through

errico armandillo - 回复

Is there a guide to replace the LCD without replacing the entire shell with housing? Replacements for the LCD only are alt cheaper than buying the entire thing.

MrNewbhero - 回复

MrNewbhero - You probably can replace it without a full clamshell, however, be advised that the front glass acts as a part of the LCD and the layers underneath are just backlight pieces and so on. It's a very difficult job for a DIY

PC Service Center Oesterbro - 回复

This repair is so nervewreaking. I suggest everyone to take your time and really make sure you're not rushing it, or you may break the connectors, as there's tape on everything almost breaking the connector when you remove the flex cable.

PC Service Center Oesterbro - 回复

My screen bezel is tearing apart in pieces and got no damage, drop or else, since day 1 I use a UrbanArmor cover, how can I change it, I bought a replacement in eBay.

gerardjulien - 回复

添加评论

浏览统计数据:

过去 24 小时: 15

过去 7 天: 90

过去 30 天: 475

总计 88,896