跳转到主内容

当前版本的文档还未经巡查,您可以查看最新的已查核版本

2015年 Retina MacBook 电池更换

你所需要的

  1. 这个步骤还没有翻译 帮忙翻译一下

    2015年 Retina MacBook  电池更换: 步骤 1 中的图像 1,1
    在这个步骤中使用的工具:
    Magnetic Project Mat
    $19.95
    购买
    • Before proceeding, unplug and power down your MacBook. Close the display and flip it upside-down.

    • Remove the following eight screws securing the lower case:

    • Two 1.8 mm P5 Pentalobe screws

    • Four 2.9 mm P5 Pentalobe screws

    • Two 6.1 mm P5 Pentalobe screws

    • Note the orientation of the screws as you remove them—they need to be reinstalled at a slight angle.

    • Throughout this repair, keep track of each screw and make sure it goes back exactly where it came from to avoid damaging your device.

  2. 这个步骤还没有翻译 帮忙翻译一下

    2015年 Retina MacBook  电池更换: 步骤 2 中的图像 1,3 2015年 Retina MacBook  电池更换: 步骤 2 中的图像 2,3 2015年 Retina MacBook  电池更换: 步骤 2 中的图像 3,3
    • Wedge your fingers between the upper case and the lower case, starting from the rear of the MacBook between the hinges.

    • Lift the lower case only slightly to avoid damaging the cables that connect the lower case to the upper case.

    • Keeping a firm grip, lift steadily until the lower case separates slightly from the upper case.

    • You may experience a lot of resistance when lifting the lower case. If necessary, slide an opening pick or other ESD-safe pry tool down the side edges of the lower case to pop the two hidden retaining clips free.

    • During reassembly, to re-engage the clips, press firmly near both side edges of the lower case (near where the pick is inserted in the third image) until you hear the clips snap into place.

  3. 这个步骤还没有翻译 帮忙翻译一下

    2015年 Retina MacBook  电池更换: 步骤 3 中的图像 1,1
    • While holding the lower case in place, carefully flip the MacBook over so the Apple logo faces up.

  4. 这个步骤还没有翻译 帮忙翻译一下

    2015年 Retina MacBook  电池更换: 步骤 4 中的图像 1,2 2015年 Retina MacBook  电池更换: 步骤 4 中的图像 2,2
    • Lift the upper case and display together from the front edge and raise it to about a 45˚ angle.

    • It may be helpful to prop the MacBook open in this position for the next step.

  5. 这个步骤还没有翻译 帮忙翻译一下

    2015年 Retina MacBook  电池更换: 步骤 5 中的图像 1,3 2015年 Retina MacBook  电池更换: 步骤 5 中的图像 2,3 2015年 Retina MacBook  电池更换: 步骤 5 中的图像 3,3
    • Use the flat end of a spudger to press and hold the small gold 'battery disconnect' button.

    • If the power LED is lit up, continue holding the button until the LED goes dark, and then release. This may take up to 10 seconds.

    • If the LED does not light, release the button after 5-10 seconds. Press and hold it again for 5-10 seconds, and release. Finally, press and hold it a third time for 5-10 seconds, and release.

    • This step ensures the MacBook is fully powered down and safe to work on.

  6. 这个步骤还没有翻译 帮忙翻译一下

    2015年 Retina MacBook  电池更换: 步骤 6 中的图像 1,1
    • Close the MacBook and carefully flip it upside-down.

  7. 这个步骤还没有翻译 帮忙翻译一下

    2015年 Retina MacBook  电池更换: 步骤 7 中的图像 1,1
    • Lifting from the front edge, open the lower case to an angle of about 45°.

    • Take care not to damage the ribbon cables that still attach the lower case to the MacBook.

  8. 这个步骤还没有翻译 帮忙翻译一下

    2015年 Retina MacBook  电池更换: 步骤 8 中的图像 1,2 2015年 Retina MacBook  电池更换: 步骤 8 中的图像 2,2
    • Use tweezers to peel back the tape covering the trackpad cable ZIF connector.

  9. 这个步骤还没有翻译 帮忙翻译一下

    2015年 Retina MacBook  电池更换: 步骤 9 中的图像 1,2 2015年 Retina MacBook  电池更换: 步骤 9 中的图像 2,2
    • Use a spudger to carefully flip up the retaining flap on the trackpad cable ZIF connector.

  10. 这个步骤还没有翻译 帮忙翻译一下

    2015年 Retina MacBook  电池更换: 步骤 10 中的图像 1,2 2015年 Retina MacBook  电池更换: 步骤 10 中的图像 2,2
    • Disconnect the trackpad ribbon cable from the trackpad by pulling it gently through its slot in the frame.

  11. 这个步骤还没有翻译 帮忙翻译一下

    2015年 Retina MacBook  电池更换: 步骤 11 中的图像 1,2 2015年 Retina MacBook  电池更换: 步骤 11 中的图像 2,2
    • Carefully turn the MacBook over, so that the lower case lays flat.

    • Raise the upper case/display assembly to about a 90° angle, and prop it up against something sturdy so you don't have to hold it.

    • Add a piece of tape near the track pad to secure the upper case and prevent accidental movement.

    • It's possible to open the MacBook all the way and lay both sides down flat, but this may damage the flex cables and is not recommended.

  12. 这个步骤还没有翻译 帮忙翻译一下

    2015年 Retina MacBook  电池更换: 步骤 12 中的图像 1,2 2015年 Retina MacBook  电池更换: 步骤 12 中的图像 2,2
    • Remove the single 2.9 mm T5 Torx screw securing the battery connector to the logic board.

    • 2015 models have a silver grounding clip with two foam pads directly under this screw, which may come loose. Be sure to reinstall it during reassembly.

  13. 这个步骤还没有翻译 帮忙翻译一下

    2015年 Retina MacBook  电池更换: 步骤 13 中的图像 1,2 2015年 Retina MacBook  电池更换: 步骤 13 中的图像 2,2
    在这个步骤中使用的工具:
    Battery Blocker
    $3.99
    购买
    • As an added precaution, you may physically disconnect the battery by inserting a battery isolation pick between the logic board and the battery connector.

  14. 这个步骤还没有翻译 帮忙翻译一下

    2015年 Retina MacBook  电池更换: 步骤 14 中的图像 1,1
    • Remove the two screws securing the USB-C port cable bracket:

    • 1.1 mm Tri-point Y00 screw

    • Some variations of this model may use a Phillips #00 screw.

    • 3.5 mm T5 Torx screw

  15. 这个步骤还没有翻译 帮忙翻译一下

    2015年 Retina MacBook  电池更换: 步骤 15 中的图像 1,2 2015年 Retina MacBook  电池更换: 步骤 15 中的图像 2,2
    • Use the flat end of a spudger to disconnect the USB-C port cable bracket by prying it straight up from the logic board.

    • To reconnect this cable, first line up the metal bracket over the screw holes, then press down on the middle of the bracket. Make sure it's aligned correctly, or you may damage the connector.

  16. 这个步骤还没有翻译 帮忙翻译一下

    2015年 Retina MacBook  电池更换: 步骤 16 中的图像 1,2 2015年 Retina MacBook  电池更换: 步骤 16 中的图像 2,2
    • Use a spudger to flip open the retaining flap on the audio jack board cable ZIF connector.

  17. 这个步骤还没有翻译 帮忙翻译一下

    2015年 Retina MacBook  电池更换: 步骤 17 中的图像 1,1
    • Disconnect the audio jack board ribbon cable by pulling it straight back out of the ZIF connector.

    • During reassembly, orient the ribbon cable so that the side with the white stripe faces you, as shown.

  18. 这个步骤还没有翻译 帮忙翻译一下

    2015年 Retina MacBook  电池更换: 步骤 18 中的图像 1,2 2015年 Retina MacBook  电池更换: 步骤 18 中的图像 2,2
    • Use tweezers to peel back the tape covering the display cable connector.

  19. 这个步骤还没有翻译 帮忙翻译一下

    2015年 Retina MacBook  电池更换: 步骤 19 中的图像 1,2 2015年 Retina MacBook  电池更换: 步骤 19 中的图像 2,2
    • It's possible the metal retaining flap on the display cable connector may flip open, remaining stuck to the tape.

    • If so, use the flat end of a spudger to hold down the retaining flap while peeling the tape away with the tweezers.

  20. 这个步骤还没有翻译 帮忙翻译一下

    2015年 Retina MacBook  电池更换: 步骤 20 中的图像 1,1
    • Use the flat end of a spudger to flip open the retaining flap on the display cable connector.

    • Try to keep it clear of the tape, or it may re-adhere and make cable removal difficult.

  21. 这个步骤还没有翻译 帮忙翻译一下

    2015年 Retina MacBook  电池更换: 步骤 21 中的图像 1,3 2015年 Retina MacBook  电池更换: 步骤 21 中的图像 2,3 2015年 Retina MacBook  电池更换: 步骤 21 中的图像 3,3
    在这个步骤中使用的工具:
    iOpener
    $12.99
    购买
    • Carefully slide the flat end of a spudger underneath the display cable to separate the adhesive holding it to the lower case.

    • Take care not to damage the cable. If it doesn't separate easily, heat the cable and/or the case directly beneath it with a hair dryer or iOpener to soften the adhesive, and try again.

  22. 这个步骤还没有翻译 帮忙翻译一下

    2015年 Retina MacBook  电池更换: 步骤 22 中的图像 1,1
    • Disconnect the display cable by gently pulling it straight out of its connector.

    • Immediately close the retaining flap.

    • The flap must remain closed when the cable is reinserted during reassembly. Carefully line up the cable with the gold contacts facing down, and gently slide it into the connector. Take care not to crimp or damage the cable. When fully inserted, the indentations on the sides should not be visible.

  23. 这个步骤还没有翻译 帮忙翻译一下

    2015年 Retina MacBook  电池更换: 步骤 23 中的图像 1,1
    • Separate the upper case assembly from the lower case assembly.

  24. 这个步骤还没有翻译 帮忙翻译一下

    2015年 Retina MacBook  电池更换: 步骤 24 中的图像 1,3 2015年 Retina MacBook  电池更换: 步骤 24 中的图像 2,3 2015年 Retina MacBook  电池更换: 步骤 24 中的图像 3,3
    • Use tweezers to peel up the tape covering the two ZIF connectors—one for the right speaker cable, and one for the audio jack board cable.

  25. 这个步骤还没有翻译 帮忙翻译一下

    2015年 Retina MacBook  电池更换: 步骤 25 中的图像 1,3 2015年 Retina MacBook  电池更换: 步骤 25 中的图像 2,3 2015年 Retina MacBook  电池更换: 步骤 25 中的图像 3,3
    • Use the point of a spudger to flip up both ZIF connector retaining flaps.

  26. 这个步骤还没有翻译 帮忙翻译一下

    2015年 Retina MacBook  电池更换: 步骤 26 中的图像 1,2 2015年 Retina MacBook  电池更换: 步骤 26 中的图像 2,2
    • Carefully pull straight back on the two pieces of tape you just peeled up to disconnect the two ribbon cables.

  27. 这个步骤还没有翻译 帮忙翻译一下

    2015年 Retina MacBook  电池更换: 步骤 27 中的图像 1,2 2015年 Retina MacBook  电池更换: 步骤 27 中的图像 2,2
    • Use the point of a spudger to peel up the foam pad covering the two antenna connectors.

  28. 这个步骤还没有翻译 帮忙翻译一下

    2015年 Retina MacBook  电池更换: 步骤 28 中的图像 1,3 2015年 Retina MacBook  电池更换: 步骤 28 中的图像 2,3 2015年 Retina MacBook  电池更换: 步骤 28 中的图像 3,3
    • Insert one arm of your angled tweezers under the metal neck of the first antenna connector and pry up to disconnect it.

    • The antenna connectors and sockets are extremely fragile. Be very careful to lift only on the connector, and not on the socket itself. Do not lift under the cable, or put any unnecessary strain on it.

  29. 这个步骤还没有翻译 帮忙翻译一下

    2015年 Retina MacBook  电池更换: 步骤 29 中的图像 1,3 2015年 Retina MacBook  电池更换: 步骤 29 中的图像 2,3 2015年 Retina MacBook  电池更换: 步骤 29 中的图像 3,3
    • Pry up the second antenna connector to disconnect it.

    • The antenna connectors and sockets are extremely fragile. Be very careful to lift only on the connector, and not on the socket itself. Do not lift under the cable, or put any unnecessary strain on it.

  30. 这个步骤还没有翻译 帮忙翻译一下

    2015年 Retina MacBook  电池更换: 步骤 30 中的图像 1,2 2015年 Retina MacBook  电池更换: 步骤 30 中的图像 2,2
    • Use a spudger to disconnect the left speaker cable connector by prying it straight up from the logic board.

  31. 这个步骤还没有翻译 帮忙翻译一下

    2015年 Retina MacBook  电池更换: 步骤 31 中的图像 1,2 2015年 Retina MacBook  电池更换: 步骤 31 中的图像 2,2
    • Use a spudger to flip up the retaining flap on the trackpad cable ZIF connector.

  32. 这个步骤还没有翻译 帮忙翻译一下

    2015年 Retina MacBook  电池更换: 步骤 32 中的图像 1,2 2015年 Retina MacBook  电池更换: 步骤 32 中的图像 2,2
    • Disconnect the trackpad cable from the logic board by gently pulling it straight out of its connector.

    • During reassembly, check that your ZIF connector flaps are flipped up before reinserting their cables.

  33. 这个步骤还没有翻译 帮忙翻译一下

    2015年 Retina MacBook  电池更换: 步骤 33 中的图像 1,1
    • Remove the single 3.5 mm T5 Torx screw securing the logic board to the lower case.

  34. 这个步骤还没有翻译 帮忙翻译一下

    2015年 Retina MacBook  电池更换: 步骤 34 中的图像 1,3 2015年 Retina MacBook  电池更换: 步骤 34 中的图像 2,3 2015年 Retina MacBook  电池更换: 步骤 34 中的图像 3,3
    • Flip up the front edge of the logic board.

    • Handle the logic board only by its edges.

    • Lift and detach the EMI tape securing the logic board to the lower case.

    • If the tape feels stuck, heat it with a hair dryer or iOpener to soften the adhesive.

    • Reattach the tape securely during reassembly.

  35. 这个步骤还没有翻译 帮忙翻译一下

    2015年 Retina MacBook  电池更换: 步骤 35 中的图像 1,1
    • Remove the logic board.

  36. 2015年 Retina MacBook  电池更换, 电池: 步骤 36 中的图像 1,3 2015年 Retina MacBook  电池更换, 电池: 步骤 36 中的图像 2,3 2015年 Retina MacBook  电池更换, 电池: 步骤 36 中的图像 3,3
    • 抬起下壳组件的后边缘,并使用书本或泡沫块以一定角度将其支撑起来。

    • 在以下步骤中,你将沿着电池的边缘涂抹液体粘合剂去除剂。保持MacBook的一部分升高将有助于粘合剂移除在电池下方的流动。

    • 你可以在此过程中根据需要重新调整MacBook的方向,但请尽量避免粘合剂去除剂接触电池和金属机箱以外的任何组件。

    • 如有必要,可在MacBook下方添加一层铝箔,以防止工作区掉落粘合剂。

  37. 2015年 Retina MacBook  电池更换: 步骤 37 中的图像 1,2 2015年 Retina MacBook  电池更换: 步骤 37 中的图像 2,2
    • iFixit 粘合剂去除剂含有丙酮,对皮肤和眼睛略具有刺激性。

    • 处理和使用粘合剂去除剂时请戴上护目镜。(套装中包含护目镜。)

    • 如果不戴护目镜就不要戴隐形眼镜。套装中还包括防护手套。

    • 如果你担心皮肤过敏,请立即戴上手套。

  38. 2015年 Retina MacBook  电池更换: 步骤 38 中的图像 1,3 2015年 Retina MacBook  电池更换: 步骤 38 中的图像 2,3 2015年 Retina MacBook  电池更换: 步骤 38 中的图像 3,3
    • 从你的粘合剂去除剂瓶中取下黑色橡胶塞。

    • 在切割涂抹器尖端之前拧开以松开或取下瓶盖。

    • 这会打开瓶子并在切割涂抹器尖端之前使压力均衡。如果跳过此步骤,粘合剂去除器可能会在切割尖端时意外喷出。

    • 用剪刀剪掉涂抹器的密封尖端。

    • 靠近狭窄的尖端切割将使您获得更好的控制,因此您可以少量使用粘合剂去除剂。

    • 在进一步操作之前,请拧紧并关闭瓶盖。

  39. 2015年 Retina MacBook  电池更换: 步骤 39 中的图像 1,3 2015年 Retina MacBook  电池更换: 步骤 39 中的图像 2,3 2015年 Retina MacBook  电池更换: 步骤 39 中的图像 3,3
    • 将电池单元固定到下壳体的粘合剂位于标记为红色的区域中。

    • 在以下步骤中使用粘合剂去除剂时,你可以使用此步骤作为参考。

  40. 2015年 Retina MacBook  电池更换: 步骤 40 中的图像 1,2 2015年 Retina MacBook  电池更换: 步骤 40 中的图像 2,2
    • 沿右侧电池的边缘均匀涂抹几滴粘合剂。

    • 你不需要使用太多。瓶中含有两倍以上的去除所有电池所需的除胶剂。

    • 在进行下一步之前,等待2-3分钟让除胶剂渗入电池下方。

  41. 2015年 Retina MacBook  电池更换: 步骤 41 中的图像 1,3 2015年 Retina MacBook  电池更换: 步骤 41 中的图像 2,3 2015年 Retina MacBook  电池更换: 步骤 41 中的图像 3,3
    • 2-3分钟后,将塑料卡的一角滑到电池单元下方。

    • 这应该需要很小的力。如果你遇到问题,请沿着电池的另一边涂上更多的粘合剂去除剂,再给它2-3分钟穿透。

    • 尽量不要让电池变形。损坏或刺破的电池可能会泄漏危险化学品和/或着火。

    • 轻轻扭动卡片可能有助于在电池和MacBook 之间打开一个小小的空隙

    • 将其电池单元向下滑动,使其与将电池固定在MacBook 上盖上的粘合胶分开。

  42. 2015年 Retina MacBook  电池更换: 步骤 42 中的图像 1,2 2015年 Retina MacBook  电池更换: 步骤 42 中的图像 2,2
    • 提起电池将其从外壳中分离,但不要尝试将其取出。

    • 将塑料卡留在电池下方,以防止在进行下一步时再次粘住塑料卡。

  43. 2015年 Retina MacBook  电池更换: 步骤 43 中的图像 1,2 2015年 Retina MacBook  电池更换: 步骤 43 中的图像 2,2
    • 重复前三个步骤以分离左前电池。

    • 将塑料卡放在电池下面,以防止在进行下一步时重新粘附。

  44. 2015年 Retina MacBook  电池更换: 步骤 44 中的图像 1,3 2015年 Retina MacBook  电池更换: 步骤 44 中的图像 2,3 2015年 Retina MacBook  电池更换: 步骤 44 中的图像 3,3
    • 重复上述步骤,分离MacBook左侧的大电池。

  45. 2015年 Retina MacBook  电池更换: 步骤 45 中的图像 1,2 2015年 Retina MacBook  电池更换: 步骤 45 中的图像 2,2
    • 重复上述步骤,分离MacBook右侧的大电池。

    • 小心不要损坏靠近电池单元后缘的音频插孔柔性电缆。

  46. 2015年 Retina MacBook  电池更换: 步骤 46 中的图像 1,3 2015年 Retina MacBook  电池更换: 步骤 46 中的图像 2,3 2015年 Retina MacBook  电池更换: 步骤 46 中的图像 3,3
    • 将下壳组件平放,并将粘合剂去除剂施加到两个中间电池单元 ——每侧,并沿前边缘(与主板区域相对)。

  47. 2015年 Retina MacBook  电池更换: 步骤 47 中的图像 1,1
    • 沿着下一个电池单元中间均匀地涂上少量的粘合胶去除剂。

    • 在进行下一步之前,等待2-3分钟让粘胶去除剂渗入电池下方。

  48. 2015年 Retina MacBook  电池更换: 步骤 48 中的图像 1,3 2015年 Retina MacBook  电池更换: 步骤 48 中的图像 2,3 2015年 Retina MacBook  电池更换: 步骤 48 中的图像 3,3
    • 将塑料卡插入其中一个电池单元的前缘下方并小心地将其分开。

    • 尽量不要让电池变形。损坏或刺破的电池可能会泄漏危险化学品和/或着火。

    • 如果你在将电池放在电池单元下方时遇到问题,请尝试在电池单元下方使用一块牙线或电线,并以锯切方式将其左右拉动以分离粘合剂。

  49. 2015年 Retina MacBook  电池更换: 步骤 49 中的图像 1,1
    • 重复之前的步骤以最终分离电池。

  50. 2015年 Retina MacBook  电池更换: 步骤 50 中的图像 1,3 2015年 Retina MacBook  电池更换: 步骤 50 中的图像 2,3 2015年 Retina MacBook  电池更换: 步骤 50 中的图像 3,3
    • 提起并取出电池。

    • 注意不要将电池拖到下壳组件上,否则可能会损坏扬声器或柔性电缆。

    • 在安装新电池之前,请从MacBook机壳中去除所有剩余的粘合剂。

    • 用镊子或带手套的手指剥掉较大的粘合剂。

    • 用塑料工具刮掉剩余的粘合剂,并用粘合剂去除剂或异丙醇清洁下面的区域。擦拭一个方向,而不是来回擦拭,直到所有的粘合剂残留物消失。

    • 这可能需要相当多的清洁工作,所以要耐心等待。

  51. 2015年 Retina MacBook  电池更换: 步骤 51 中的图像 1,3 2015年 Retina MacBook  电池更换: 步骤 51 中的图像 2,3 2015年 Retina MacBook  电池更换: 步骤 51 中的图像 3,3
    • 在安装之前,请仔细测试新电池的安装和对齐情况。

    • 与大多数笔记本电池不同,MacBook的电池外形精确,以适应下壳的“梯形”形状。必须正确定位每个单元格,否则MacBook可能无法正确关闭并可能导致损坏。

    • 你的更换电池可能贴在厚塑料顶部衬垫上,以便在安装时将各个电池保持在适当的位置。

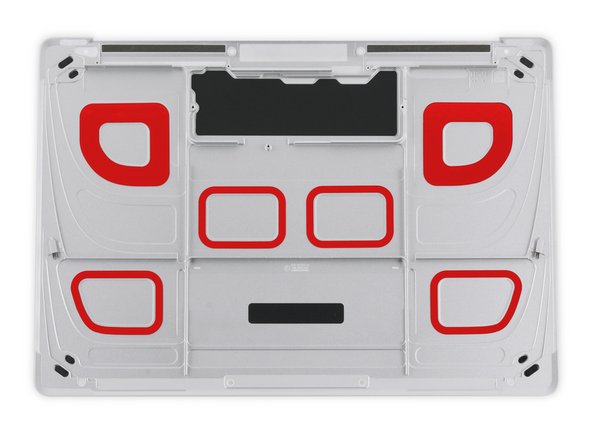
    • 在安装电池之前,请勿卸下此衬管。如果你的电池预装在底部,请剥去底部塑料衬垫以露出粘合剂。如果您的电池没有附带粘合剂,请在标有红色的区域将薄的双面胶带(如Tesa 61395)粘贴到下壳。

    • 小心放置电池并将其放置到位。将每个电池牢牢按住5-10秒钟,将其固定在下壳上。然后,将塑料顶部衬垫与任何泡沫衬垫一起剥离。

    • 仅限2015款:重新组装后,请务必在开机前将MacBook连接至低压电源。不遵守这些说明可能会导致主板损坏。

    • 校准 你新安装的电池: 将电池充电至100%并继续充电至少两小时,然后拔掉电源正常使用你的电脑。当出现低电量警告时,保存你的工作并继续使用电脑直至电量低自动休眠。静置至少5小时后一次性充电至100%。

    • 如果你在安装新电池以后注意到任何异常举动或者问题,也许你需要重置你 MacBook Pro 的 SMC。

结论

请按逆序重组你的设备。

请把你的电子废料带到 R2 或 e-Stewards 认证的回收商那里。

回收未按计划进行请查阅论坛 来排除障碍。

113等其他人完成本指南。

由衷感谢以下译者:

en zh

100%

Yuting Zhao正在帮助我们修复这个世界! 您也想加入吗?
开始翻译 ›

Jeff Suovanen

于08/06/13注册

428,437 声望

创作了259篇指南

团队

iFixit iFixit 的会员

Staff

135 名成员

创作了17,189篇指南

81条评论

Beautiful. ‘Followed the instructions to a T. No issues at all. Thanks!

Peter Rasmussen - 回复

Everything worked, except the keyboard. No backlight, no power. Using remote keyboard for now. Any ideas? Trackpad works fine.

Neal Abrams - 回复

@nabrams1 Check both cables that connect to the trackpad—make sure all four connectors are clean and fully seated, and that the cables aren’t damaged in any way. The first cable connects the keyboard to the trackpad, and should not have been disconnected, but check it anyway. The second cable connects both keyboard + trackpad to the logic board. Good luck!

Jeff Suovanen -

I did try all of those and checked the cables and ZIF connectors under a microscope. I am thinking a bad trackpad now since it works fine, but the keyboard does not respond. The only way I have figured out o use the machine is to disconnect and reconnect the battery, which is not easy. Otherwise, I cannot power it on myself since the power button is part of the keyboard. Apple won’t touch this now since I replaced the battery myself, so it is kind of a brick. I can’t run AHT since the keyboard doesn’t respond (command-D). Any ideas?

Neal Abrams - 回复

Bad trackpad seems possible. If the keyboard was working before the repair, there may be damage to the trackpad or the logic board itself. It’s hard to say without swapping out parts to test, unless you have a microscope + multimeter + board schematic, and we’re rapidly getting out of DIY territory there. I’d probably take another look at the cables and sockets just to make extra sure it’s not something simple. Hope this helps!

Jeff Suovanen -

添加评论

浏览统计数据:

过去 24 小时: 64

过去 7 天: 470

过去 30 天: 2,004

总计 179,114