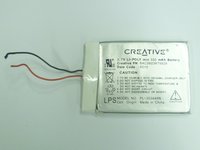
跳转到主内容
加入维修社区 - 创建账户

Replacing Creative Zen X-Fi Battery

你所需要的

  1. Replacing Creative Zen X-Fi Battery, Detaching Front Case: 步骤 1 中的图像 1,3 Replacing Creative Zen X-Fi Battery, Detaching Front Case: 步骤 1 中的图像 2,3 Replacing Creative Zen X-Fi Battery, Detaching Front Case: 步骤 1 中的图像 3,3
    • Using a spudger, wedge the tip between the front and back case to pry them apart.

    • Be careful to not apply excessive force since there are six fasteners on the screen's side that holds the cases firmly together.

    询问修复机器人

    添加评论

  2. Replacing Creative Zen X-Fi Battery, Rubber Button Cover: 步骤 2 中的图像 1,1
    • The black rubber button pad can be removed by simply picking it up.

    询问修复机器人

    添加评论

  3. Replacing Creative Zen X-Fi Battery, Button Input Chip Part 1: 步骤 3 中的图像 1,1
    • Flip the LCD screen off the midsection plate to gain access to the space around the input button chip.

    询问修复机器人

    添加评论

  4. Replacing Creative Zen X-Fi Battery, Button Input Chip: 步骤 4 中的图像 1,1
    • Using a spudger, pry off the button input chip from the mid-section of the device. To gain best leverage, start at the bottom right corner and level your way up the side of the chip.

    • Be aware that the button input chip is glued to the mid-section, so some extra force may be required.

    询问修复机器人

    添加评论

  5. Replacing Creative Zen X-Fi Battery, Access Midsection Plate: 步骤 5 中的图像 1,1
    • Lift open the LCD screen and button input chip to access the entire midsection plate.

    询问修复机器人

    添加评论

  6. Replacing Creative Zen X-Fi Battery, Unscrew below Button Chip: 步骤 6 中的图像 1,1
    • Use a Phillips Head screwdriver to unscrew the three 3/16 inch screws that were underneath the button input chip.

    询问修复机器人

    添加评论

  7. Replacing Creative Zen X-Fi Battery, Unscrew below LCD Screen: 步骤 7 中的图像 1,1
    • Use a Phillips Head screwdriver to unscrew the three 3/16 inch screws that were underneath the LCD screen.

    询问修复机器人

    添加评论

  8. Replacing Creative Zen X-Fi Battery, Separating the Battery: 步骤 8 中的图像 1,1
    • Use a spudger to pry the battery from the midsection plate.

    • There is adhesive glue underneath the battery, so additional force might be required to separate the battery.

    询问修复机器人

    添加评论

  9. Replacing Creative Zen X-Fi Battery, Disconnecting Power Supply: 步骤 9 中的图像 1,2 Replacing Creative Zen X-Fi Battery, Disconnecting Power Supply: 步骤 9 中的图像 2,2
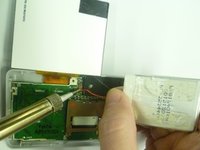
    • Locate the soldering joint connecting the battery wires to the power supply, marked by the letters "PS" on the motherboard.

    • Hold the battery wires in place so that access to the soldering joints is not blocked.

    • When using a soldering iron, keep your hands and fingers as far as possible from the iron's tip to avoid burning your skin.

    • Using a soldering iron, melt the solder connecting the red wire to the motherboard. Do the same action to the black wire.

    添加评论

结论

To reassemble your device, follow these instructions in reverse order.

取消:我没有完成这个指南。

5等其他人完成本指南。

2指南评论

very clear pictures!

John - 回复 分享

разбирать нужно со стороны противоположной гнезда наушников!!! поломал так же как и на фото все защелки со стороны кнопок(

Cooper21 - 回复 分享

添加评论

浏览统计数据:

过去 24 小时: 4

过去 7 天: 18

过去 30 天: 87

总计 8,686