跳转到主内容

RIDGID R84015 X2 Disassembly

你所需要的

  1. RIDGID R84015 X2 Disassembly, RIDGID R84015 X2 Case Removal: 步骤 1 中的图像 1,2 RIDGID R84015 X2 Disassembly, RIDGID R84015 X2 Case Removal: 步骤 1 中的图像 2,2
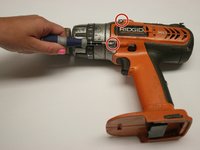
    • Remove the backplate.

    • Using a Torx T20 screwdriver, remove the four screws attaching the back plate.

  2. RIDGID R84015 X2 Disassembly: 步骤 2 中的图像 1,1
    • Remove the drill handle.

    • Using the Phillips #2 screwdriver, remove the five screws attaching the drill handle to the body.

  3. RIDGID R84015 X2 Disassembly: 步骤 3 中的图像 1,2 RIDGID R84015 X2 Disassembly: 步骤 3 中的图像 2,2
    • Remove the gear casing from the body.

    • Using the Philips #2 screwdriver, remove the four screws attaching the gear casing to the body.

  4. RIDGID R84015 X2 Disassembly, RIDGID R84015 X2 Disassembly: 步骤 4 中的图像 1,1
    • With your drill taken apart, move your attention to the trigger and forward reverse switch.

  5. RIDGID R84015 X2 Disassembly: 步骤 5 中的图像 1,1
    • Check to see that the forward reverse switch isn't broken.

    • NOTE: small tab on trigger fits into groove on forward reverse switch

  6. RIDGID R84015 X2 Disassembly: 步骤 6 中的图像 1,1
    • With the battery attached, check that the wires work when the trigger is pulled.

    • Put multimeter wires here.

    • If wires work and drill doesn't, the problem is with the motor.

  7. RIDGID R84015 X2 Disassembly: 步骤 7 中的图像 1,1
    • Make sure plastic is not broken and switch is not stuck.

终点

2等其他人完成本指南。

Brian

于04/12/10注册

97 声望

撰写一个指南

团队

Cal Poly, Team 15-48, Garner Spring 2010 Cal Poly, Team 15-48, Garner Spring 2010 的会员

CPSU-GARNER-S10S15G48

6 名成员

创作了10篇指南

一条评论

I was able to diagnose and fix my problem with my black and decker following your instructions. TY

boxingchaos2011 - 回复

添加评论

浏览统计数据:

过去 24 小时: 0

过去 7 天: 4

过去 30 天: 29

总计 13,530