跳转到主内容
加入维修社区 - 创建账户

PowerShot G7 X Mark II Top Cover Button Panel Replacement

你所需要的

    1. PowerShot G7 X Mark II Top Cover Button Panel Replacement, Top Cover Button Panel: 步骤 1 中的图像 1,2 PowerShot G7 X Mark II Top Cover Button Panel Replacement, Top Cover Button Panel: 步骤 1 中的图像 2,2
      • Use a Phillips #000 screwdriver to remove four 4mm screws from the NFC panel cover on the bottom of the camera.

      询问修复机器人

      添加评论

    2. PowerShot G7 X Mark II Top Cover Button Panel Replacement: 步骤 2 中的图像 1,2 PowerShot G7 X Mark II Top Cover Button Panel Replacement: 步骤 2 中的图像 2,2
      • Use a Phillips #000 screwdriver to remove five screws from under the LCD screen:

      • Three 2.4 mm screws

      • Two 3 mm screws

      询问修复机器人

      添加评论

    3. PowerShot G7 X Mark II Top Cover Button Panel Replacement: 步骤 3 中的图像 1,1
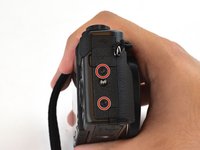
      • Use a Phillips #000 screwdriver to remove two 3mm screws on the left of the camera.

      添加评论

    4. PowerShot G7 X Mark II Top Cover Button Panel Replacement: 步骤 4 中的图像 1,2 PowerShot G7 X Mark II Top Cover Button Panel Replacement: 步骤 4 中的图像 2,2
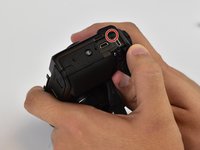
      • Use a Phillips #000 screwdriver to remove one 3mm and one 4mm screw on the surface of the right face of the camera, and one under the USB/HDMI cover.

      添加评论

    5. PowerShot G7 X Mark II Top Cover Button Panel Replacement: 步骤 5 中的图像 1,2 PowerShot G7 X Mark II Top Cover Button Panel Replacement: 步骤 5 中的图像 2,2
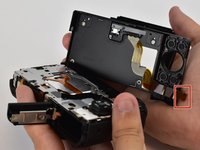
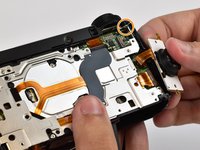
      • Carefully remove the back cover off of the camera by hand. Press the brown actuator in the FFC socket to release the FPC (Flexible Printed Circuit - brown cable attached to the back cover) and pull the FPC out of the socket.

      • If the FPC doesn't come out easily, you haven't yet released it. Do not force it. Do not use a spudger because it will break the socket. A broken socket cannot be fixed and has to be replaced by a skilled technician.

      添加评论

    6. PowerShot G7 X Mark II Top Cover Button Panel Replacement: 步骤 6 中的图像 1,2 PowerShot G7 X Mark II Top Cover Button Panel Replacement: 步骤 6 中的图像 2,2
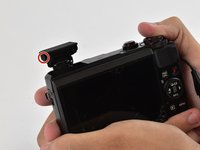
      • Use a Phillips #000 screwdriver to remove two 3mm screws on the pop-up flash.

      添加评论

    7. PowerShot G7 X Mark II Top Cover Button Panel Replacement: 步骤 7 中的图像 1,2 PowerShot G7 X Mark II Top Cover Button Panel Replacement: 步骤 7 中的图像 2,2
      • Use a Phillips #000 screwdriver to remove two 2mm screws attaching the button panel to the camera body.

      • Use a Phillips #000 screwdriver to remove a 3mm screw from beneath the mode dial.

      询问修复机器人

      添加评论

    8. PowerShot G7 X Mark II Top Cover Button Panel Replacement: 步骤 8 中的图像 1,3 PowerShot G7 X Mark II Top Cover Button Panel Replacement: 步骤 8 中的图像 2,3 PowerShot G7 X Mark II Top Cover Button Panel Replacement: 步骤 8 中的图像 3,3
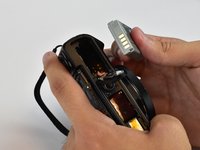
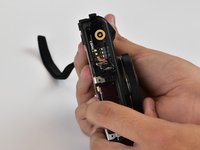
      • Open the battery compartment and remove the battery by flipping the small latch holding it in.

      • Use a Phillips #000 screwdriver to remove one 6mm screw in the bottom of the battery compartment.

      添加评论

    9. PowerShot G7 X Mark II Top Cover Button Panel Replacement: 步骤 9 中的图像 1,2 PowerShot G7 X Mark II Top Cover Button Panel Replacement: 步骤 9 中的图像 2,2
      • Pry the top cover button assembly off of the camera body by detaching clips around the base of it.

      添加评论

结论

To reassemble your device, follow these instructions in reverse order.

取消:我没有完成这个指南。

4等其他人完成本指南。

Brandon

于02/15/17注册

644 声望

创作了4篇指南

团队

USF Tampa, Team 12-3, Eyestone Spring 2017 USF Tampa, Team 12-3, Eyestone Spring 2017 的会员

USFT-EYESTONE-S17S12G3

3 名成员

创作了4篇指南

1指南评论

We followed this guide but now my camera will not turn on. The little green light by the play button will light up but thats it. Any idea what went wrong?

Alexa Smith - 回复 分享

添加评论

浏览统计数据:

过去 24 小时: 3

过去 7 天: 16

过去 30 天: 83

总计 4,089