跳转到主内容
加入维修社区 - 创建账户

Panasonic Camera DMC-TZ3 LCD DISPLAY Replacement

你所需要的

    1. Panasonic Camera DMC-TZ3 LCD DISPLAY Replacement, Step 1: 步骤 1 中的图像 1,1
      • Remove the battery and memory card from the device.

      询问修复机器人

      添加评论

    2. Panasonic Camera DMC-TZ3 LCD DISPLAY Replacement, Step 2: 步骤 2 中的图像 1,1
      • Remove the single .5mm screw on the left side of the camera.

      询问修复机器人

      添加评论

    3. Panasonic Camera DMC-TZ3 LCD DISPLAY Replacement, Step 3: 步骤 3 中的图像 1,1
      • Remove 4 (0.5mm) screws from the right side of the camera.

      • There are two screws at the top.

      • There are two screws at the bottom.

      询问修复机器人

      添加评论

    4. Panasonic Camera DMC-TZ3 LCD DISPLAY Replacement, Step 4: 步骤 4 中的图像 1,1
      • Remove 5 screws from the base of the camera.

      • There are two (0.2mm) screws next to the battery compartment.

      • There are three (0.5mm) screws around the tripod base mount.

      询问修复机器人

      添加评论

    5. Panasonic Camera DMC-TZ3 LCD DISPLAY Replacement: 步骤 5 中的图像 1,1
      • Slowly open the back cover away from the device

      • The wrist strap bar can easily be lost so now is a good time to remove it.

      • Use caution. The rear cover is attached to the Main PCB via cables. You will need to release these cables before removing the rear cover.

      询问修复机器人

      添加评论

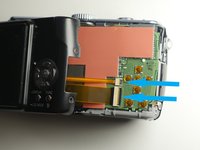
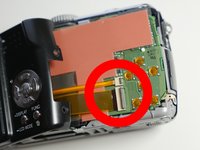
    6. Panasonic Camera DMC-TZ3 LCD DISPLAY Replacement: 步骤 6 中的图像 1,2 Panasonic Camera DMC-TZ3 LCD DISPLAY Replacement: 步骤 6 中的图像 2,2
      • Detach both ribbon cables using a spudger or other method.

      • Lift the black clip upward, unlocking the ribbon cable

      • Once the clip is in the up position you can slide the cable out. Release cable by pulling the cable out.

      • DO NOT pull on the Back case to release the cable.

      询问修复机器人

      添加评论

    7. Panasonic Camera DMC-TZ3 LCD DISPLAY Replacement: 步骤 7 中的图像 1,1
      • Screw Arrangements

      • Make sure you organize your screws to make re-assembly easier.

      询问修复机器人

      添加评论

    8. Panasonic Camera DMC-TZ3 LCD DISPLAY Replacement, Step 8: 步骤 8 中的图像 1,1
      • Remove the back casing from the camera.

      询问修复机器人

      添加评论

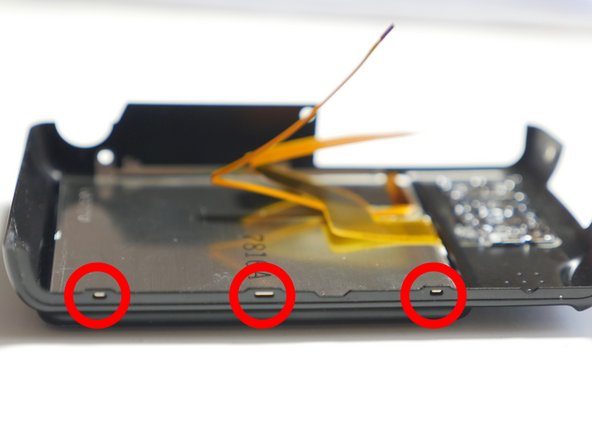
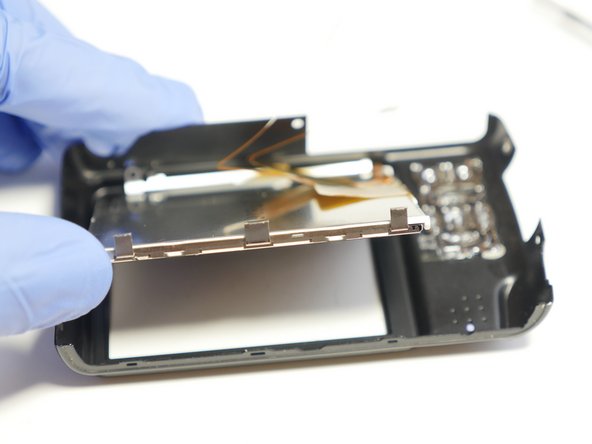
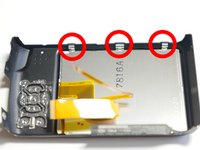
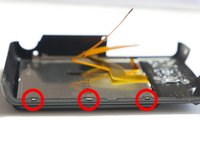
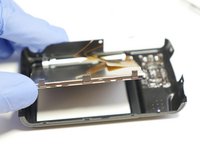
    9. Panasonic Camera DMC-TZ3 LCD DISPLAY Replacement: 步骤 9 中的图像 1,3 Panasonic Camera DMC-TZ3 LCD DISPLAY Replacement: 步骤 9 中的图像 2,3 Panasonic Camera DMC-TZ3 LCD DISPLAY Replacement: 步骤 9 中的图像 3,3
      • Use a spudger or other tool to release the 3 clips between the LCD case and housing.

      • Note: when re-assembly all 3 clips need to be seated in the grooves as shown in the 2nd picture.

      • Lift LCD out as shown in 3rd picture

      询问修复机器人

      添加评论

    10. Panasonic Camera DMC-TZ3 LCD DISPLAY Replacement: 步骤 10 中的图像 1,1

      添加评论

结论

To reassemble your device, follow these instructions in reverse order.

取消:我没有完成这个指南。

另外一个人完成了本指南。

3指南评论

Very well presented and helpful - thank you.

It sems important to use the correct screwdriver and my impression is that the screws are JIS rather than Philips.

So far I have been unable to locate a replacement screen with back light (I assume the back light is connected by the narrower ribbon cable).

George Winspur - 回复 分享

I  Like my Panasonic  DMC-TZ3  , paid 300 way back in 2007  and has flawlessly  perfect, till I Dropped it in the case  …

IT still take pictures,  store on Memory, etc  all functions work , and can down load to computer ..

BUT the Back LCD  I can barely see unless I put a LIGHT to it ….

SO I assume I screwed the Back Light,  … can anybody help ?

Gary Trembley - 回复 分享

Hi…. the backlite cable might have come loose or damaged. I would disassembly the unit and re-insert the backlite cable to see if that does the trick.. Otherwise you would have to invest in a new Display ASSY or backlite. A used backlite or Display assy is not that expensive and easy to replace..

Sales Cameraparts4you - 回复 分享

添加评论

浏览统计数据:

过去 24 小时: 3

过去 7 天: 18

过去 30 天: 67

总计 4,847