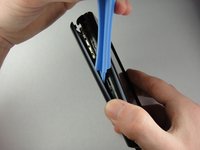
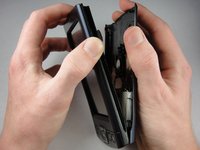
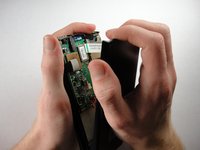
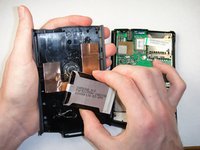
跳转到主内容
加入维修社区 - 创建账户

Palm TX Back Panel Replacement

你所需要的

  1. Palm TX Back Panel Replacement, Back Panel: 步骤 1 中的图像 1,2 Palm TX Back Panel Replacement, Back Panel: 步骤 1 中的图像 2,2
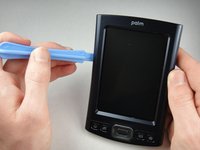
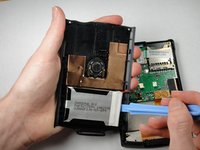
    • Orient the device so that the display faces forward.

    • Remove the stylus from the right side.

    询问修复机器人

    添加评论

  2. Palm TX Back Panel Replacement: 步骤 2 中的图像 1,1
    • Turn over the device so that the back panel faces forward.

    • Use a T5 Torx screwdriver to remove the four 6.35mm corner screws.

    询问修复机器人

    添加评论

  3. Palm TX Back Panel Replacement: 步骤 3 中的图像 1,2 Palm TX Back Panel Replacement: 步骤 3 中的图像 2,2
    • Rotate the device so that the display faces forward.

    • Insert a plastic opening tool with the angled tip pointing downward into the crevice on the left side of the device.

    • Pry along the crevice to loosen the back panel.

    • Repeat this process for the right side.

    询问修复机器人

    添加评论

  4. Palm TX Back Panel Replacement: 步骤 4 中的图像 1,2 Palm TX Back Panel Replacement: 步骤 4 中的图像 2,2
    • Carefully pry the back panel to open the device.

    • Be careful not to break the wire that connects the battery pack to the motherboard.

    • When reassembling, snap the back panel back into place and then insert the top cover.

    询问修复机器人

    添加评论

  5. Palm TX Back Panel Replacement: 步骤 5 中的图像 1,2 Palm TX Back Panel Replacement: 步骤 5 中的图像 2,2
    • Use a plastic opening tool to peel the battery pack from the back panel.

    • The battery pack is glued to the back panel so removing it may require considerable effort.

    询问修复机器人

    添加评论

结论

To reassemble your device, follow these instructions in reverse order.

取消:我没有完成这个指南。

另外一个人完成了本指南。

团队

Cal Poly, Team 1-15, Amido Winter 2011 Cal Poly, Team 1-15, Amido Winter 2011 的会员

CPSU-AMIDO-W11S1G15

4 名成员

创作了9篇指南

0指南评论

添加评论

浏览统计数据:

过去 24 小时: 3

过去 7 天: 10

过去 30 天: 44

总计 1,998