简介
请按照本指南卸下并装回Nintendo Switch游戏机上的散热器。
Switch 使用 JIS 螺丝,但你可以用一个 Phillips 螺丝起子插入。拆卸时要非常小心不要把螺丝打花。iFixit 的 Phillips 螺丝刀头被设计成与JIS螺丝双向兼容(注:JIS 螺丝与 Philips 螺丝是两种略微不同的十字螺丝)。
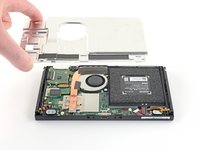
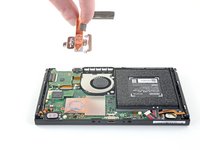
注意: 当卸下屏蔽板时,你需要更换屏蔽板和散热器之间的导热膏。 由于普通导热膏并不能很好的填充大的间隙,因此最接近的替代品是 K5 Pro 粘性导热膏。 但是,您需要为 CPU 正常更换散热膏。
注意:本指南以及我们销售的部件与 2017 年发布的原始 Nintendo Switch 型号以及 2019 年发布的更新型号兼容(型号分别是 HAC-001 和 HAC-001(-01))。
你所需要的
-
-
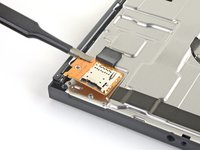
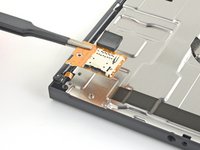
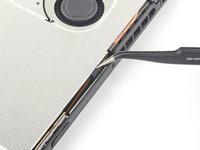
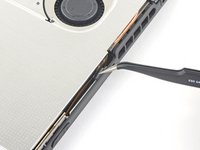
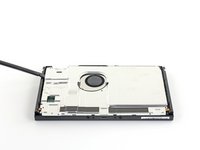
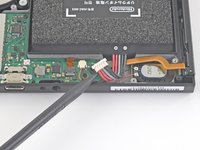
使用 JIS000 螺丝刀,或者 iFixIt PH000 螺丝刀取下用于固定后面板的螺丝:
-
一颗在主机顶部的散热器出口旁,长度为2.5毫米的螺丝
-
两颗在主机底部的充电接口两侧,长度为2.5毫米的螺丝
-
-


将新的替换零件与原始零件进行比较。在安装之前,你可能需要转移剩余的组件或从新零件上取下胶粘剂背衬。
要重新组装设备,请按照逆序进行操作。
将你的电子垃圾带到R2或e-Stewards认证回收商。
维修没有按计划进行吗?尝试一些基本故障排除后的故障排除,或向我们的Nintendo Switch 社区寻求帮助。
将新的替换零件与原始零件进行比较。在安装之前,你可能需要转移剩余的组件或从新零件上取下胶粘剂背衬。
要重新组装设备,请按照逆序进行操作。
将你的电子垃圾带到R2或e-Stewards认证回收商。
维修没有按计划进行吗?尝试一些基本故障排除后的故障排除,或向我们的Nintendo Switch 社区寻求帮助。
55等其他人完成本指南。


9条评论
I couldn’t even get past the first step because my screws were in so tight I made them threadbare trying to get them out. I did use the iFixit toolkit so I was using the right head but taking the screws out is not as easy as demonstrated lol
same mines are stripped
Same happened to me :( I was able to file down the screwdriver I was given and it worked on three of the screws before they’d stripped too much. The fourth screw I couldn’t remove so I was able to slightly bend and turn the backing enough to access the fan. I also wasn’t able to peel the tape back without it completely disintegrating. Haha guess I don’t have the magic touch.
You just need a good thermal paste