简介
在遵循本指南之后,A、B、X、Y和start/select按钮中的任何一个都可以独立更换。在开始本指南之前,必须先取出电池。
你所需要的
-
-
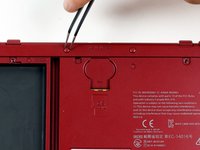
使用JIS 0号螺丝刀,松开背面的两个黑色螺丝。
My experience indicates that a JIS #1 is more appropriate here.
Same here, much more appropriate.
-
-
-
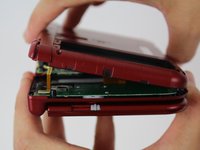
螺丝松动后,撬开后盖。
In order to remove the back cover, slide it down towards you and then pry the cover off.
-
-
-
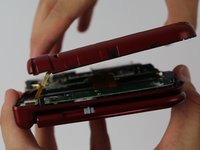
电池位于3DS的左手边--要取下,利用位于中上部的小缝隙,用撬棒拉起。
Also you should remove any SD card at this point
Does this battery work on a NEW 3DS XL model?
This guide is for the New 3DS XL, which is called the 2015 3DS XL here on iFixit. If you're asking about the 3DS replacement battery advertised in the iFixit store, I believe it works for both new and old models.
The battery is the same and will work on both the new and old models
-
-
-
-
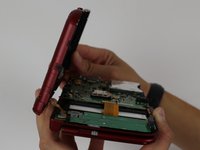
用JIS#000螺丝刀卸下副面板上的6毫米螺丝。
the heck. on step 5 im using the 000 screwdriver from the kit and i am destroying the screw, yes going counter clockwise.
the j000 and 000 don't work. im using the toolkit from your site and i don't see a JIS #000 just J000 and 000
edit: so the j00 works.
-
-
-
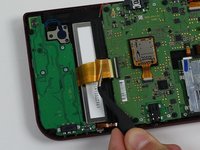
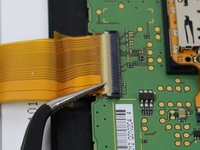
小心地把板子翻过来,用镊子取出位于下面的蓝黑色排线。
Closely examine the connection before removing the ribbon from the board!
The C-stick ribbon is secured to the action board at the socket by a black tab that must be unlocked (swiveled up) before the ribbon is free to be removed. Yanking the ribbon from the locked connector may break off the lock and you'll be forced to replace the entire board.
The easier way to do this is to leave this ribbon connected. Go back to Step 10 and remove the three black screws securing the C-stick unit to the frame. Remove the C-stick unit along with the board and move onto Step 12.
-
-
-
取下灰色的大片的按键导胶,可以看到A/B/X/Y按钮,下方长方形的按键导胶拿下就可以看到start和select按钮。
-
用镊子取下按键。
-


要重新组装你的设备,请按照这些说明以相反的顺序进行。
要重新组装你的设备,请按照这些说明以相反的顺序进行。
27等其他人完成本指南。

团队

Cal Poly, Team 24-4, Lancaster Spring 2015 Cal Poly, Team 24-4, Lancaster Spring 2015 的会员
CPSU-LANCASTER-S15S24G4
4 名成员
创作了30篇指南
15条评论
It will work, since the only difference between them is the size of screen and shell, but size of buttons and other pieces should be of the same.
If anyone else comes on this, I can confirm the small 3ds buttons do not quite work right they are slightly smaller and the cut outs that keep the buttons from spinning around are not the same
Demon09 -
Can someone provide further information about replacement of the entire C stick?
Or is it just as simple as pull the ribbon carefully, take the old one out and put the new one in?
CheatJoker - 回复
There are two parts. The rubber bit, and the joystick assembly. The stick assembly is connected by 3 short screws, and inserted into the joystick board via zif connector. You need to unscrew the assembly to access the rubber bit.
The set of screws on the secondary panel are giving me trouble. I think I might be stripping them... Is it normal for them to be screwed on so tight? I don't want to pay 85 bucks just because I need to press my B button harder to make it work...
One of the screw of the second set was also giving me trouble. Just press firmly and turn very slowly. As they are not supposed to be touched by the consumer, I suspect they put a kind of sealant to make them harder to unscrew.
Mine were tight as well, make sure you're using JIS and not Philips and you should be fine. Since this is seven years later I hope you've fixed it though!
Isak -
One thing to note is that the kit that I received from ifixit had the c-stick nub attached to the board. As such, you'll want to remove the c-stick instead of disconnecting the ribbon.
Would be cool to provide in every section a place where users can offer a paid service to repair devices other users are afraid to repair.
Does annyone know what is wrong with my new 3ds xl... So all buttons work fine BUT the a button needs alot of pressure to work. Tried to clean it but idk still needs way more pressure than the rest…
I had the same problem, the A button especially was very temperamental and had to push it very hard to trigger. I watched a video yesterday which showed carefully peeling the transparent membrane off with tweezers to get inside the metal domes (it's very sticky so was difficult to get it to start peeling, but comes away carefully once you manage to get it started, just don't peel too hard that it rips). This is what holds the 4 metal domes in place. I then cleaned them as there was slight corrosion in there. I then pushed the membrane down and reassembled where it now works perfectly. I then did the same with the D-pad which worked but didn't always trigger when it clicked but would it you pushed them slightly harder and they are working perfectly.
One tip, if possible, don't completely remove the transparent membrane. just peel it enough to gain access, so you can push back down .if you peel it completely you'll have to realign it perfectly, and if it doesn't line up they won't work. The tolerance is tight!
Andrew -
This guide doesn't mention that if a button is no longer working or needs to be pressed harder to work, that the contacts on the board shown in step 11 need to be replaced, not necessarily the board or the outer buttons themselves. This video shows how to replace the sticker containing the contacts. I plan to do this replacement myself when the replacement comes in. As of today, such a replacement costs about $10, whereas the board is about $15.
Turns out that you can't edit a comment after five minutes have passed, which is dumb.
IMPORTANT FOR ANYBODY ATTEMPTING THIS FIX: Try to clean the contacts beneath the contact sticker before you do any of these replacements. It will likely fix your issue. Just be careful to realign the sticker correctly, as Andrew posted above.
Isak -