跳转到主内容

当前版本的文档还未经巡查,您可以查看最新的已查核版本

你所需要的

  1. , 电池: 步骤 1 中的图像 1,1
    • 首先,断开设备的电源

  2. : 步骤 2 中的图像 1,3 : 步骤 2 中的图像 2,3 : 步骤 2 中的图像 3,3
    • 将相机放置到它的一边

    • 向镜头方向扳动释放按钮,打开电池仓盖

    • 这会使盖子轻轻的弹出式打开

  3. : 步骤 3 中的图像 1,2 : 步骤 3 中的图像 2,2
    • 现在,抬起电池仓盖板

    • 轻推黄色的锁止按钮以释放电池

    • 由于底部有弹簧,这会导致电池跳起来

    • 将新电池慢慢的径直推入

    • 请注意电池的插入方向

  4. 这个步骤还没有翻译 帮忙翻译一下

    : 步骤 4 中的图像 1,1
    • After removal of the battery. Pull the battery compartment door away from the lens.

    • There are eleven Philips head screws that hold the bottom cover on, including a few inside the battery compartment.

    • Remove all the screws and the bottom face should pop off easily.

  5. 这个步骤还没有翻译 帮忙翻译一下

    : 步骤 5 中的图像 1,3 : 步骤 5 中的图像 2,3 : 步骤 5 中的图像 3,3
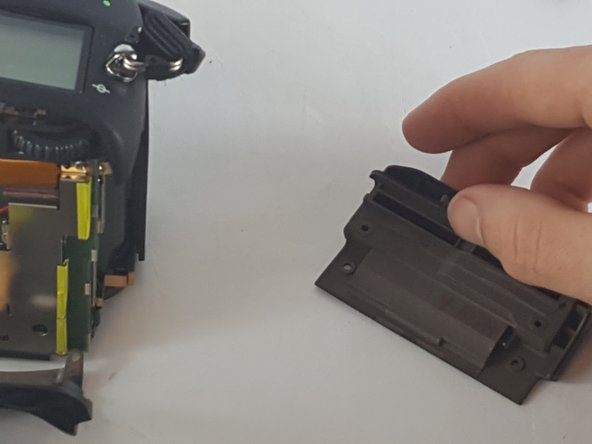
    • Then next step is removing the seven Philips #00 screws that hold the rear face plate on.

    • There are screws hidden in three separate spots.

    • One is under the rubber doors on the left side of the camera. the next one at the eye hole.

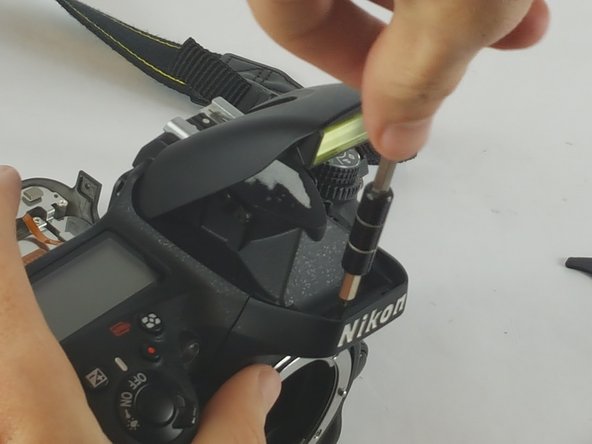
    • The final one involves taking off the small dial that is about half an inch to the right of the eye hole.

    • Removing this dial involves putting a spungder tool behind it and applying a gradual amount of pressure.

  6. 这个步骤还没有翻译 帮忙翻译一下

    : 步骤 6 中的图像 1,2 : 步骤 6 中的图像 2,2
    • The rear face plate will include the LCD display it separates from the body of the camera with a small tug.

    • Do not pull to hard otherwise you risk breaking the ribbon wire that connects the controls and the screen.

    • Once there is enough space it will be possible to gently pull the ribbon cable out of their ports.

  7. 这个步骤还没有翻译 帮忙翻译一下

    : 步骤 7 中的图像 1,2 : 步骤 7 中的图像 2,2
    • The next piece to come off is the front plate and the red grip.

    • The front plate is held on by 2 Philips #00 screws on the front and two more beneath the flash bulb.

    • Remove the two Phillips #00 screws holding on the grip and it slides off easily.

    • After removing the screws the face plate comes off by pulling it straight off to avoid damage.

  8. 这个步骤还没有翻译 帮忙翻译一下

    : 步骤 8 中的图像 1,2 : 步骤 8 中的图像 2,2
    • It is now possible to remove the last three Philips #00 screws that are hidden under the memory card slot door.

    • The screws come out and the cover comes straight off.

    • The last cover plate is the top. The top is held on by two screws located just beneath the rim of the cover.

    • The top should be pulled off very slowly. There are several electronic components that connect between the body and the top.

    • There are three wires that need to be disconnected.

  9. 这个步骤还没有翻译 帮忙翻译一下

    : 步骤 9 中的图像 1,2 : 步骤 9 中的图像 2,2
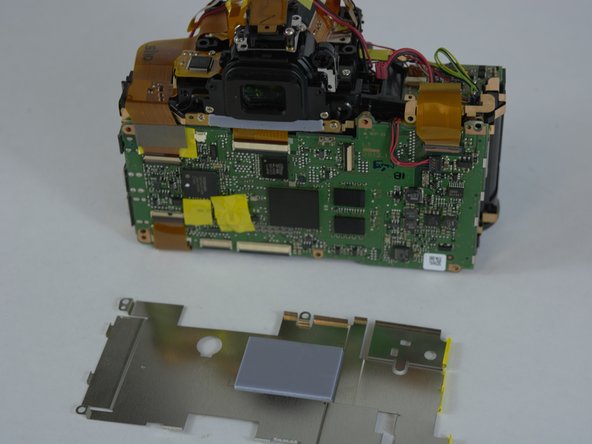
    • The rear side of the camera is where the motherboard is located. It is visible after you have taken off the rear face plate.

    • Remove the shield that protects it from static first.

    • This shield has six Philips #00 screws that are positioned around the edge of the shield.

    • After removal of the screws the shield will come free from the motherboard.

  10. 这个步骤还没有翻译 帮忙翻译一下

    : 步骤 10 中的图像 1,2 : 步骤 10 中的图像 2,2
    • The six screws that were removed in the previous step also hold the motherboard in place.

    • There are a few ribbon cables that connect to the motherboard to the rest of the camera with some of them hiding under other ribbon cables.

    • Be very careful when removing the ribbon wires. If they break it can cause problems with needing more repairs.

终点

2等其他人完成本指南。

Daniel Eagan

于02/10/16注册

606 声望

创作了5篇指南

团队

USF Tampa, Team 4-4, Lacy Spring 2016 USF Tampa, Team 4-4, Lacy Spring 2016 的会员

USFT-LACY-S16S4G4

3 名成员

创作了6篇指南

0条评论

添加评论

浏览统计数据:

过去 24 小时: 0

过去 7 天: 0

过去 30 天: 6

总计 2,624