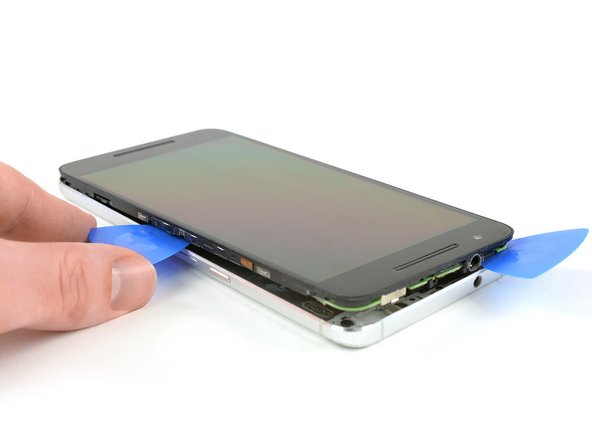
跳转到主内容

此翻译可能不反映源指南的最新更新。 帮助更新翻译查看源指南

Nexus 6P 电池更换

你所需要的

  1. Nexus 6P 电池更换, 后盖: 步骤 1 中的图像 1,3 Nexus 6P 电池更换, 后盖: 步骤 1 中的图像 2,3 Nexus 6P 电池更换, 后盖: 步骤 1 中的图像 3,3
    • 拆除后盖时虽然可以用iOpener,但这是一个漫长而艰难的过程。 我们推荐使用热风枪或类似的东西进行拆卸 Nexus 6P中的粘合剂非常粘稠,在大部分情况下会导致背面的玻璃和塑料盖折断或弯曲。

    • 使用卡针取出SIM卡托盘

    • 使用iOpener融化手机底部小塑料盖下面的粘合剂。

  2. Nexus 6P 电池更换: 步骤 2 中的图像 1,3 Nexus 6P 电池更换: 步骤 2 中的图像 2,3 Nexus 6P 电池更换: 步骤 2 中的图像 3,3
    • 小刀十分锋利,注意不要伤到自己或你的手机

    • 在手机和塑料盖之间插入一把小刀。 撬起塑料盖,直到你可以插入塑料翘片。

    • 滑动插入的翘片切割粘合剂

  3. Nexus 6P 电池更换: 步骤 3 中的图像 1,2 Nexus 6P 电池更换: 步骤 3 中的图像 2,2
    • 使用iOpener 融化手机顶部玻璃盖下方的粘合剂。

    • 在手机和玻璃盖之间插入一把小刀。 撬起玻璃盖,直到你可以插入一个翘片

  4. Nexus 6P 电池更换: 步骤 4 中的图像 1,3 Nexus 6P 电池更换: 步骤 4 中的图像 2,3 Nexus 6P 电池更换: 步骤 4 中的图像 3,3
    • 玻璃可能破碎,佩戴保护眼镜,带好保护手套

    • 滑动玻璃盖下方的翘片并用它切割下方的粘合剂。

    • 撬开玻璃盖。

  5. Nexus 6P 电池更换: 步骤 5 中的图像 1,3 Nexus 6P 电池更换: 步骤 5 中的图像 2,3 Nexus 6P 电池更换: 步骤 5 中的图像 3,3
    • 用镊子取出进水指示标贴纸

    • 移除六角 Philipps #000 螺丝

  6. Nexus 6P 电池更换: 步骤 6 中的图像 1,3 Nexus 6P 电池更换: 步骤 6 中的图像 2,3 Nexus 6P 电池更换: 步骤 6 中的图像 3,3
    • 在金属后盖和前玻璃面板之间插入一把刀以制造缝隙,将翘片插入缝隙并滑到右上角

    • 注意 小刀十分锋利 不要弄伤你自己或者你的手机。

    • 插入第二个翘片并滑到左上角

    • 沿边缘滑动翘片以分开塑料扣,保持后盖和中间框架在一起。

    • 卸下后盖

  7. Nexus 6P 电池更换, 电池: 步骤 7 中的图像 1,2 Nexus 6P 电池更换, 电池: 步骤 7 中的图像 2,2
    • 将 #00 号十字螺丝取下

    • 用镊子取下金属板

  8. Nexus 6P 电池更换: 步骤 8 中的图像 1,3 Nexus 6P 电池更换: 步骤 8 中的图像 2,3 Nexus 6P 电池更换: 步骤 8 中的图像 3,3
    • 使用撬棒的扁平端断开三根柔性电缆。

  9. Nexus 6P 电池更换: 步骤 9 中的图像 1,2 Nexus 6P 电池更换: 步骤 9 中的图像 2,2
    • 使用撬棒的扁平端将互连电缆与子板断开。

    • 使用 iOpener 融化电池下方的粘合剂

  10. Nexus 6P 电池更换: 步骤 10 中的图像 1,3 Nexus 6P 电池更换: 步骤 10 中的图像 2,3 Nexus 6P 电池更换: 步骤 10 中的图像 3,3
    • 警告:请勿将撬棒或塑料卡插入电池下面太深。 显示屏电缆位于电池下方。

    • 向下滚动到下一步,查看电缆的位置。

    • 将撬棒的平端插入切口深处,并小心地沿边缘滑动以切割粘合剂...

    • 使用塑料卡片切割电池下方左侧的剩余粘合剂。

  11. Nexus 6P 电池更换: 步骤 11 中的图像 1,1
    • 移除电池

结论

重新组装手机时,请按照相反的步骤进行,并在已经有粘合剂的地方涂上新的粘合剂。

138等其他人完成本指南。

由衷感谢以下译者:

en zh

88%

这些译者帮助我们修补全世界! 您也想加入吗?
开始翻译 ›

Dominik Schnabelrauch

于11/23/16注册

203,353 声望

创作了682篇指南

团队

iFixit iFixit 的会员

Staff

135 名成员

创作了16,817篇指南

37条评论

In case anyone is wondering, I was able to get the two small back covers to reassemble without using new adhesive. I didn’t have any on hand so I just used a heat gun to warm the adhesive that was left over and firmly held them in place. So far it seems to be holding well.

Vince Cipriani - 回复

Adhesive? I’m wondering what kind of adhesive to use for reassembly?

antoine courtemanche - 回复

Didn’t need any additional adhesive and the iopener worked fine for both loosening adhesive for disassembly and getting it sticky again for reassembly.. Managed not to break the glass camera cover!

antoine courtemanche -

any tips on using the iOpener for the top glass? It dosen’t seem to be helping me at all. :(

Ellison Gregg - 回复

These were great instructions, but have to admit this was quite a hair-raising process because of the amount of heat that was required to soften the adhesive and the amount of force needed to pry things apart. Luckily, I have a digital hot air source (Sparkfun 303D) used for surface mount electronics. The safe temperature ended up being about 200 F. If I did it again would be much easier because I know the glass piece at the top is not as fragile as I thought. So, heat gun, definitely. iOpener would be next to useless, especially to loosen under battery. But be careful not to concentrate the heat and melt plastic or make glass crack. Adhesive under battery definitely reusable, easy to peel off old battery. Go slow with the whole process and it will be successful!

Andris Vizulis - 回复

添加评论

浏览统计数据:

过去 24 小时: 3

过去 7 天: 35

过去 30 天: 142

总计 77,453