简介
It’s been a couple years since Google unveiled its last 5" smartphone, the Nexus 5, and a lot has changed since then—the Nexus family's been augmented by a premium 6" phablet, a highly acclaimed 7" tablet, and even a full-fledged set top box. One thing remains constant though—we’re still tearing down Nexii as fast as they (in this case, LG) can make them! Today we’re looking at the Nexus 5X—successor to the Nexus 5 which impressed us with its modular design and ease of access. Will the 5X earn the same high marks? Join us 'round the teardown table as we find out!
Don't want to miss a beat? Follow us on Facebook, Instagram, and Twitter for the latest updates from the repair world!
你所需要的
视频概述
-
-
在我们拆除5X之前,让我们来看看它的配置信息:
-
1.8 GHz Qualcomm Snapdragon 808六核64位处理器,配备Adreno 418 GPU和Android Sensor Hub
-
带有激光辅助自动对焦的12.3MP / 4K后置摄像头以及5MP前置摄像头
-
2 GB LPDDR3 RAM,内置16 GB或32 GB内存
-
5.2“全高清1920×1080 IPS液晶屏,423 ppi
-
USB Type-C端口,支持快速充电
-
Nexus Imprint 指纹识别传感器
-
Android 6.0 棉花糖
-
-
-
太棒了,Scott! 谷歌最新的Nexus提供了一个USB-C充电端口,就在耳机插口旁边。
-
USB-C端口提供的增加的充电速度(5V / 3A)并不令人失望。
-
RGB LED 提醒指示藏在底部扬声器网罩的下面,看起来很甜美的3 x 3的提醒框。但不好的是它不能移动......
-
Nexus 5X的后部配备全新的Nexus Imprint指纹识别器,12.3 MP相机,双闪光灯和激光测距仪。
-
-
这个步骤还没有翻译 帮忙翻译一下
-
Just like its older sibling, the 5X uses clips to secure the rear case to the rest of the phone.
-
LG seems to have gotten the message about our feelings on adhesive.
-
Adhesive? Where we're going, we don't need adhesive.
-
-
这个步骤还没有翻译 帮忙翻译一下
-
That wasn't so bad! Things are looking up for the 5X as we get our first glimpse at the interior of the phone.
-
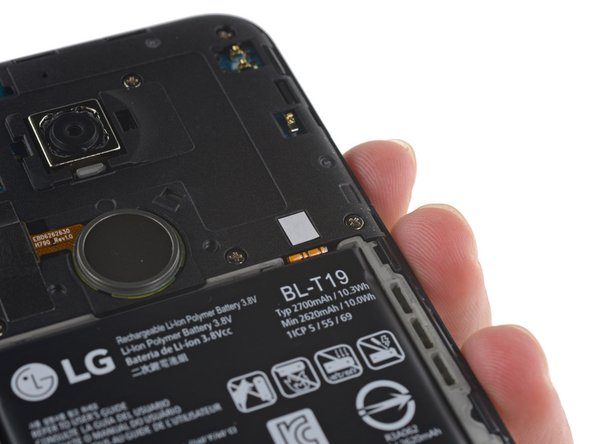
Luckily, this sticker on the inside of the back panel has all the essentials: IMEI, country of origin, and the model number: LG-H790.
-
Our spirits soared as we spied the 2700 mAh battery sitting in plain view—a removable battery is hard to come by these days.
-
But alas, it was not to be. The battery connector is squirreled away beneath the midframe, and it's totally inaccessible for now.
-
-
这个步骤还没有翻译 帮忙翻译一下
-
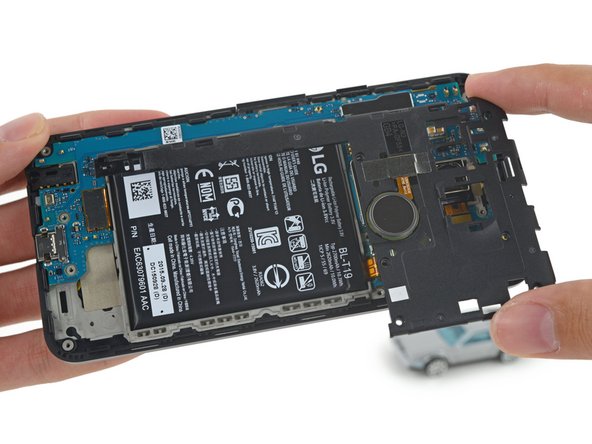
Our 64 Bit Driver Kit makes short work of the 10 Phillips screws holding the midframe captive.
-
The midframe comes piecefully (two pieces to be exact):
-
The lower half contains a few antennas and the phone's front-facing speaker.
-
The upper half contains the Nexus Imprint fingerprint reader.
-
-
这个步骤还没有翻译 帮忙翻译一下
-
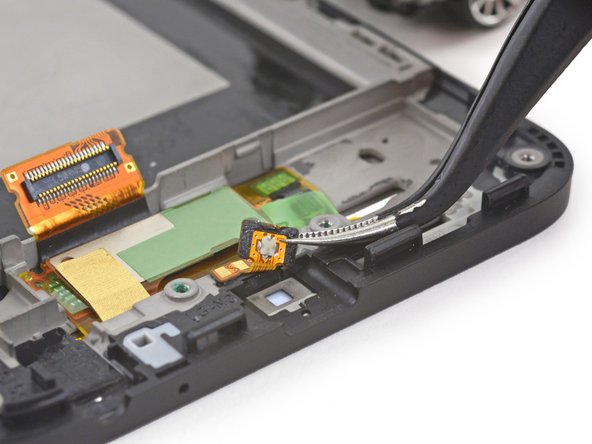
Piggybacking on the midframe, we find the
Touch IDNexus Imprint fingerprint reader. -
Flipping the Imprint over reveals an unidentified control chip and our favorite, spring contacts! These connectors are much more durable than traditional connectors that snap into place, and they're much easier to work with during repairs. Win win!
-
-
-
这个步骤还没有翻译 帮忙翻译一下
-
Some light adhesive secures the battery, but it's nothing that a little spudgering can't handle.
-
The 5X packs a 3.8 V, 2700 mAh battery—a 400 mAh increase over the Nexus 5.
-
Although the 5X doesn't officially support Quick Charge 2.0, Google claims that USB-C will provide "four hours of use after only ten minutes of charging."
-
-
这个步骤还没有翻译 帮忙翻译一下
-
Where are we? When are we?
-
We're almost to the motherboard, but we stop to get a better look at the rear-facing camera.
-
The 5X's rear camera is packing a Sony IMX377 12.3 MP sensor, that sits behind a ƒ/2.0 lens—a feature common to both the 5X and the 6P.
-
Unlike previous generations, this new camera doesn't include Optical Image Stabilization.
-
The Nexus team claims this is no longer necessary, thanks to the increase in pixel size (from 1.4 μm to 1.55 μm).
-
-
这个步骤还没有翻译 帮忙翻译一下
-
The 5 MP front-facing camera is the last component preventing us from relieving this phone of its motherboard.
-
Off comes the motherboard, leaving behind the screen and I/O ports... Well, all except the USB-C port. This doesn't look good.
-
Similar to the LG G4, the USB-C port is soldered to the motherboard—not an easily replaced daughterboard. Unless you know how to microsolder, you'll need to replace the motherboard when the port fails.
-
-
这个步骤还没有翻译 帮忙翻译一下
-
Much to our disappointment, the motherboard isn't powered by a Mr. Fusion:
-
Samsung K3QF3F30BM-QGCF 2 GB LPDDR3 RAM, with the Qualcomm Snapdragon 808 layered beneath
-
Toshiba THGBMFG7C2LBAIL 16 GB eMMC 5.0 Flash Memory
-
Qualcomm WTR3925 LTE Transceiver (Also found in LG G4/HTC One M9)
-
Qualcomm SMB1358 Quick Charge 2.0 IC
-
Qualcomm PMI8994 Power Management IC (Also found in LG G4, HTC One M9, and OnePlus Two)
-
Qualcomm WCD9330 Audio Codec (Also found in LG G4 and OnePlus Two)
-
Skyworks SKY77814-11 power amplifier module for LTE (Also found in OnePlus Two)
-
-
这个步骤还没有翻译 帮忙翻译一下
-
And on the flip side...
-
Qualcomm PM8994 power management IC
-
Avago ACPM7800 Quad-band GSM/EDGE and Multi-mode power amplifier (as seen in the HTC One M9)
-
Qualcomm QCA6174 802.11ac Wi-Fi 2x2 MIMO combo SoC
-
NXP Semiconductor PN548 NFC controller
-
RF Micro Devices RF1149A routing switch
-
Qualcomm QFE1100 envelope tracking IC
-
Avago BFI523
-
-
这个步骤还没有翻译 帮忙翻译一下
-
IC identification, pt. 2:
-
ON Semiconductor FSUSB104UMX USB 2.0 high-speed analog switch
-
ON Semiconductor FAN48623UC35X 2.5 A synchronous regulator
-
NXP Semiconductor NCX2200 comparator
-
Ricoh RP602Z330C 1.5 A / 3.3 V buck-boost DC/DC converter
-
Knowles MEMS microphone
-
-
这个步骤还没有翻译 帮忙翻译一下
-
IC identification, pt. 4 (sensors):
-
Bosch Sensortec BMI160 3-axis accelerometer/gyroscope
-
Bosch Sensortec BMM150 3-axis magnetometer
-
Bosch Sensortec BMP280 pressure sensor
-
STMicroelectronics VL6180 ToF proximity sensor
-
ABLIC, Inc. (formerly Seiko Instruments) S-5717ACDL8-I4T1U hall sensor
-
Ambient light sensor (likely)
-
-
这个步骤还没有翻译 帮忙翻译一下
-
Nexus 5X Repairability Score: 7 out of 10 (10 is easiest to repair).
-
Many components are modular and can be replaced independently.
-
Standard Phillips screws means a driver is easy to find.
-
The battery isn't immediately user accessible but isn't too challenging, or too adhered, to replace.
-
Fused display assembly—glass and LCD will need to be replaced together if one or the other breaks.
-


69条评论
the back cover looks like is had space for a wireless charge pad but as the 6p is metal and could not have wireless charging they wimped out.
agreed, I'd love to know what that light grey area is on the inside of the back cover.
I'm sure the NFC antenna is in there
Does the Nexus 5x battery size is the same as Nexus 5 2013 battery size? I'm hoping that the 5x's battery can be put inside N5 2013.